OpenAI Python API A Helpful Illustrated Guide in 5 Steps : Chris
by: Chris
blow post content copied from Be on the Right Side of Change
click here to view original post
How to Use OpenAI API in Python? 5 Steps + Screenshots
- Go to https://platform.openai.com/signup/.
- Fill in your email address and click “
Continue“. - Once logged in, click “
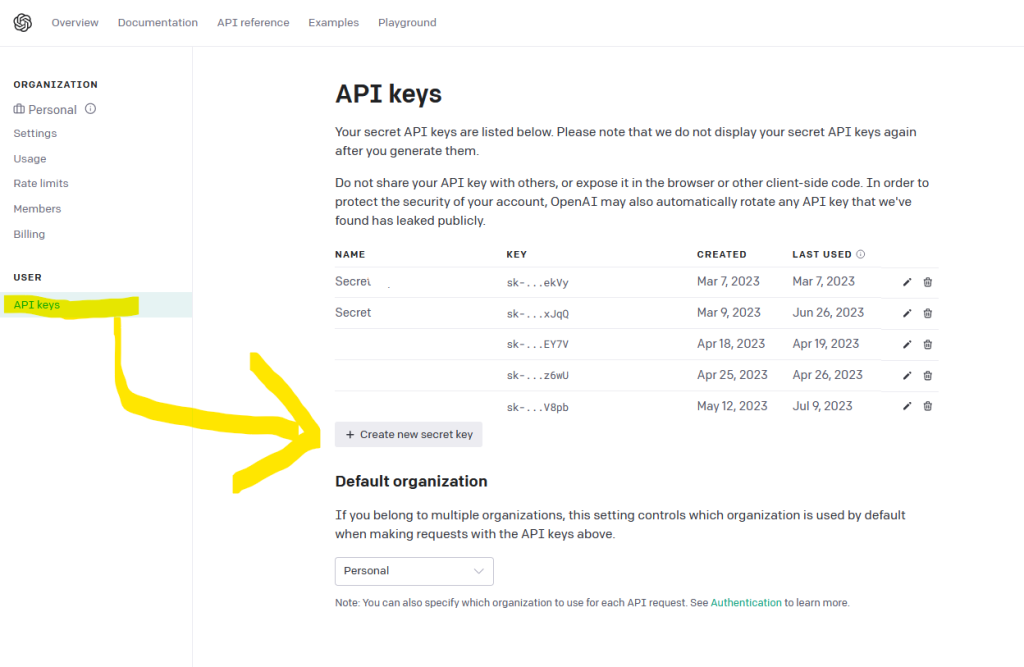
API Keys” in the left side menu. - Click on “
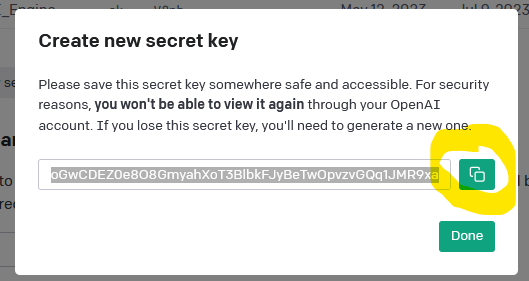
Create New Secret Key” to create a new API key. - Copy your API key, we’ll use it later in our Python code.

OpenAI API Python Example
Now we’re ready to use OpenAI in Python in our short minimal example. 

First, pip install the openai library in Python using the following command in your operating system/IDE terminal or shell:
pip install openaiYou may want to check out my detailed guide on installing the OpenAI library on the Finxter blog.
Second, paste the OpenAI API key generated in the previous step into the following minimal code example running a GPT-4 model query. You can modify the highlighted lines and run the code yourself:
import openai

openai.api_key = "Your_OPENAI_API_KEY" # Replace with your API key

response = openai.ChatCompletion.create(
  model="gpt-4",
  messages=[
    {
      "role": "user",
      "content": "hello world - what is the answer to the universe and all the rest?"
    }
  ],
  temperature=1,
  max_tokens=256,
  top_p=1,
  frequency_penalty=0,
  presence_penalty=0
)

print(response)
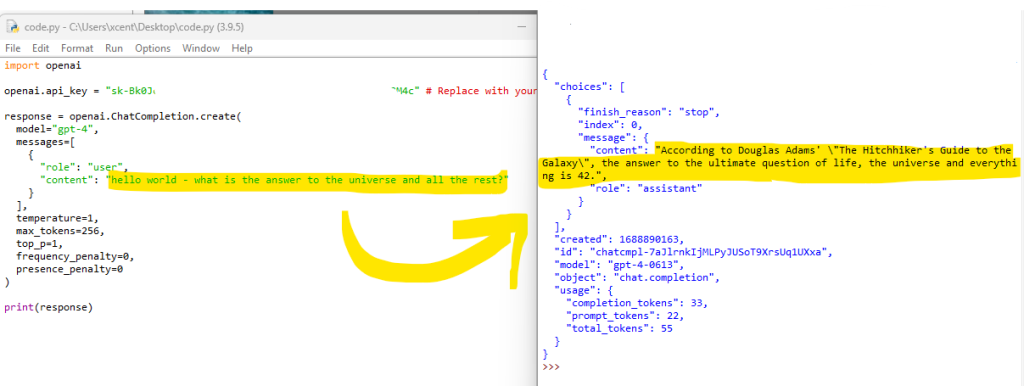
The output when I run this on my computer is the following JSON:
{
  "choices": [
    {
      "finish_reason": "stop",
      "index": 0,
      "message": {
        "content": "According to Douglas Adams' \"The Hitchhiker's Guide to the Galaxy\", the answer to the ultimate question of life, the universe and everything is 42.",
        "role": "assistant"
      }
    }
  ],
  "created": 1688890163,
  "id": "chatcmpl-7aJlrnkIjMLPyJUSoT9XrsUq1UXxa",
  "model": "gpt-4-0613",
  "object": "chat.completion",
  "usage": {
    "completion_tokens": 33,
    "prompt_tokens": 22,
    "total_tokens": 55
  }
}
You can extract only the answer of the model without the meta information by chaining simple dictionary access and list indexing like so:
>>> print(response['choices'][0]['message']['content'])
According to Douglas Adams in his book 'The Hitchhiker's Guide to the Galaxy', the answer to the ultimate question of life, the universe, and everything is 42. Though the exact nature of the question is not specified.
Congratulations, you have successfully used OpenAI API call in your Python code!  Imagine how you can make your Python code more intelligent with this superpower!
In the remaining article, I give another detailed guide in case you had trouble understanding any of the steps. If you want to dive right into more meat, check out the following Finxter article on using the same OpenAI API to generate images with code (it’s easy):

Recommended: Python OpenAI Generate Image with DALL·E
Setting Up Your Environment
In this section, we’ll cover the necessary steps for this initial setup. These steps include Installation of OpenAI Python Library and Setting Up API Key.
Installation of OpenAI Python Library
To start, you’ll need to install the OpenAI Python library. This library allows you to interact with the OpenAI API seamlessly. You can install the library by running the following command in your terminal:
pip install openai
This command should install the OpenAI library for your python environment. Make sure you have Python installed on your system before installing the library. If you don’t have Python, you can download it from the official Python website.

 Recommended: How to Install OpenAI in Python?
Setting Up API Key
Once you have the OpenAI Python library installed, you’ll need to set up the API key to authenticate your requests. Follow the steps below to obtain an API key from the OpenAI website:
- First, create an OpenAI account if you don’t already have one.
- Log in to your account and navigate to the API keys section by clicking on your profile name in the top-right corner and selecting View API keys.
- Create a new secret key by clicking the “Create new secret key” button.
With your API key in hand, you’ll need to store it as an environment variable to be easily accessible by your Python script.
You can do this using the following command:
export OPENAI_API_KEY="your_api_key_here"
Remember to replace "your_api_key_here" with the actual API key obtained from the OpenAI website. Now your Python script will be able to access the OpenAI API with the required authentication.
Authenticating with OpenAI API
Before you can start using the OpenAI API, you need to authenticate your requests by setting your API key.
The API key is a unique identifier provided by OpenAI when you create an account. The key is used to both verify your identity and grant you access to the API services. Here’s how to authenticate your requests using Python.
First, you need to install the official Python bindings for the OpenAI API. If you haven’t done so, run the following command:
pip install openai
Once the installation is complete, you can import the openai module in your Python script. To set your API key, you’ll need to assign it to the openai.api_key variable. You can do this in two ways:
- Directly set the
openai.api_keyvariable in your Python code:
import openai
openai.api_key = "your_api_key_here"
Remember to replace your_api_key_here with your actual API key.
- Alternatively, you can use environment variables to store your API key securely. First, add your API key to the environment variables:
export OPENAI_API_KEY="your_api_key_here"
Then, in your Python script, you can set the openai.api_key using the os module:
import openai
import os

openai.api_key = os.environ["OPENAI_API_KEY"]
This approach keeps your API key hidden from your source code, which can be useful when working with version control systems like Git or when collaborating with others.
Now that your authentication is set up, you can start making requests to the OpenAI API using the provided Python library or other alternative libraries.
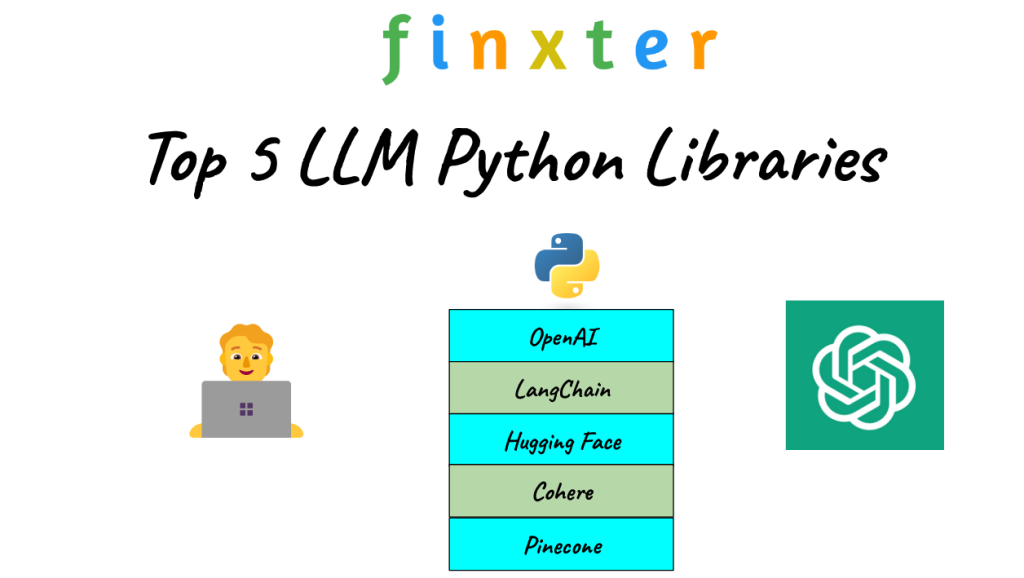
Recommended: Top 5 LLM Python Libraries Like OpenAI, LangChain, Pinecone
Remember to keep your API key safe and secure, as it grants access to your OpenAI account. Do not share it with anyone or include it in your code repositories.
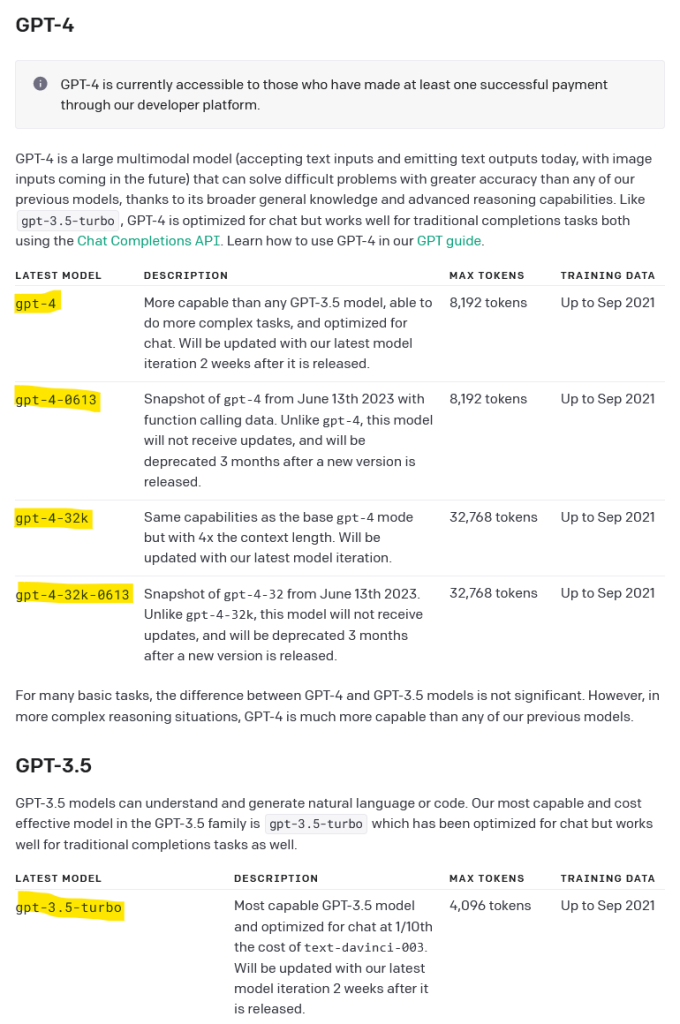
Exploring OpenAI Models and Languages
As you begin working with the OpenAI API in Python, you’ll encounter a range of powerful language models, including GPT-3 and its variants like text-davinci-002, and text-davinci-003, gpt-3.5-16k, or GPT-4.
Davinci models, which include text-davinci-002 and text-davinci-003, are known for their outstanding capabilities in understanding complex language tasks and providing resourceful responses. These models are ideal for applications that require sophisticated problem-solving, creative thinking, or domain-specific expertise.
To access these models, you’ll need to interact with the OpenAI API. Start by installing the OpenAI Python library:
pip install openai
Next, import the library and set your API key:
import openai
openai.api_key = "your_api_key"
Now you’re ready to explore the models and languages that OpenAI offers. To list all available language models, use the following code snippet:
models = openai.Model.list()
for model in models['data']:
    print(model.id)
Each OpenAI model supports a variety of languages. The GPT models are especially powerful when handling multilingual tasks. To explore the languages supported by a model, you can use the get method:
model = openai.Model.get("text-davinci-003")
print(model.supported_languages)
In this example, the text-davinci-003 model is used to retrieve its supported languages.
Keep in mind that different models have different capabilities, strengths, and limitations. Therefore, it’s essential to choose the correct model and language for your specific project needs. You can check out the different models here.
By exploring the OpenAI models and languages, you can harness the power of these AI tools to create a wide range of applications, from natural language processing to content generation and more.
Using OpenAI API with Python
Importing OpenAI Library
To get started with the OpenAI API in Python, you first need to import the OpenAI library. You can do this by running:
import openai
If you haven’t installed the library yet, you can do so using the following command:
pip install -q openai
Once the library is installed and imported, you should configure your API key as well. You can do this by adding:
openai.api_key = "your_api_key"
Replace "your_api_key" with your actual API key obtained from the OpenAI Dashboard.
API Endpoints and Functions
The OpenAI API offers various functions and endpoints that you can interact with to accomplish different tasks. Some common tasks include text completions, translations, and summarization among others.
For instance, to use the Completions API, you can call the create function like this:
response = openai.Completion.create(
    engine="text-davinci-002",
    prompt="Translate the following English text to French: 'Hello, how are you?'",
    max_tokens=30,
    n=1,
    temperature=0.5
)
In this example, we’ve specified the following parameters:
engine: The AI model you want to use, e.g., “text-davinci-002”prompt: The input text that you want to processmax_tokens: The maximum number of tokens you want the AI to generate in its responsen: The number of completions you want the AI to generatetemperature: The “creativity” level of the AI (higher values result in more creative outputs)
Handling API Responses
Once you’ve executed a function or endpoint and received a response from the API, you will need to parse and handle the response appropriately. The API will return a response as a Python dictionary. You can access the desired data by navigating the dictionary’s keys.
For instance, to access the generated completion from the Completions API example above, you can use:
completion = response['choices'][0]['text']
This line of code extracts the first generated completion from the response dictionary. You can then print or save the result for further processing.
Remember to handle errors and exceptions when working with the API to ensure your application runs smoothly. It’s also essential to monitor your API usage to stay within the limits of your OpenAI subscription plan.
Working with GPT-3 and Python
In this section, you will learn how to use the OpenAI API in Python for various tasks using GPT-3. We will cover text generation, text completion, question answering, language translation, text summarization, and text classification.
Text Generation
To generate text with GPT-3, you need to make a request to the OpenAI API. You can include a prompt as input and specify the model (e.g., gpt-3.5, gpt-4) you want to use.
Here’s an example code snippet to generate text:
import openai

openai.api_key = "your_api_key"
response = openai.Completion.create(
    engine="gpt-3.5",
    prompt="Once upon a time,",
    max_tokens=50,
    n=1,
    stop=None,
    temperature=0.7,
)
generated_text = response.choices[0].text
print(generated_text)
Text Completion
For text completion, you can follow similar steps as in text generation. Provide an incomplete sentence or phrase as the prompt to get a completion from the GPT-3 model.
prompt = "The best way to learn Python is to"
response = openai.Completion.create(
    engine="gpt-3.5",
    prompt=prompt,
    max_tokens=20,
    n=1,
    stop=None,
    temperature=0.7,
)
completed_text = response.choices[0].text
print(prompt + completed_text)
Question Answering
To perform question answering, send a prompt containing a question to the GPT-3 model. You might consider including context before the question to improve the quality of the answer.
question = "What is the capital of France?"
response = openai.Completion.create(
    engine="gpt-3.5",
    prompt=question,
    max_tokens=10,
    n=1,
    stop=None,
    temperature=0.7,
)
answer = response.choices[0].text
print(answer)
Language Translation
For language translation tasks, format your prompt as a translation request from one language to another. For example, to translate English text to French:
text = "Translate the following English text to French: 'Hello, how are you?'"
response = openai.Completion.create(
    engine="gpt-3.5",
    prompt=text,
    max_tokens=20,
    n=1,
    stop=None,
    temperature=0.7,
)
translation = response.choices[0].text
print(translation)
Text Summarization
To generate a summary of a given text, create a prompt asking GPT-3 to summarize the content.
long_text = "Long input text here..."
prompt = f"Summarize the following text: {long_text}"
response = openai.Completion.create(
    engine="gpt-3.5",
    prompt=prompt,
    max_tokens=40,
    n=1,
    stop=None,
    temperature=0.7,
)
summary = response.choices[0].text
print(summary)
Text Classification
For text classification, you can provide a list of categories and ask GPT-3 to categorize a given piece of text.
text = "This is a sample text to be classified."
categories = ["Category A", "Category B", "Category C"]
prompt = f"Classify the text '{text}' into one of the following categories: {', '.join(categories)}."

response = openai.Completion.create(
    engine="gpt-3.5",
    prompt=prompt,
    max_tokens=20,
    n=1,
    stop=None,
    temperature=0.7,
)
classification = response.choices[0].text
print(classification)
With these examples, you can now work with GPT-3 and Python for a variety of tasks. Make sure you replace your_api_key with your actual API key and select the appropriate GPT model for your needs.
Understanding Tokens and Costs
When working with the OpenAI API in Python, it’s essential to understand tokens and their impact on both cost and performance. Tokens are the basic building blocks of language models like GPT-3, and they represent pieces of words or entire words that the model processes.
Token costs are directly related to the number of tokens used in your API inputs and outputs. The more tokens you use, the more you will be charged, as OpenAI’s price plans are based on token usage. Be aware that even trailing spaces and sub-words count as tokens, as explained by OpenAI Help Center. To keep your costs down, aim to use concise, well-crafted prompts and responses.
Performance is also affected by tokens. As the number of tokens within a request increases, so does the processing time. To strike a balance between providing useful information and maintaining low latency, use shorter prompts with fewer tokens. Additionally, when fine-tuning the model, remember that training with more tokens may increase the cost.
Here are a few tips to help you manage tokens and costs in your projects with OpenAI API in Python:
- Monitor token counts: Prioritize keeping track of the number of tokens used in your prompts and responses to stay within budget and avoid exceeding token limits.
- Fine-tune for better results: If you require higher quality results, consider fine-tuning the model, which can lead to shorter prompts with fewer tokens. This, in turn, can save tokens and lower latency, as outlined in OpenAI Platform.
- Optimize prompts: Effective prompt design can lead to significant improvements in response quality. Keep your prompts short and clear, and make sure to include context when it adds value.
Navigating the intricacies of tokens and costs can be challenging, but by understanding their impact and employing the methods mentioned above, you can effectively manage your OpenAI API usage in Python while optimizing performance.
Fine-Tuning OpenAI Models
Fine-tuning OpenAI models with Python is an excellent approach to improve your model’s performance on specific tasks and domains by leveraging pre-trained models like GPT-3. This process involves adjusting the model to your custom dataset, which can enhance its accuracy and related metrics.
To fine-tune an OpenAI model, you should first prepare your dataset. Make sure you have a collection of text data structured in a suitable format for the task at hand. You may use various sources, such as text files, JSON files, or CSV files, depending on your convenience and the nature of the data.
Once you have your dataset ready, you’ll need to install the necessary Python libraries for working with the OpenAI API. You can install the required libraries by running the command:
pip install openai
After the libraries are installed, connect to the OpenAI API by importing the module and setting your API key. You can obtain the API key from the OpenAI platform:
import openai
openai.api_key = "your_api_key"
Now that your connection is established, you can start the fine-tuning process. First, upload your dataset using the openai.Dataset.create method. Replace the <file_path> with the path to your dataset:
dataset = openai.Dataset.create(
    file=open("<file_path>"),
    purpose="fine-tuning",
    name="your_dataset_name"
)
Next, create a fine-tuning job by specifying your desired parameters, such as the base model, the dataset ID, and the number of training steps. Keep in mind that you might need to adjust hyperparameters to achieve the best results:
finetuning_job = openai.FineTune.create(
    base_model="gpt-3",
    dataset_id=dataset.id,
    n_steps=1000,
    learning_rate=1e-4
)
Monitor the progress of your fine-tuning job to ensure that it’s processing and learning from your dataset as intended:
job_status = openai.FineTune.get_status(finetuning_job.id)
print(job_status)
Once the fine-tuning job is complete, you can test your tailored model by using it for tasks like text generation:
response = openai.Completion.create(
    engine="gpt-3",
    prompt="your_prompt",
    max_tokens=100,
    temperature=0.7
)
print(response.choices[0].text)
By following these steps, you can successfully fine-tune OpenAI models using Python to improve their performance on your specific tasks and achieve better accuracy.
Other Applications of OpenAI API
In addition to using the OpenAI API for text generation and completions, there are various other applications that you can explore to leverage the power of AI in your projects.
One of the most exciting applications is generating images with DALL-E. DALL-E helps to create unique and contextually relevant images from textual prompts you provide. This can be useful in tasks such as designing logos, creating artwork, or generating illustrations based on written concepts. By providing creative prompts to DALL-E, you may be surprised by the innovative images the API generates for you.

Recommended: I Created My First DALL·E Image in Python OpenAI Using Four Easy Steps
Another practical use case of the OpenAI API is transcription. If you have audio or video files that need to be converted into text, the API can expedite the process by automating transcription. This can be a game changer for businesses that require transcribing meeting notes, interviews, or podcasts content. Simply pass the audio information to the API and let the AI handle the rest.
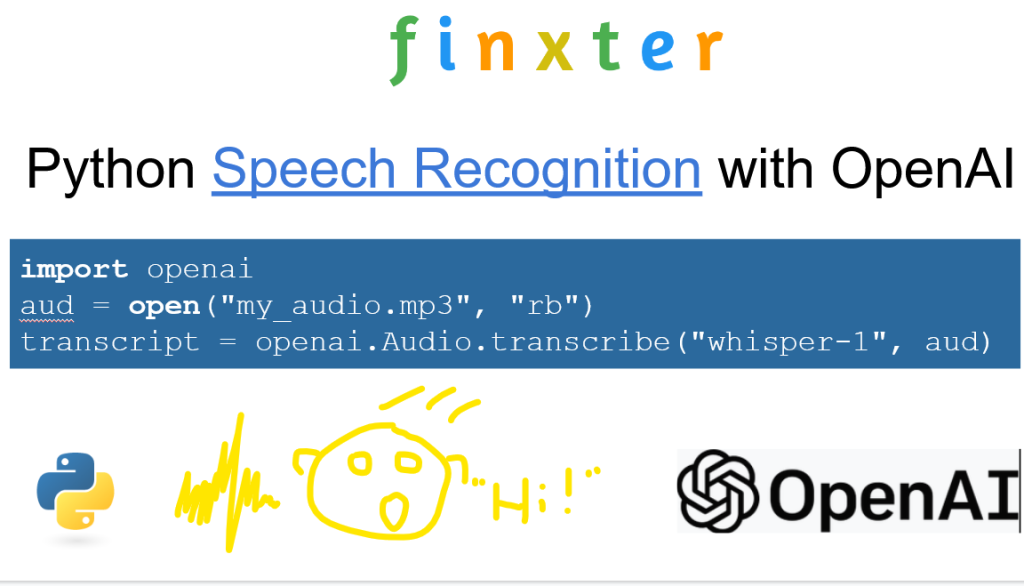
Recommended: OpenAI’s Speech-to-Text API: A Comprehensive Guide
Incorporating AI-powered bots into your applications is also a popular application of the OpenAI API. These bots can be employed for customer support, personalized recommendations, or even content curation. By tapping into the API’s natural language understanding capabilities, your bots can deliver more accurate and relevant responses to user inputs. This can greatly enhance user experience and efficiency in your applications.
Finally, using the API in combination with machine learning models for image recognition can open up endless possibilities. For instance, if you want to automatically identify objects within an image, you can use the API to process images, extract features, and classify objects accordingly. This can be particularly valuable for tasks like image-based search or filtering content based on visual criteria.
Frequently Asked Questions
What are the first steps in setting up the OpenAI API with Python?
To begin, you’ll need to install the official OpenAI Python library, which you can do with the following pip command:
pip install openai
After installing the library, clone the OpenAI API Quickstart – Python example app to get a sample project that will help you familiarize yourself with the OpenAI API.
How do I authenticate with the OpenAI API using my API key?
Before you can interact with the API, you need to authenticate by providing your API key. Store your key in an environment variable called OPENAI_API_KEY or set it directly within your Python script as follows:
import openai
openai.api_key = "your_api_key_here"
Remember to keep your API key secure, and don’t share it publicly.
Which Python libraries are essential for working with the OpenAI API?
The primary library required is the openai library, which you can install using pip. Depending on your use case, additional libraries such as requests and json may be useful when making API requests and handling API responses. However, the openai library should suffice for most tasks.
Can you provide an example of a Python script that interacts with the OpenAI API?
Certainly! Here’s a simple example that uses GPT-3 to generate a text completion using the OpenAI API:
import openai

openai.api_key = "your_api_key_here"

prompt = "Once upon a time in a small village, there lived a"

response = openai.Completion.create(
    engine="davinci-codex",
    prompt=prompt,
    temperature=0.7,
    max_tokens=50
)

generated_text = response.choices[0].text.strip()
print(generated_text)
How do I make API requests and handle responses using Python?
The OpenAI Python library provides simple methods for interacting with the API. Here’s a basic example that demonstrates how to make a completion request and handle the response:
import openai

openai.api_key = "your_api_key_here"

response = openai.Completion.create(
    engine="davinci-codex",
    prompt="the benefits of learning Python are",
    temperature=0.7,
    max_tokens=50
)

generated_text = response.choices[0].text.strip()
print(generated_text)
Simply adjust the parameters according to your needs, such as changing the engine, prompt, temperature, and max_tokens.
What are some best practices for optimizing OpenAI API usage?
To ensure efficient API usage, consider the following best practices:
- Adjust the
max_tokensparameter to avoid generating excessively long responses. - Experiment with the
temperatureto find the right balance between randomness and coherence. - Use faster and more cost-effective engines, like
text-davinci-002, when appropriate. - Be mindful of token limits and total token counts when making API requests.
Remember to consult the OpenAI API documentation for a comprehensive understanding of the various parameters and usage guidelines.
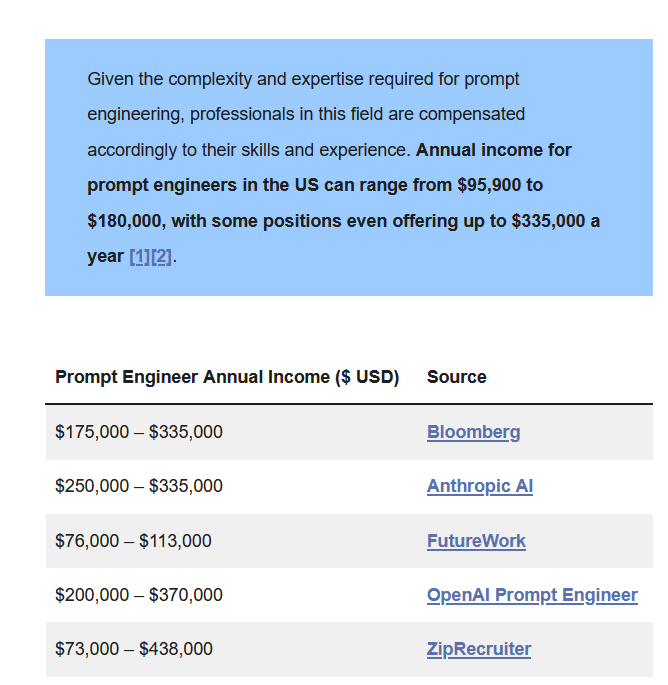
Now let’s get started with the real deal: prompt engineering. This is currently the most important skill you can learn as a developer or tech geek. It pays multiple six-figures per year!
Prompt Engineering with Python and OpenAI
You can check out the whole course on OpenAI Prompt Engineering using Python on the Finxter academy. We cover topics such as:
- Embeddings
- Semantic search
- Web scraping
- Query embeddings
- Movie recommendation
- Sentiment analysis
 Academy: Prompt Engineering with Python and OpenAI
July 09, 2023 at 02:05PM
Click here for more details...
=============================
The original post is available in Be on the Right Side of Change by Chris
this post has been published as it is through automation. Automation script brings all the top bloggers post under a single umbrella.
The purpose of this blog, Follow the top Salesforce bloggers and collect all blogs in a single place through automation.
============================


Post a Comment