Build a Search Engine: Deploy Models and Index Data in AWS OpenSearch : Vikram Singh
by: Vikram Singh
blow post content copied from PyImageSearch
click here to view original post
Table of Contents
- Build a Search Engine: Deploy Models and Index Data in AWS OpenSearch
- Introduction
- Configuring Your Development Environment
- Project Structure
- Setting Up OpenSearch Locally with Docker
- Dataset: Wikipedia Movie Plots
- Overview of the Dataset
- Dataset Context and Content
- Loading and Exploring the Dataset
- Key Statistics of the Dataset
- Transforming Data for OpenSearch Indexing
- Deploying a Sentence Transformer Model in OpenSearch
- Creating an Ingest Pipeline for Automatic Embedding Generation
- Why Use an Ingest Pipeline?
- Defining the Ingest Pipeline Configuration
- Creating the Ingest Pipeline in OpenSearch
- Setting the Pipeline to Use the Deployed Model
- Creating an Index and Storing Movie Data in OpenSearch
- Why Do We Need an Index?
- Defining the Index Mappings
- Creating the Index in OpenSearch
- Bulk Indexing Movie Data into OpenSearch
- Verifying the Indexed Data
- Summary
Build a Search Engine: Deploy Models and Index Data in AWS OpenSearch
In this tutorial, you will learn how to deploy a Sentence Transformer model, create an ingest pipeline for automatic embedding generation, and index movie metadata along with vector embeddings in AWS (Amazon Web Services) OpenSearch. You’ll also discover how to run OpenSearch locally using Docker and prepare your setup for semantic search and neural queries in the next stage. 🚀

This lesson is the 2nd of a 3-part series on Building a Semantic Search System with AWS OpenSearch:
- Build a Search Engine: Setting Up AWS OpenSearch
- Build a Search Engine: Deploy Models and Index Data in AWS OpenSearch (this tutorial)
- Build a Search Engine: Semantic Search System Using OpenSearch
To learn how to deploy a Sentence Transformer model, create an ingest pipeline, and index movie metadata along with vector embeddings in AWS OpenSearch, just keep reading.
Introduction
In the previous blog, we covered the end-to-end setup of AWS OpenSearch, from deploying an OpenSearch domain to indexing and retrieving test data, as well as testing access via API and OpenSearch Dashboards to ensure everything was functioning correctly. With OpenSearch now fully functional, it’s time to move beyond basic indexing and prepare for semantic search by integrating text embeddings.
Traditional keyword-based search (Best Match 25 (BM25)) works well for exact matches, but it struggles with conceptual understanding. For example, if a user searches for “a space adventure with robots,” a traditional search engine may not return Star Wars since those exact words might not appear in the movie plot. This is where semantic search powered by vector embeddings comes in.
What Will We Do in This Blog?
In this tutorial, we will:
- Work with the Wikipedia Movie Plots Dataset: This dataset contains thousands of movies, including titles, genres, directors, and detailed plot summaries. We will focus on plot summaries to generate embeddings for semantic search.
- Deploy a Sentence Transformer Model: Using MiniLM v6, we will convert text descriptions into high-dimensional embeddings, allowing OpenSearch to perform similarity-based searches.
- Create an Ingest Pipeline: Instead of manually computing embeddings and uploading them, we will set up an ingest pipeline in OpenSearch that automatically generates embeddings when new movie data is indexed.
- Index Metadata and Embeddings into OpenSearch: Along with embeddings, we will store structured metadata (e.g., movie titles, directors, and release years), ensuring that search results include rich, meaningful information.
- Run OpenSearch Locally with Docker: This tutorial will use Docker for OpenSearch, allowing you to quickly test everything locally. However, we will also provide AWS OpenSearch instructions so you can apply the same setup in the cloud.
Why Are We Using Vector Embeddings?
Traditional search engines rely on keyword-based matching (BM25), which can be limiting when searching for conceptually similar content. By using text embeddings, we can move beyond keyword search and enable semantic search — allowing OpenSearch to retrieve results that match meaning, not just exact words.
In simple terms, instead of matching text literally, OpenSearch will match by meaning. This is particularly powerful for movie recommendations, where users may describe movies in different words than the actual metadata.
For example:
❌ Traditional Search: "A superhero film with an AI-powered villain" → Doesn’t match Avengers: Age of Ultron unless those exact words appear in the dataset.
✅ Semantic Search: "A superhero film with an AI-powered villain" → Correctly retrieves Avengers: Age of Ultron, even if the description is phrased differently.
By the end of this guide, you will have a fully indexed movie dataset with embeddings, ready for semantic search in the next blog.
What’s Coming Next?
In the next blog, we will:
- Run semantic search queries using neural search.
- Retrieve the most relevant movies based on plot similarity.
Let’s dive in and start setting up OpenSearch for indexing movie data! 🚀
Configuring Your Development Environment
Before we begin indexing and storing data in OpenSearch, we need to set up our development environment with the required dependencies.
Installing Docker (Required for This Lesson)
Since we will be running OpenSearch locally using Docker, be sure Docker is installed on your system. If you haven’t installed it yet, follow this step-by-step guide: Getting Started with Docker for Machine Learning.
Installing Required Libraries
Below are the libraries we need for this tutorial, and you can install them using pip:
$ pip install opensearch-py==2.4.2 pandas==2.0.3 tqdm==4.66.1 pyarrow==14.0.2
Once the installations are complete and Docker is set up, you’re ready to proceed with indexing movie data in OpenSearch. 🚀
Need Help Configuring Your Development Environment?
All that said, are you:
- Short on time?
- Learning on your employer’s administratively locked system?
- Wanting to skip the hassle of fighting with the command line, package managers, and virtual environments?
- Ready to run the code immediately on your Windows, macOS, or Linux system?
Then join PyImageSearch University today!
Gain access to Jupyter Notebooks for this tutorial and other PyImageSearch guides pre-configured to run on Google Colab’s ecosystem right in your web browser! No installation required.
And best of all, these Jupyter Notebooks will run on Windows, macOS, and Linux!
Project Structure
We first need to review our project directory structure.
Start by accessing this tutorial’s “Downloads” section to retrieve the source code and example images.
From there, take a look at the directory structure:
$ tree .
.
├── data
│   ├── queries_set_1.txt
│   ├── queries_set_2.txt
│   └── wiki_movie_plots.csv
├── deploy_and_index.py
├── find_similar_movies.py
├── pyimagesearch
│   ├── __init__.py
│   ├── config.py
│   ├── index.json
│   ├── ingest_pipeline.json
│   ├── model_data.json
│   ├── search_utils.py
│   └── utils.py
├── results
│   ├── search_results_set_1.csv
│   └── search_results_set_2.csv
└── run_opensearch.sh
4 directories, 15 files
data/Directory — Contains Raw Data and Queries: This folder holds the dataset and sample query sets used for testing retrieval.wiki_movie_plots.csv: The main dataset containing metadata and plot summaries of movies. This is the data we will process, embed, and index in OpenSearch.queries_set_1.txtandqueries_set_2.txt: Text files with sample queries to test the search functionality.
deploy_and_index.py— Main Script for Indexing Data: This is the core script responsible for:- Loading the dataset (
wiki_movie_plots.csv). - Registering and deploying the Sentence Transformer model for embedding generation.
- Creating an ingest pipeline in OpenSearch.
- Indexing both metadata and embeddings into OpenSearch.
- This script automates the entire data ingestion process, making it easy to set up OpenSearch for movie searches.
- Loading the dataset (
find_similar_movies.py— Search and Retrieval Script: This script is used for retrieving similar movies from OpenSearch based on a given query.- Takes a text query (movie description).
- Uses neural search to find semantically similar movies based on embeddings.
- Returns matching movies ranked by similarity.
- This script will be heavily used in the next blog post for search and retrieval!
pyimagesearch/Directory — Utility Modules and Configurations: This folder contains all helper scripts, configurations, and JSON files required for indexing and search.config.py: Stores configuration variables (e.g., OpenSearch URL, index name, model ID).index.json: JSON schema defining index mappings for storing movie metadata and embeddings.ingest_pipeline.json: Defines an ingest pipeline for automatic embedding generation inside OpenSearch.model_data.json: Contains metadata for registering the Sentence Transformer model in OpenSearch.search_utils.py: Helper functions for performing search queries.utils.py: General utility functions for data transformation and processing.
results/Directory — Stores Search Results: This folder contains search results from previous test runs.search_results_set_1.csvandsearch_results_set_2.csv: CSV files containing results for predefined search queries. These can be used to evaluate retrieval quality and fine-tune the search pipeline.
run_opensearch.sh— Script to Start OpenSearch Locally: A shell script that launches OpenSearch using Docker.- This is useful for running OpenSearch locally for testing before deploying it on AWS.
- Typically contains a Docker command to start OpenSearch on port
9200.
Setting Up OpenSearch Locally with Docker
To develop and test our indexing pipeline efficiently, we will run OpenSearch locally using Docker before deploying it to AWS OpenSearch. Running OpenSearch in a containerized environment allows us to work in an isolated setup, avoiding installation issues while ensuring compatibility across different systems.
Why Use Docker for Local Testing Before AWS Deployment?
Using Docker to run OpenSearch locally provides several advantages:
- Faster Setup: No need for manual installation; just pull the container and run it.
- Consistency: Ensures the same environment across different machines.
- Easy Cleanup: You can remove the container anytime without affecting your system.
- No AWS Costs: Allows development and testing without incurring AWS OpenSearch Service charges.
- Flexibility: Test configurations, indexing, and query performance before deploying to AWS.
Once everything is verified locally, we can update the OpenSearch URL and migrate the setup to AWS OpenSearch.
Running OpenSearch Using Docker
Follow the steps below to launch an OpenSearch container on your machine.
Pull the Latest OpenSearch Image
Before running OpenSearch, ensure that you have Docker installed (see Getting Started with Docker if needed).
Now, pull the latest OpenSearch Docker image:
docker pull opensearchproject/opensearch:latest
If you want to use a particular version of OpenSearch just update the latest tag in the above command with the exact version you wish to use.
Start an OpenSearch Container
Once the image is downloaded, start OpenSearch using the following command:
docker run -d --name opensearch \
  -p 9200:9200 \
  -e "discovery.type=single-node" \
  opensearchproject/opensearch:latest
In the above command:
docker run -d: Runs the container in detached mode (in the background).--name opensearch: Assigns the container the nameopensearch.-p 9200:9200: Maps OpenSearch’s port9200to the host machine so that we can access it viahttp://localhost:9200.-e "discovery.type=single-node": Runs OpenSearch as a single-node cluster (since we’re not setting up a distributed system locally).
After running this command, OpenSearch should now be running locally on port 9200.
Verifying the OpenSearch Setup
To confirm that OpenSearch is running correctly, we can test the setup using cURL or Postman. If you’re using VS (Visual Studio) Code, you can even install a Postman extension to make testing easier. 🙂
The responses from local OpenSearch (Docker) should be quite similar to the ones we received when setting up AWS OpenSearch Service. You should see details about cluster health, the number of nodes, and the OpenSearch version.
1️⃣ Check Cluster Health Using cURL
Run the following command in your terminal:
curl -X GET "http://localhost:9200/_cluster/health?pretty"
✅ Expected Response (Example):
{
  "cluster_name": "opensearch-cluster",
  "status": "green",
  "number_of_nodes": 1
}
2️⃣ Verify OpenSearch in Postman
- Open Postman and create a new
GETrequest. - Enter the URL:
http://localhost:9200/_cluster/health?pretty - Click Send and check if the response contains cluster health information.
3️⃣ Check OpenSearch in the Browser
Alternatively, you can open this URL in your browser: http://localhost:9200
If OpenSearch is running, you should see a JSON response with the OpenSearch version details.
Now that OpenSearch is running locally, we can proceed to load the Wikipedia Movie Plots dataset, deploy a Sentence Transformer model, and set up an ingest pipeline for embeddings. 🚀
📊Dataset: Wikipedia Movie Plots
Overview of the Dataset
For this tutorial, we will use the Wikipedia Movie Plots dataset, which contains metadata and plot summaries for  35,000 movies from around the world. This dataset is ideal for semantic search, as it allows us to:
✅ Index structured metadata (e.g., movie title, director, release year, genre, and Wikipedia page).
✅ Generate embeddings for the plot summaries, enabling vector-based similarity search.
✅ Build a neural search system that can retrieve similar movies based on plot meaning rather than exact keyword matches.
Dataset Context and Content
The dataset was scraped from Wikipedia and contains detailed plot summaries of movies across multiple languages, genres, and film industries (e.g., Hollywood, Bollywood, Tamil, etc.).
📂 Key Columns in the Dataset

For this project, we will focus on:
- Metadata Fields:
Title,Director,Release Year,Wiki Page, andGenre. - Semantic Search Embeddings: Generated from the
Plotcolumn.
Loading and Exploring the Dataset
We will use Pandas to load and inspect the dataset stored in data/wiki_movie_plots.csv.
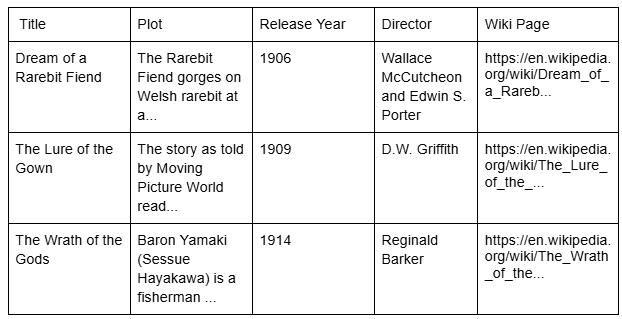
import pandas as pd

# Load the dataset
dataset_path = "data/wiki_movie_plots.csv"
df = pd.read_csv(dataset_path)

# Display dataset structure
print(df.head())
Expected Output (Example)
Key Statistics of the Dataset
📊 Dataset Summary
- Total Movies: 34,886
- Earliest Release Year: 1874
- Most Recent Release Year: 2020
- Top 5 Genres: Drama, Comedy, Thriller, Romance, and Action
Figure 1 displays some data insights and visualizations generated from the dataset.
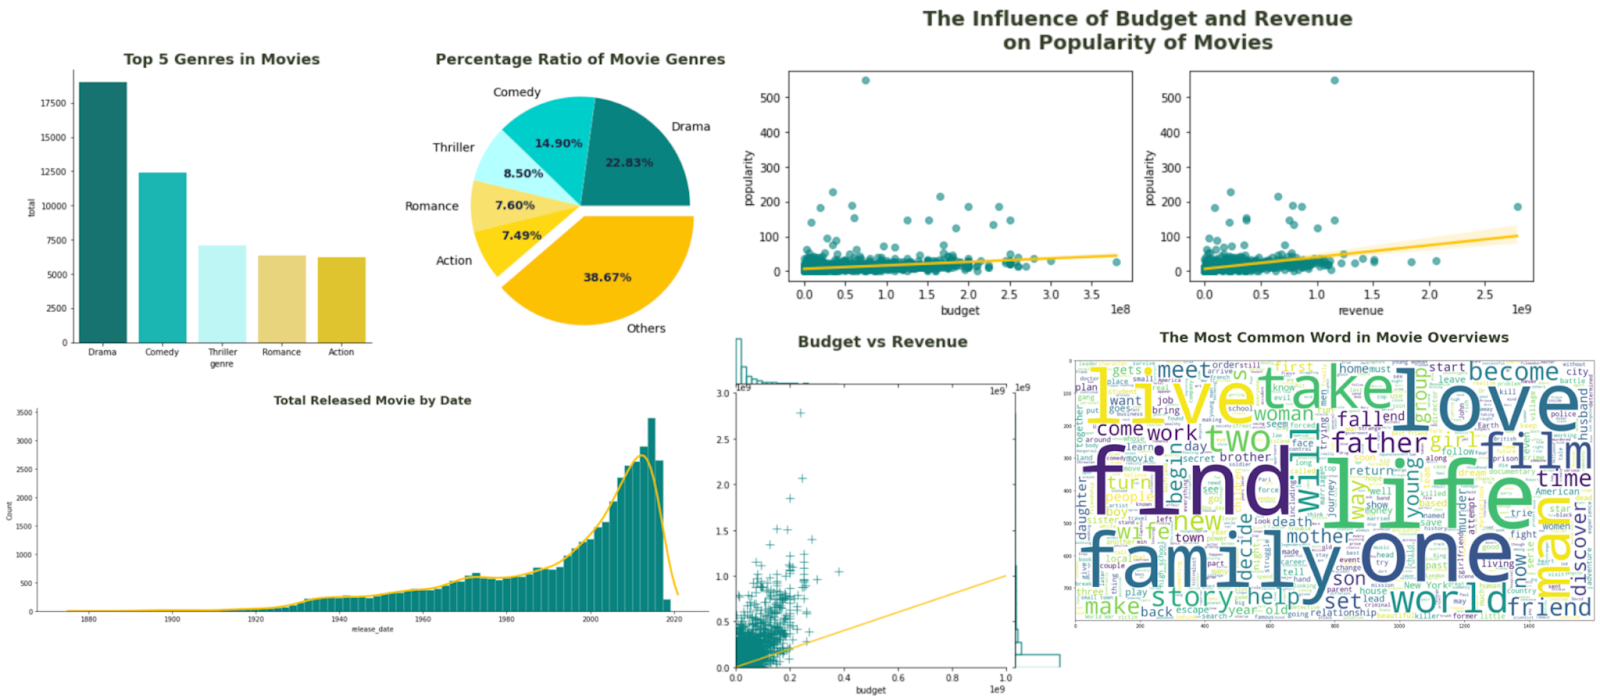
Top 5 Genres in Movies
- Total Movies Released Over Time
- Most Common Words in Plot Descriptions
- Correlation Between Budget, Revenue, and Popularity
Transforming Data for OpenSearch Indexing
Before indexing, we transform the dataset into a format suitable for OpenSearch.
Why Is This Needed?
- OpenSearch expects data in a structured dictionary format, not a CSV.
- We store metadata (title, director, year, wiki) along with the plot description for embeddings.
The function in utils.py handles this transformation:
def transform_data_to_documents(data):
    """
    Transforms movie data from the CSV format into a structured dictionary format for OpenSearch indexing.
    """
    documents = []
    for _, row in data.iterrows():
        document = {
            "title": row["Title"],
            "plot_text": row["Plot"],  # The field used for embeddings
            "year": row["Release Year"],
            "director": row["Director"],
            "wiki": row["Wiki Page"],
        }
        documents.append(document)
    return documents

# Transform dataset for OpenSearch
documents = transform_data_to_documents(df)
print(documents[:2])  # Show first two transformed documents
Output Example
[{'title': 'Kansas Saloon Smashers', 'plot_text': "A bartender is working at a saloon, serving drinks to customers. After he fills a stereotypically Irish man's bucket with beer, ...... ......seltzer water in Nation's face before a group of policemen appear and order everybody to leave.[1]", 'year': 1901, 'director': 'Unknown', 'wiki': 'https://en.wikipedia.org/wiki/Kansas_Saloon_Smashers'}, {'title': 'Love by the Light of the Moon', 'plot_text': "The moon, painted with a smiling face hangs over a park at night. A young couple walking past a fence learn on a railing and look up. The moon ..... woman with his hat because the moon has left the sky and is perched over her shoulder to see everything better.", 'year': 1901, 'director': 'Unknown', 'wiki': 'https://en.wikipedia.org/wiki/Love_by_the_Light_of_the_Moon'}]
This transformation process is crucial as it:
- Ensures Correct Field Mapping: The transformation process ensures that the dataset aligns with OpenSearch’s expected structure by mapping the correct field names. This maintains consistency with OpenSearch index mappings and prevents indexing errors.
- Prepares Plot Summaries for Embedding Generation: Since the plot summaries will be used to generate embeddings, structuring them correctly is essential for effective semantic search. A well-structured dataset improves the quality of embeddings and enhances search performance.
- Simplifies Bulk Indexing: Preparing the data in this structured format makes the bulk indexing process more efficient, allowing both metadata and embeddings to be stored seamlessly in OpenSearch. This reduces complexity and speeds up data ingestion.
Deploying a Sentence Transformer Model in OpenSearch
Now that our dataset is prepared, the next step is to deploy a Sentence Transformer model in OpenSearch. This model will be responsible for generating text embeddings that enable semantic search by understanding the meaning behind movie plot descriptions.
Why Use a Sentence Transformer Model?
Traditional search engines rely on keyword-based matching, which can be limiting when searching for semantically similar content. Sentence Transformers help overcome this by:
- Generating Vector Embeddings: Converts text (plot summaries) into high-dimensional vectors.
- Capturing Semantic Meaning: Allows OpenSearch to compare and retrieve similar movies based on meaning rather than just keywords.
- Powering Neural Search: Enables advanced similarity-based retrieval using OpenSearch’s k-NN (k-Nearest Neighbors) indexing.
For this setup, we will use the MiniLM v6 model from Hugging Face, a compact yet powerful transformer model optimized for semantic search tasks.
Steps to Deploy the Model in OpenSearch
To use a Sentence Transformer model inside OpenSearch, we must:
- Register the Model: Inform OpenSearch about the model we want to use.
- Deploy the Model: Make the model available for real-time inference.
📌 Model Configuration (model_data.json)
{
    "name": "huggingface/sentence-transformers/all-MiniLM-L6-v2",
    "version": "1.0.1",
    "model_format": "TORCH_SCRIPT"
}
This JSON file specifies the model we are using from Hugging Face (all-MiniLM-L6-v2), its version, and the format required by OpenSearch (TORCH_SCRIPT). This ensures compatibility when the model is deployed for inference.
Registering the Model in OpenSearch
We first register the model using OpenSearch’s ML Commons API. The following function from utils.py handles this process:
import requests
from pyimagesearch.config import model_register_url, auth

def register_model(model_data):
    response = requests.post(
        model_register_url, json=model_data, auth=auth, verify=False
    )
    return response.json()
This function sends a POST request to OpenSearch to register the model. If the request is successful, OpenSearch responds with a task_id, which we need to track the model registration progress.
You can expect a response like the following:
{
    "task_id": "abcd-1234-efgh-5678"
}
The task_id indicates that OpenSearch is processing the model registration asynchronously. We need to track this task to confirm when registration is completed.
Deploying the Model for Real-Time Inference
Once registered, we deploy the model inside OpenSearch:
from pyimagesearch.config import model_deploy_url, task_url_template

def deploy_model(model_id):
    deploy_url = model_deploy_url.format(model_id=model_id)
    response = requests.post(deploy_url, auth=auth, verify=False)
    return response.json()
This function makes another POST request, this time instructing OpenSearch to deploy the registered model so it can start processing embeddings. If successful, OpenSearch returns another task_id, similar to the registration step.
{
    "task_id": "ijkl-5678-mnop-9012"
}
Again, the task_id signifies that deployment is in progress. OpenSearch handles model deployment asynchronously, so we need to check the task’s status before using the model.
Polling for Deployment Status
Since model deployment is asynchronous, we must periodically check if the deployment is complete. We do this using the following function:
import time
def check_task_status(task_id):
    task_url = task_url_template.format(task_id=task_id)
    while True:
        response = requests.get(task_url, auth=auth, verify=False).json()
        task_status = response.get("state")

        if task_status == "COMPLETED":
            print("✅ Model deployment completed successfully!")
            return True
        elif task_status == "FAILED":
            raise Exception("❌ Model deployment failed!")

        print("⏳ Deployment in progress... Checking again in 5 seconds.")
        time.sleep(5)
This function continuously checks the deployment status every 5 seconds. Once the model is fully deployed, the state will change to "COMPLETED", indicating that the model is now ready for inference. If deployment fails, an error message will be raised.
Now that the model is registered and deployed, we will proceed with setting up an ingest pipeline that automatically generates embeddings when new movie data is indexed. This pipeline will extract plot summaries, pass them through the deployed model, and store the resulting embeddings in OpenSearch. Once the ingest pipeline is in place, we will define an OpenSearch index to store both metadata and embeddings, setting the foundation for semantic search queries.
Creating an Ingest Pipeline for Automatic Embedding Generation
Now that the Sentence Transformer model is deployed, the next step is to set up an ingest pipeline in OpenSearch. This pipeline will allow OpenSearch to automatically generate embeddings for plot summaries whenever a new document is indexed.
Why Use an Ingest Pipeline?
Instead of manually computing embeddings before indexing, we can let OpenSearch handle this step in real-time. The ingest pipeline ensures:
- Automatic Embedding Generation: No need to precompute embeddings separately.
- Efficient Indexing: OpenSearch processes raw text and converts it into embeddings on the fly.
- Simplified Data Flow: Any new document added to OpenSearch automatically gets its vector representation stored.
With this setup, OpenSearch will extract the plot_text field from each document, pass it through the deployed model, and store the resulting vector in the plot_embedding field.
Defining the Ingest Pipeline Configuration
To create the ingest pipeline, we define the following JSON structure (ingest_pipeline.json):
{
    "description": "A text embedding pipeline",
    "processor": [
        {
            "text_embedding": {
                "field_map": {
                    "plot_text": "plot_embedding"
                }
            }
        }
    ]
}
This JSON defines how OpenSearch should process documents before they are indexed. The description field provides a short explanation of the pipeline’s purpose. The processor field lists the transformations to apply before storing a document. In this case, we define a text_embedding processor, which applies a machine learning model to generate embeddings.
The field_map section specifies that OpenSearch should extract text from the plot_text field, pass it through the model, and store the resulting vector in the plot_embedding field. This setup ensures that every movie plot gets converted into an embedding at the time of indexing.
Creating the Ingest Pipeline in OpenSearch
To register the pipeline in OpenSearch, we use the following function from utils.py:
import requests
from pyimagesearch.config import ingest_pipeline_url, auth

def create_ingest_pipeline(pipeline_body):
    response = requests.put(
        ingest_pipeline_url, json=pipeline_body, auth=auth, verify=False
    )
    return response.json()
This function makes a PUT request to OpenSearch to create or update the ingest pipeline. It takes in pipeline_body, which is the JSON configuration we defined earlier, and sends it to OpenSearch using the configured ingest_pipeline_url.
By calling this function, OpenSearch registers the pipeline, ensuring that any incoming document automatically goes through the text embedding process before being stored. If the request is successful, OpenSearch confirms that the pipeline has been created.
Setting the Pipeline to Use the Deployed Model
Since the ingest_pipeline.json file contains a placeholder for the model ID ("model_id"), we must replace it dynamically before creating the pipeline. The following code snippet does this:
from pyimagesearch.utils import load_json

# Load the pipeline configuration
pipeline_body = load_json("pyimagesearch/ingest_pipeline.json")

# Replace the model ID dynamically
pipeline_body["processors"][0]["text_embedding"]["model_id"] = "<your-model-id>"

# Create the ingest pipeline
create_ingest_pipeline(pipeline_body)
print("✅ Ingest pipeline created or updated successfully.")
This script first loads the ingest pipeline configuration from ingest_pipeline.json. It then replaces the placeholder "model_id" with the actual model ID that was obtained during model deployment. Finally, it calls the create_ingest_pipeline() function to send the updated configuration to OpenSearch.
Once this script is executed, OpenSearch will apply the ingest pipeline to every new document, ensuring that embeddings are generated and stored alongside metadata.
Now that the ingest pipeline is in place, we will:
- Create an index in OpenSearch to store metadata and embeddings.
- Index movie data into OpenSearch using bulk upload.
Creating an Index and Storing Movie Data in OpenSearch
Now that we have set up an ingest pipeline to generate embeddings automatically, the next step is to create an OpenSearch index that will store both movie metadata and vector embeddings. Once the index is created, we will bulk index movie data from our dataset into OpenSearch.
Why Do We Need an Index?
An index in OpenSearch is similar to a database table — it defines how data is structured and stored. In this case, we need an index that can:
- Store structured movie metadata (title, director, release year, etc.).
- Store plot summaries as raw text for future reference.
- Store embeddings generated by the ingest pipeline for semantic search.
By defining an index mapping correctly, OpenSearch can efficiently store and retrieve movie data while leveraging k-NN (k-Nearest Neighbors) search to find similar movies based on embeddings.
Defining the Index Mappings
To create the index, we define its schema (mappings) in index.json:
{
    "settings": {
      "index.knn": "tr",
      "default_pipeline": "nlp-ingest-pipeline"
    },
    "mappings": {
      "properties": {
        "title": {
          "type": "text"
        },
        "director": {
          "type": "text"
        },
        "year": {
          "type": "text"
        },
        "wiki": {
          "type": "text"
        },
        "plot_embedding": {
          "type": "knn",
          "dimension": 300,
          "method": {
            "engine": "nmslib",
            "space_type": "cosinesimil",
            "parameters": {}
          }
        },
        "plot_text": {
          "type": "text"
        }
      }
    }
}
This JSON file defines the structure of the OpenSearch index. The settings section enables k-NN search for vector-based retrieval by setting "index.knn": "tr". The "default_pipeline": "nlp-ingest-pipeline" ensures that every document indexed in this index goes through the ingest pipeline, where embeddings are automatically generated for the plot summaries.
The mappings section specifies the different fields we will store. Fields (e.g., title, director, year, and wiki) are stored as text and can be used for filtering or keyword-based searches.
The plot_embedding field is a knn_vector field with 300 dimensions, which stores the embeddings produced by the deployed model. This allows OpenSearch to retrieve similar movies based on semantic meaning rather than keyword matches.
Creating the Index in OpenSearch
We will now use the following function from utils.py to create the index in OpenSearch:
from pyimagesearch.config import index_name
from pyimagesearch.utils import create_client, load_json

def create_index(client, index_name, index_body):
    if not client.indices.exists(index=index_name):
        response = client.indices.create(index=index_name)
        return response
    else:
        print(f"Index {index_name} already exists.")
        return None

# Load index settings and mappings
index_body = load_json("pyimagesearch/index.json")

# Initialize OpenSearch client
client = create_client()

# Create index
create_index(client, index_name, index_body)
print(f"✅ Index '{index_name}' created successfully.")
This script first loads the index configuration from index.json, ensuring that the correct settings and mappings are applied. It then initializes an OpenSearch client to connect to the database. Before creating the index, it checks whether an index with the same name already exists to avoid duplicate creations. If the index does not exist, OpenSearch creates it using the provided index_body, and a confirmation message is printed. This step ensures that OpenSearch is ready to store movie data while automatically handling text embeddings through the ingest pipeline.
Bulk Indexing Movie Data into OpenSearch
Once the index is created, we proceed with bulk indexing movie data into OpenSearch. Instead of indexing each document individually, we use the bulk() function from OpenSearch to upload multiple documents efficiently. The following function performs this operation:
from opensearchpy.helpers import bulk
from pyimagesearch.config import dataset_path, index_name
from pyimagesearch.utils import transform_data_to_documents

# Load movie dataset
import pandas as pd
data = pd.read_csv(dataset_path)

# Transform dataset into OpenSearch document format
documents = transform_data_to_documents(data.head(1000))  # Index first 1000 movies

# Bulk upload documents to OpenSearch
bulk(client, documents)
print(f"✅ {len(documents)} movies indexed successfully.")
This script begins by loading the Wikipedia Movie Plots dataset using Pandas. Since we don’t want to overload OpenSearch with too much data at once, we limit the indexing process to the first 1000 movies. The transform_data_to_documents() function converts the raw CSV (Comma Separated Values) data into the structured dictionary format required for OpenSearch.
Once the dataset is transformed, we use the bulk() function to upload multiple documents at once efficiently. During this process, the ingest pipeline automatically processes each document, extracts the plot summary, and generates embeddings before storing the document in OpenSearch. After the indexing process is complete, OpenSearch confirms how many documents have been successfully stored.
Verifying the Indexed Data
Once the data is indexed, we need to verify that it is stored correctly. We can do this using cURL or OpenSearch Dashboards.
Check Total Documents in the Index
curl -X GET "http://localhost:9200/pyimagesearch/_count?pretty"
This command queries OpenSearch to count the total number of documents in the pyimagesearch index. If the process is successful, the count should match the number of indexed movies (e.g., 1000).
Retrieve a Sample Document
curl -X GET "http://localhost:9200/pyimagesearch/_search?pretty&size=1"
This command retrieves a sample document from OpenSearch, allowing us to check that movie metadata and generated embeddings are correctly stored.
If the indexing process worked as expected, the output should display a structured JSON response containing fields like title, director, year, plot_text, and plot_embedding.
What's next? We recommend PyImageSearch University.
86+ total classes • 115+ hours hours of on-demand code walkthrough videos • Last updated: May 2025
★★★★★ 4.84 (128 Ratings) • 16,000+ Students Enrolled
I strongly believe that if you had the right teacher you could master computer vision and deep learning.
Do you think learning computer vision and deep learning has to be time-consuming, overwhelming, and complicated? Or has to involve complex mathematics and equations? Or requires a degree in computer science?
That’s not the case.
All you need to master computer vision and deep learning is for someone to explain things to you in simple, intuitive terms. And that’s exactly what I do. My mission is to change education and how complex Artificial Intelligence topics are taught.
If you're serious about learning computer vision, your next stop should be PyImageSearch University, the most comprehensive computer vision, deep learning, and OpenCV course online today. Here you’ll learn how to successfully and confidently apply computer vision to your work, research, and projects. Join me in computer vision mastery.
Inside PyImageSearch University you'll find:
- ✓ 86+ courses on essential computer vision, deep learning, and OpenCV topics
- ✓ 86 Certificates of Completion
- ✓ 115+ hours hours of on-demand video
- ✓ Brand new courses released regularly, ensuring you can keep up with state-of-the-art techniques
- ✓ Pre-configured Jupyter Notebooks in Google Colab
- ✓ Run all code examples in your web browser — works on Windows, macOS, and Linux (no dev environment configuration required!)
- ✓ Access to centralized code repos for all 540+ tutorials on PyImageSearch
- ✓ Easy one-click downloads for code, datasets, pre-trained models, etc.
- ✓ Access on mobile, laptop, desktop, etc.
Summary
In this post, we walked through the end-to-end process of indexing and storing data in OpenSearch, focusing on semantic search capabilities using embeddings. We started by setting up OpenSearch locally with Docker, ensuring that we had a working environment to index and query movie data.
We then explored the Wikipedia Movie Plots dataset, which contains titles, directors, release years, genres, and plot summaries for over 34,000 movies. Since semantic search requires embeddings rather than just keywords, we deployed a Sentence Transformer model (MiniLM v6) in OpenSearch to generate text embeddings for the plot summaries.
To automate embedding generation, we created an ingest pipeline, which applies the transformer model to each movie plot at indexing time, converting text into vector embeddings. After setting up the pipeline, we defined an OpenSearch index with the necessary mappings for both metadata fields and vector embeddings, enabling k-NN-based similarity search. We then bulk-indexed movie data, allowing OpenSearch to automatically generate embeddings and store movie metadata efficiently.
Finally, we validated our setup by running test queries via cURL.
With indexing now complete, the next step is to implement neural search, where we will use OpenSearch’s k-NN search capabilities to retrieve movies based on the semantic similarity of plot descriptions.
📌 Stay tuned for the next post, where we will build a full semantic search system using these indexed embeddings!🚀
Citation Information
Singh, V. “Build a Search Engine: Deploy Models and Index Data in AWS OpenSearch,” PyImageSearch, P. Chugh, S. Huot, G. Kudriavtsev, A. Sharma, and P. Thakur, eds., 2025, https://pyimg.co/j8o9a
@incollection{Singh_2025_build-search-engine-deploy-models-and-index-data-in-aws-opensearch,
  author = {Vikram Singh},
  title = ,
  booktitle = {PyImageSearch},
  editor = {Puneet Chugh and Susan Huot and Georgii Kudriavtsev and Aditya Sharma and Piyush Thakur},
  year = {2025},
  url = {https://pyimg.co/j8o9a},
}
To download the source code to this post (and be notified when future tutorials are published here on PyImageSearch), simply enter your email address in the form below!

Download the Source Code and FREE 17-page Resource Guide
Enter your email address below to get a .zip of the code and a FREE 17-page Resource Guide on Computer Vision, OpenCV, and Deep Learning. Inside you'll find my hand-picked tutorials, books, courses, and libraries to help you master CV and DL!
The post Build a Search Engine: Deploy Models and Index Data in AWS OpenSearch appeared first on PyImageSearch.
May 12, 2025 at 06:30PM
Click here for more details...
=============================
The original post is available in PyImageSearch by Vikram Singh
this post has been published as it is through automation. Automation script brings all the top bloggers post under a single umbrella.
The purpose of this blog, Follow the top Salesforce bloggers and collect all blogs in a single place through automation.
============================


Post a Comment