Multi-Task Learning and HydraNets with PyTorch : Jeremy Cohen
by: Jeremy Cohen
blow post content copied from PyImageSearch
click here to view original post
Table of Contents
Multi-Task Learning and HydraNets with PyTorch
Today, we will learn about Multi-Task Learning and HydraNets. This is a Deep Learning technique I first introduced back in mid-2020 in an email I sent to exactly 653 people.

The responses to this email were so high (engineers from everywhere around the planet told me they loved it and wanted to apply it to their company) I had to create an entire HydraNet section in my course catalog. You can learn more by visiting https://www.thinkautonomous.ai/
Not only is this technique new and exciting for the Deep Learning field, but it’s also accessible to many Computer Vision Engineers. I suspect it may even become mandatory inside Deep Learning curriculums in the next few years.
Today, we are going to learn the fundamentals of Multi-Task Learning, and to kick off this article, below is the story of how I first learned about it:
I researched Tesla’s Autopilot a few years ago to write an article. I learned TONS of things through their conferences, articles, and by following the engineers on LinkedIn. But at some point, I stumble across a word:
“HydraNet”
HydraNet? Interesting, what is this?
I did some digging and learned that Tesla isn’t using 10 or 20 models. Despite having 20+ tasks to solve, they’re using just one (at least, this is the main idea behind that).
They have one model that can solve every possible task they are working on, such as:
- Object Detection
- Road curves estimation
- Depth Estimation
- 3D Reconstruction
- Video Analysis
- Object Tracking
- etc…

Before we dive into the “how,” I’d like to show you what a HydraNet can do.
Here’s a benchmark of 2 Computer Vision models running on an NVIDIA GPU on 3 different configurations.
- In the first configuration, we’re running a semantic segmentation model.
- On the second configuration, we’re stacking a monocular depth estimation model.
- In the third configuration, we’re building a HydraNet capable of doing both tasks simultaneously.
Now, look at the results (see Table 1):

Semantic segmentation runs at 29 FPS in the first column and uses 70% of the GPU. But as soon as we add Depth Estimation, the GPU becomes full.
This happened a few years ago while I was working on autonomous shuttles. I trained a YOLOv3 model to detect obstacles and needed to add more tasks, such as lane line estimation.
Suddenly, my GPU was full, and I couldn’t run the car anymore.
So in the third column, you notice that the HydraNet saves the GPU usage while keeping the FPS relatively high.
Because instead of doing this in parallel:
We’re doing this:

This is the same kind of architecture that Tesla uses; as you notice, it’s powerful.
One body, several heads.

This is what Tesla is doing, and the article I was referring to is available here.
In this lesson, we will see a simpler version of a multi-task learning project:
Solving a Multi-Task Learning Project
Now that you’re familiar with HydraNets, we will have a short tutorial on using HydraNets with PyTorch.
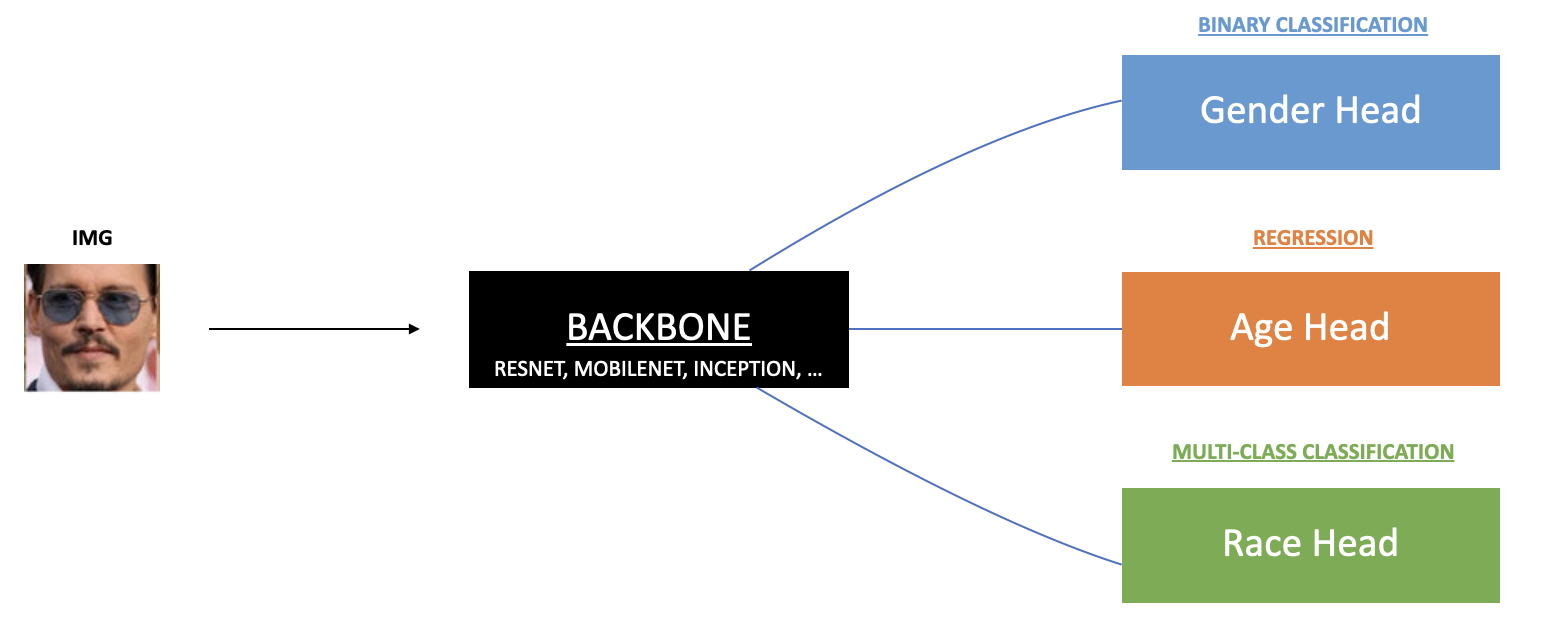
For that, we will use the UTK Face Dataset. It’s a classification dataset where each image has 3 labels:
- gender (male or female)
- race (white, black, Asian, Indian, other)
- age (a continuous number)
Our HydraNet will therefore have 3 heads, one for each task. The fun part is that these won’t be the same heads: predicting the age is a regression task, but predicting the gender is a binary classification task and predicting the race is a multi-class classification task.
This all means there will be several loss functions to handle.

With PyTorch, we will create this exact project. For that, we’ll:
- Create a Multi-Task DataLoader with PyTorch
- Create a Multi-Task Network
- Train the Model and Run the Results
With PyTorch, we always start with a Dataset that we encapsulate in a PyTorch DataLoader and feed to a model.
The DataLoader is our first step.
Creating a Multi-Task DataLoader with PyTorch
In this tutorial, I will assume that you are familiar with PyTorch. You know all about datasets and dataloaders, and seeing __dunders__ doesn’t scare you.
Here is the idea: our data will be fed to a dataset class converted to a PyTorch DataLoader.

On the image:
- We collect data, like for any Deep Learning project
- We send this data to a custom Dataset class and create a train and test dataset
- We encapsulate these two datasets into two PyTorch DataLoaders
- When training, we’re working with these DataLoaders
Data
The first is the data.
The dataset is a set of images, and the names of the images give the labels. For example, the image UTKFace/100_0_0_20170112213500903.jpg.chip.jpg can be interpreted as follows:
- UTKFace/ is a prefix
- 100 is the age
- 0 is the gender (0: male, 1: female)
- 0 is the race (0:White, 1:Black, 2:Asian, 3:Indian, 4:Other)
- The rest is the date and the extension (jpg)
Dataset
The Dataset class must implement 3 functions:
def __init__(self): a function defining the elements of a dataset (like inputs and labels)def __len__(self): a function that returns the number of elementsdef __getitem__(self): a function that returns an item from the dataset
Now, here is how each function is implemented.
INIT
 def __init__(self, image_paths):
        # Define the Transforms
        self.transform = transforms.Compose([transforms.Resize((32, 32)), transforms.ToTensor(), transforms.Normalize([0.485, 0.456, 0.406], [0.229, 0.224, 0.225])])

        # Set Inputs and Labels
        self.image_paths = image_paths
        self.images = []
        self.ages = []
        self.genders = []
        self.races = []

        for path in image_paths:
            filename = path[8:].split("_")
            if len(filename)==4:
                self.images.append(path)
                self.ages.append(int(filename[0]))
                self.genders.append(int(filename[1]))
                self.races.append(int(filename[2]))
In the init function, we define the transforms (data augmentation, conversion to a tensor, etc.) operations.
Then, we go over the image paths and take the elements (e.g., 100, 0, and 0), and add them to lists of labels.
Once we have called the __init__ function, we should have 4 list definitions (images, races, genders, ages).
LEN
This function just returns the number of images.
def __len__(self):
         return len(self.images)
If you didn’t use that, you couldn’t run the training loop for every dataset image. You need the len function because len() doesn’t work with custom classes; it works with lists, arrays, etc., but not custom elements. So you need to redefine it.
GET_ITEM
This function will do all the work you defined in __init__ (e.g., loading an image, calling the transformation, and getting the label). In addition, this function aims to return a specific element of the dataset given an index.
def __getitem__(self, index):
        # Load an Image
        img = Image.open(self.images[index]).convert('RGB')
        # Transform it
        img = self.transform(img)

        # Get the Labels
        age = self.ages[index]
        gender = self.genders[index]
        race = self.races[index]

        # Return the sample of the dataset
        sample = {'image':img, 'age': age, 'gender': gender, 'race':race}
        return sample
Note: In this example, we return it as a dictionary, but you could also return 4 elements (this is Python, after all!)
DataLoaders
Finally, we can have a DataLoader by calling the function:
train_dataloader = DataLoader(UTKFace(train_dataset), shuffle=True, batch_size=BATCH_SIZE)
val_dataloader = DataLoader(UTKFace(valid_dataset), shuffle=False, batch_size=BATCH_SIZE)
Model Definition
Once we have a DataLoader, we can define and train our model with PyTorch.
We could go from scratch, but if you have taken a few Deep Learning courses, you know that we often prefer to use Transfer Learning. This is why we’ll start with a pretrained model that we’ll transform to make it match our problem.
The backbone we’ll use can be anything (e.g., a ResNet, MobileNet, Inception, etc.).
What matters is the end of the network! We want to change the last layer of the pretrained model and, just like transfer learning, adapt it to our problem.
In this case, there are two ways to process:
- Since our case is really simple, we could change the last layer and add 7 neurons: 1 for the gender (binary classification requires one neuron), 5 for the race (as for 5 classes), 1 for the age (a regression requires one neuron)
- Or, we could build heads and have several layers for each.
In the first case, we would have something as simple as this:
self.net = models.resnet18(pretrained=True)
self.net.fc = nn.Linear(model.fc.in_features, 7)
- On Line 1, we download the
resnet18model from PyTorch. - On Line 2, notice that we use
model.fc. The last layer of the pretrained ResNet we download is called “FC” for Fully Connected. We modify that layer by changing the number of neurons. If you had a different model,fccould be named something else.
In the second case, we build heads. For that, we build sequences of layers on top of the existing FC layer.
We will define:
fc1: as the fully connected layer for the agefc2: for the gendersfc3: for the races
Here is the code version:
class HydraNet(nn.Module):
    def __init__(self):
        super().__init__()
        self.net = models.resnet18(pretrained=True)
        self.n_features = self.net.fc.in_features
        self.net.fc = nn.Identity()
        self.net.fc1 = nn.Sequential(OrderedDict([('linear', nn.Linear(self.n_features,self.n_features)),('relu1', nn.ReLU()),('final', nn.Linear(self.n_features, 1))]))
        self.net.fc2 = nn.Sequential(OrderedDict([('linear', nn.Linear(self.n_features,self.n_features)),('relu1', nn.ReLU()),('final', nn.Linear(self.n_features, 1))]))
        self.net.fc3 = nn.Sequential(OrderedDict([('linear', nn.Linear(self.n_features,self.n_features)),('relu1', nn.ReLU()),('final', nn.Linear(self.n_features, 5))]))

    def forward(self, x):
        age_head = self.net.fc1(self.net(x))
        gender_head = self.net.fc2(self.net(x))
        race_head = self.net.fc3(self.net(x))
        return age_head, gender_head, race_head
In the init() function, we define sequential models, which are sequences of layers.
If we consider just the age:
self.net.fc1 = nn.Sequential(OrderedDict([('linear', nn.Linear(self.n_features,self.n_features)),('relu1', nn.ReLU()),('final', nn.Linear(self.n_features, 1))]))
We create a dictionary (we don’t have to, but this is good practice to name layers) with a linear Layer of size (n_features, n_features), followed by a ReLU activation and another linear layer of size (n_features, 1).
Then, in the network:
age_head = self.net.fc1(self.net(x))
Our input goes through the model and then goes through fc1.
We then repeat this for the 2 other heads. Again, the forward function returns the 3 heads, but this time, it could also return one dictionary made of the 3 (just like for the dataset class).
Next, we need to define loss functions and train our model.
Training: Loss Functions
We’ll begin with the loss functions. In Multi-Task Learning, you still have one loss. The difference is that this loss combines all your other losses.
We could have something as simple as:

 : the Age Loss, is a regression loss. For example, Mean Squared Error or Negative Log Likelihood.
 : the Race Loss, is a multi-class classification loss. In our case, it’s Cross-Entropy!
 : the Gender Loss, is a Binary Classification loss. In our case, Binary Cross-Entropy.
There are peculiarities to every type of loss. In the gender case, we want to apply a sigmoid activation in the last layer; but in the Race case, we want to apply a softmax.
Now, here is where it will probably fail:
Consider we must predict an age. If our prediction is 50, but the actual age is 30, we have a loss of 20. If we use Mean Squared Error, our loss becomes (20² = 400).

If we add the classification loss from the genders, it will be a number between 0 and 1.
If we add the two, we’ll end up with a loss affected only by the age error; our losses aren’t on the same scale.
A simple way would be to add coefficients in front of the losses and have an overall loss that has balanced values:

An even better way would be to change our age loss from Mean Squared Error to Loss:

An error of 20 would stay 20, and we can bring it back to a normal scale.
Finally, the training loop.
Training Loop
We are now ready to train our model with PyTorch!
The code will be minimal to “make it work,” just for the training.
net = resnet34(pretrained=True)
model = HydraNet(net).to(device=device)

race_loss = nn.CrossEntropyLoss() # Includes Softmax
gender_loss = nn.BCELoss() # Doesn't include Softmax
age_loss = nn.L1Loss()

optimizer = torch.optim.SGD(model.parameters(), lr=1e-4, momentum=0.09)

Sig = nn.Sigmoid()
All of this is the prelude to our work. We define a model and then:
- The race loss is the Cross-Entropy Loss
- The gender loss is the Binary Cross-Entropy Loss
- The age loss is the Loss
Something to note, for binary classification, we’ll use Binary Cross-Entropy that doesn’t include the softmax. Instead, we’ll use Sigmoid, more suited for this special case.
Finally, the loop:
for epoch in range(n_epochs):
   model.train()
   total_training_loss = 0

    for i, data in enumerate(train_dataloader):
        inputs = data["image"].to(device=device)

        age_label = data["age"].to(device=device)
        gender_label = data["gender"].to(device=device)
        race_label = data["race"].to(device=device)

        optimizer.zero_grad()

        age_output, gender_output, race_output = model(inputs)
        loss_1 = race_loss(race_output, race_label)
        loss_2 = gender_loss(sig(gender_output), gender_label.unsqueeze(1).float())
        loss_3 = age_loss(age_output, age_label.unsqueeze(1).float())
        loss = loss_1 + loss_2 + loss_3
        loss.backward()
        optimizer.step()
        total_training_loss += loss
Then the same goes for validation.
The model will train for a number of epochs, and the loss will be optimized.
Once the model is trained, we can use it for inference and predict our 3 values for any input face!
What's next? I recommend PyImageSearch University.
45+ total classes • 39h 44m video • Last updated: July 2022
★★★★★ 4.84 (128 Ratings) • 15,800+ Students Enrolled
I strongly believe that if you had the right teacher you could master computer vision and deep learning.
Do you think learning computer vision and deep learning has to be time-consuming, overwhelming, and complicated? Or has to involve complex mathematics and equations? Or requires a degree in computer science?
That’s not the case.
All you need to master computer vision and deep learning is for someone to explain things to you in simple, intuitive terms. And that’s exactly what I do. My mission is to change education and how complex Artificial Intelligence topics are taught.
If you're serious about learning computer vision, your next stop should be PyImageSearch University, the most comprehensive computer vision, deep learning, and OpenCV course online today. Here you’ll learn how to successfully and confidently apply computer vision to your work, research, and projects. Join me in computer vision mastery.
Inside PyImageSearch University you'll find:
- ✓ 45+ courses on essential computer vision, deep learning, and OpenCV topics
- ✓ 45+ Certificates of Completion
- ✓ 52+ hours of on-demand video
- ✓ Brand new courses released regularly, ensuring you can keep up with state-of-the-art techniques
- ✓ Pre-configured Jupyter Notebooks in Google Colab
- ✓ Run all code examples in your web browser — works on Windows, macOS, and Linux (no dev environment configuration required!)
- ✓ Access to centralized code repos for all 450+ tutorials on PyImageSearch
- ✓ Easy one-click downloads for code, datasets, pre-trained models, etc.
- ✓ Access on mobile, laptop, desktop, etc.
Conclusion
Multi-Task Learning is one of the most promising techniques in Deep Learning. Many researchers consider it the future of Artificial Intelligence.
It solves an important speed and memory problem (stacking 20 models can’t be good for your RAM and GPU) and has TONS of benefits when training several tasks. For example, in Computer Vision, researchers noted that co-training specific tasks had better advantages than not training them. Just like learning to play tennis, it makes you very good at Ping-Pong!
If you want to apply these concepts, I recommend PyImageSearch University, which contains a HydraNets course for Computer Vision.
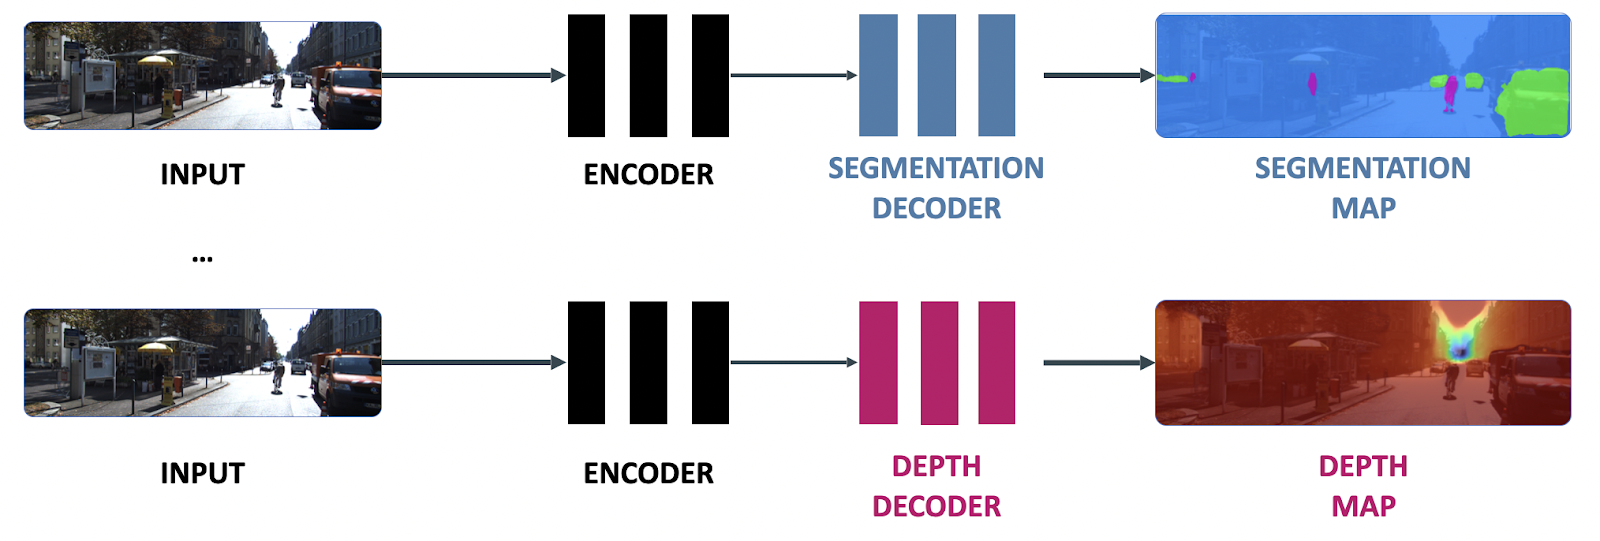
In fact, we go much further than this and apply this to semantic segmentation and depth estimation for self-driving cars.
Here is a preview of what you’ll do:

To enroll: PyImageSearch University
This article was written by Jérémy Cohen from Think Autonomous. Jérémy has been teaching thousands of engineers how to work in cutting-edge fields such as self-driving cars or Advanced Computer Vision through his daily emails and online courses. You can subscribe to Jérémy’s email and read them at https://www.thinkautonomous.ai/py.
Citation Information
Cohen, J. “Multi-Task Learning and HydraNets with PyTorch,” PyImageSearch, P. Chugh, A. R. Gosthipaty, S. Huot, and R. Raha, eds., 2022, https://pyimg.co/hdkl7
@incollection{Cohen_2022_HydraNets,
  author = {Jeremy Cohen},
  title = {Multi-Task Learning and HydraNets with PyTorch},
  booktitle = {PyImageSearch},
  editor = {Puneet Chugh and Aritra Roy Gosthipaty and Susan Huot and Ritwik Raha},  year = {2022},
  note = {https://pyimg.co/hdkl7},
}

Join the PyImageSearch Newsletter and Grab My FREE 17-page Resource Guide PDF
Enter your email address below to join the PyImageSearch Newsletter and download my FREE 17-page Resource Guide PDF on Computer Vision, OpenCV, and Deep Learning.
The post Multi-Task Learning and HydraNets with PyTorch appeared first on PyImageSearch.
August 17, 2022 at 06:30PM
Click here for more details...
=============================
The original post is available in PyImageSearch by Jeremy Cohen
this post has been published as it is through automation. Automation script brings all the top bloggers post under a single umbrella.
The purpose of this blog, Follow the top Salesforce bloggers and collect all blogs in a single place through automation.
============================


Post a Comment