Breaking the CNN Mold: YOLOv12 Brings Attention to Real-Time Object Detection : Vikram Singh
by: Vikram Singh
blow post content copied from PyImageSearch
click here to view original post
Table of Contents
- Breaking the CNN Mold: YOLOv12 Brings Attention to Real-Time Object Detection
- The YOLO Evolution (Quick Recap)
- YOLOv8: Introducing the C2f Module and OBB Support
- YOLOv9: Programmable Gradient Information and GELAN
- YOLOv10: NMS-Free Training and Dual Assignments
- YOLOv11: Enhanced Speed with C3K2 Blocks and Official OBB Support
- Limitations of YOLOv8 to YOLOv11
- Why YOLO Avoided Attention (Until Now)
- What’s New in YOLOv12?
- Area Attention: Local Efficiency, Global Awareness
- R-ELAN: Making Attention Models Trainable
- FlashAttention: Fixing the Latency Bottleneck
- Other Architecture Improvements
- Recap: YOLOv12’s Key Innovations
- Supported Tasks
- Limitations of YOLOv12
- Configuring Your Development Environment
- Running YOLOv12 Inference
- Supported Hardware (FlashAttention vs. Not)
- Method 1: Running YOLOv12 from the Official Repo with FlashAttention on NVIDIA GPU
- Clone the YOLOv12 Repository
- Step 2: Switch to the Correct Branch
- Set Up a Conda Environment
- Download the FlashAttention.whl File
- Install Dependencies
- Install the YOLOv12 Package
- Run the YOLOv12 Gradio App
- Running YOLOv12 via Python Code (Without Gradio)
- Running YOLOv12 via CLI
- Object Detection Results and CLI Logs
- Troubleshooting Common Errors (Gradio)
- Running YOLOv12 with Ultralytics: A Simplified Approach to Fast Inference
- Insights and Performance Notes
- Performance Benchmarks
- Summary
Breaking the CNN Mold: YOLOv12 Brings Attention to Real-Time Object Detection
In this tutorial, you will learn what makes YOLOv12 a groundbreaking leap in the YOLO series. We’ll explore how it moves beyond traditional CNN-based architectures by integrating attention mechanisms without sacrificing speed. You’ll also run the YOLOv12 inference step-by-step to gain hands-on experience with its architecture and outputs.
This lesson is the 1st of a 3-part series on YOLOv12:
- Breaking the CNN Mold: YOLOv12 Brings Attention to Real-Time Object Detection (this tutorial)
- Lesson 2
- Lesson 3
To learn how to run YOLOv12 inference and understand the attention-powered upgrades under the hood, just keep reading.
The YOLO Evolution (Quick Recap)
The YOLO (You Only Look Once) series has consistently advanced real-time object detection, striking a balance between speed and accuracy. From YOLOv8 to YOLOv11, each iteration brought architectural enhancements to optimize performance.
YOLOv8: Introducing the C2f Module and OBB Support
YOLOv8 marked a significant shift by incorporating the C2f (Convolutional to Fused) module. This design splits feature maps, processes them through bottleneck layers, and then fuses them, enhancing multi-scale feature learning and expanding the receptive field without increasing computational complexity.
Additionally, YOLOv8.1 introduced support for Oriented Bounding Boxes (OBB), enabling the detection of rotated objects, which is particularly useful in applications (e.g., aerial imagery and document analysis).
YOLOv9: Programmable Gradient Information and GELAN
Building upon YOLOv8, YOLOv9 introduced two major innovations:
- Programmable Gradient Information (PGI): A technique to preserve input information throughout the network, ensuring reliable gradient flow and improving training efficiency.
- Generalized Efficient Layer Aggregation Network (GELAN): An architecture designed to maximize parameter utilization and computational efficiency, leading to superior performance even in lightweight models.
OBB support was also extended in the YOLOv9u variant, which is based on Ultralytics’ implementation.
YOLOv10: NMS-Free Training and Dual Assignments
YOLOv10 addressed the limitations of Non-Maximum Suppression (NMS) by introducing:
- Consistent Dual Assignments: A strategy combining one-to-one and one-to-many label assignments during training, eliminating the need for NMS and reducing inference latency.
- Efficiency-Accuracy Driven Design: Comprehensive optimization of model components to enhance performance while minimizing computational overhead.
While not officially documented, community discussions indicate that OBB support was implemented in certain forks or variants of YOLOv10.
YOLOv11: Enhanced Speed with C3K2 Blocks and Official OBB Support
The final CNN-based iteration, YOLOv11, focused on speed and efficiency by:
- C3K2 Modules: Replacing previous blocks with structures utilizing smaller kernel convolutions, improving feature representation with fewer parameters.
- Depthwise Separable Convolutions: Reducing computational load while maintaining accuracy.
YOLOv11 officially includes OBB detection with pretrained models available (e.g., yolo11n-obb.pt), trained on datasets (e.g., DOTAv1).
Want to dive deeper into YOLOv11? Check out our full tutorial on PyImageSearch: Getting Started with YOLOv11.
Limitations of YOLOv8 to YOLOv11
Despite these advancements, YOLOv8 through YOLOv11 shared common limitations:
- CNN-Centric Architectures: All models relied heavily on convolutional neural networks (CNNs) without integrating attention mechanisms.
- Lack of Attention Mechanisms: The absence of attention modules limited the models’ ability to capture global context, affecting performance in complex scenes.
These constraints set the stage for YOLOv12, which aims to overcome these challenges by integrating attention mechanisms, all while maintaining real-time performance.
Why YOLO Avoided Attention (Until Now)
If attention mechanisms have proven so powerful — especially in models like ViT (vision transformers) and DETR (detection transformers) — why did none of the previous YOLO models use them?
Simple — they were too slow.
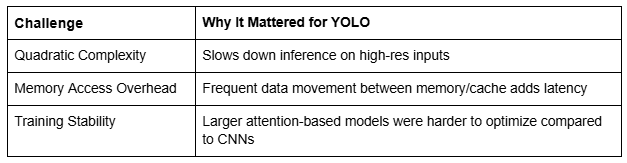
Attention mechanisms are notoriously resource-intensive, especially when applied to high-resolution inputs. Unlike convolutional operations, which scale linearly with input size, self-attention scales quadratically. For real-time detection tasks, this is a deal-breaker.
But computational cost isn’t the only issue. Attention-based models also suffer from inefficient memory access patterns. During inference, attention maps frequently need to move between the high-speed GPU cache and main memory, slowing things down even more. CNNs, on the other hand, benefit from localized operations and structured memory access, giving them a speed advantage on modern hardware.
This made it nearly impossible for attention mechanisms to meet the low-latency demands of YOLO’s real-time design philosophy.
CNN-based architectures outperform attention-based ones by a factor of
Tian et al., YOLOv12: Attention-Centric Real-Time Object Detectors, 20253×…, which significantly limits the adoption of attention mechanisms in YOLO systems where high inference speed is critical.
The Bottlenecks at a Glance
YOLOv12: A New Solution
In their 2025 technical report, “YOLOv12: Attention-Centric Real-Time Object Detectors,” Yunjie Tian, Qixiang Ye, and David Doermann propose a bold rethinking of the YOLO architecture. For the first time in the series, attention mechanisms are made central to the model without compromising on speed.
YOLOv12 tackles these bottlenecks head-on. With innovations like Area Attention (a more efficient form of local attention), FlashAttention (optimized memory access), and a residual architecture tailored for stability, attention finally becomes viable in real-time detection.
We’ll dig into those in the next section.
What’s New in YOLOv12?
YOLOv12 is more than just the next iteration in the YOLO family — it’s a bold rethinking of the architecture. For the first time, the YOLO framework shifts from being purely CNN-based to embracing an attention-centric design, all without compromising the real-time performance for which the series is known.
Here’s a closer look at the innovations that make YOLOv12 stand apart.
Area Attention: Local Efficiency, Global Awareness
Traditional self-attention is powerful but expensive. Its quadratic complexity makes it difficult to scale, especially when dealing with high-resolution images or real-time constraints.
YOLOv12 addresses this challenge with a novel attention mechanism called Area Attention (A²).
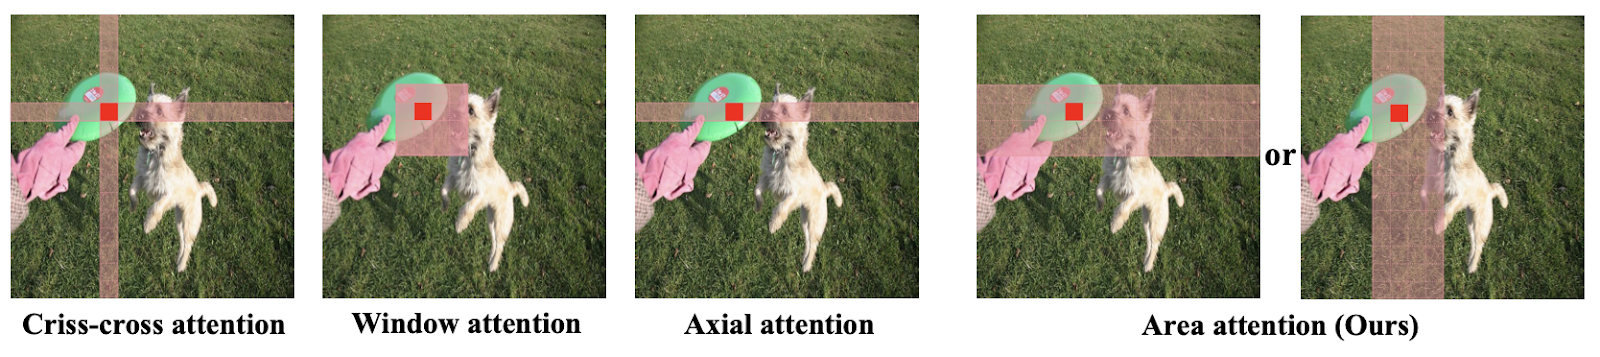
Instead of computing attention globally (as in ViTs), Area Attention splits the input feature map into equal-sized segments along horizontal or vertical directions — usually into 4 parts. Attention is then applied within each of these local “areas.”
This brings two big benefits:
- Maintains a large receptive field, which is crucial for object detection
- Reduces complexity by
 50%, making it fast enough for real-time use
Despite the complexity n², this [Area Attention] is still efficient enough to meet the real-time requirements… has only a slight impact on performance.
— Tian et al., 2025, Section 3.2
R-ELAN: Making Attention Models Trainable
Before we discuss R-ELAN, it’s helpful to understand its origins.
What Is ELAN?
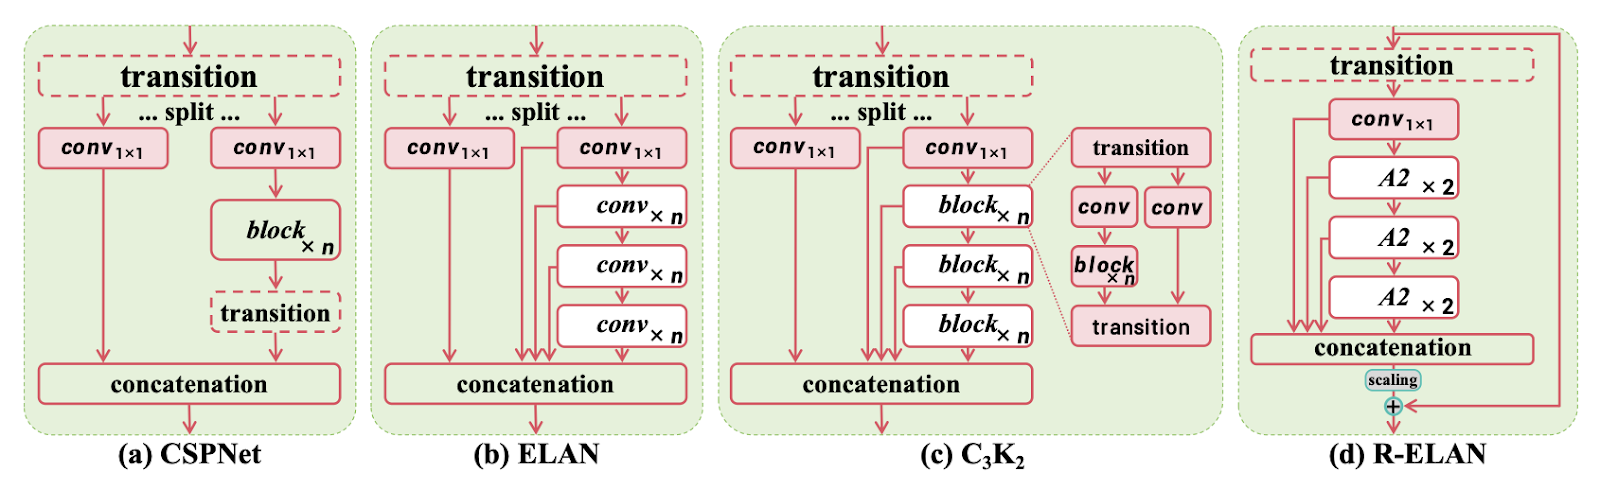
ELAN (Efficient Layer Aggregation Network) was first introduced in YOLOv7 to improve feature aggregation. It works by:
- Splitting feature maps into multiple branches
- Passing each through a series of convolutional blocks
- Concatenating the outputs and merging them with a final transition layer
This design enhances learning capacity without increasing network depth, and it has become foundational to later modules (e.g., GELAN in YOLOv9 and C3K2 in YOLOv11).
But ELAN Had Issues…
While ELAN worked well with CNNs, it didn’t translate smoothly into attention-based architectures:
- No residual connections meant weak gradient flow in deep stacks
- Instability in larger models (especially L/X variants)
- Overhead from too many transitions and splits
Empirically, L- and X-scale models either fail to converge or remain unstable, even when using Adam or AdamW optimizers.
—Tian et al., 2025, Section 3.3
Enter R-ELAN: Residual Efficient Layer Aggregation Network
To fix this, YOLOv12 introduces R-ELAN, which modifies the structure in two key ways:
- Residual Connections with Scaling: A shortcut connection is added from the input to the output of each block using a small scaling factor (default = 0.01). This dramatically improves convergence, especially for deep attention-based networks.
- Simplified Aggregation: Instead of splitting and transitioning multiple times like ELAN, R-ELAN:
- Uses a single transition layer to standardize input channels
- Passes through attention/convolutional blocks
- Concatenates only once, reducing memory and compute
This approach not only preserves the original feature integration capability, but also reduces both computational cost and parameter / memory usage.
—Tian et al., 2025, Section 3.3
FlashAttention: Fixing the Latency Bottleneck
Even with simplified attention mechanisms, memory access remains a major bottleneck.
Enter FlashAttention — a custom kernel-level optimization that reduces memory overhead during attention computation. Instead of repeatedly moving data between the GPU cache and main memory, FlashAttention optimizes this flow, significantly reducing latency.
Key Benefit
YOLOv12-N becomes  0.3ms faster, and YOLOv12-S saves 0.4ms per image when FlashAttention is enabled (see Tian et al., 2025, Table 5h).
FlashAttention accelerates YOLOv12-N by approximately 0.3ms and YOLOv12-S by around 0.4ms without other costs.
—Tian et al., 2025, Section 4.5
FlashAttention plays a significant role in how YOLOv12 achieves real-time inference, even with attention layers in place.
Other Architecture Improvements
YOLOv12 goes beyond just plugging in attention. The model’s architecture has been fine-tuned in several key ways:
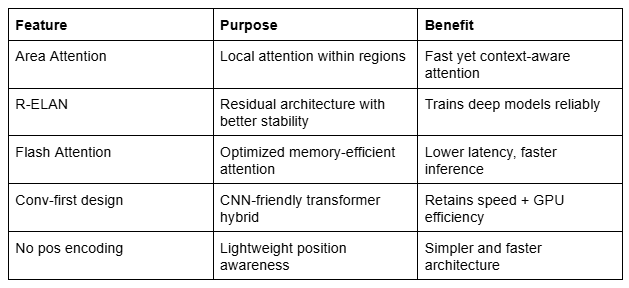
- MLP Ratio Tweaked: Traditional transformer blocks use a feed-forward network (FFN) with a 4:1 hidden dimension ratio. YOLOv12 reduces this to 1.2 or 2.0, reallocating more compute to the attention layers.
- Conv+BN Instead of Linear+LN: Instead of using fully connected layers and layer normalization (common in ViTs), YOLOv12 favors convolution + batch normalization, which improves both performance and GPU efficiency.
- No Positional Embeddings: YOLOv12 removes positional encoding entirely and uses a 7×7 separable convolution (“Position Perceiver”) to inject spatial information in a more lightweight and interpretable way.
- Hierarchical Design Retained: Unlike plain transformer backbones, YOLOv12 keeps the multi-stage, hierarchical structure seen in previous YOLOs. This enables the model to process both low-level and high-level features at varying depths, which is crucial for detecting both small and large objects alike.
These changes collectively ensure that YOLOv12 feels familiar to users of CNN-based models while gaining the flexibility and expressiveness of transformer-style models.
Recap: YOLOv12’s Key Innovations
Supported Tasks
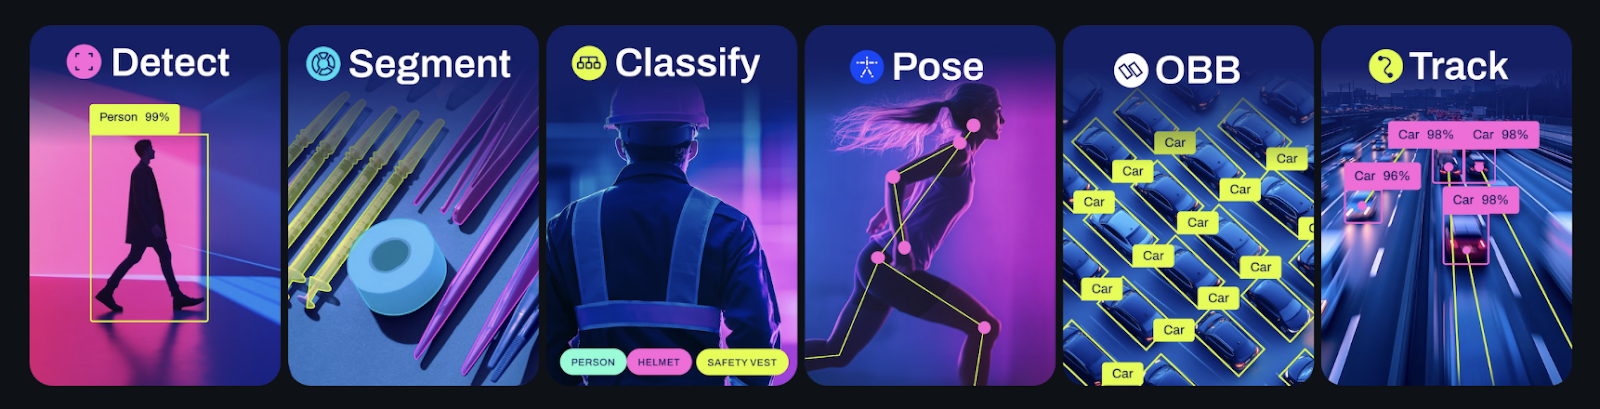
YOLOv12 is designed to handle a wide range of computer vision tasks with high efficiency and accuracy, just like previous YOLO versions (e.g., YOLOv11, YOLOv8). YOLOv12 supports all similar tasks like:
- Object Detection: Detects and locates objects within an image.
- Instance Segmentation: Identify and segment individual objects in an image.
- Image Classification: Assign a label to the entire image based on its content.
- Pose/Keypoints Estimation: Detect key points of interest in humans or objects to estimate pose.
- Oriented Object Detection: Detect objects with orientation angles (e.g., rotated bounding boxes).
- Multi-Object Tracking: Available for Detect, Segment, and Pose models, enabling real-time tracking of objects across frames.
Limitations of YOLOv12
While YOLOv12 delivers exceptional performance gains, it’s not without caveats.
The model’s speed advantage is tightly linked to FlashAttention, a memory-efficient implementation that significantly reduces attention latency. However, this technique is only supported on newer GPU architectures such as the following:
- NVIDIA T4
- RTX 20/30/40 series
- A-series (A5000, A6000, A100)
- H100 (Hopper)
On older GPUs (e.g., GTX 1080 or lower-end mobile GPUs), FlashAttention won’t work. YOLOv12 falls back to standard attention kernels, losing much of its real-time inference advantage. It’ll still work — but it won’t be nearly as fast.
Configuring Your Development Environment
To get started with YOLOv12 and follow along with this guide, we’ll walk through how to set up your environment for two methods:
- Method 1: Running YOLOv12 directly from the official GitHub repo, which comes with FlashAttention support (we’ll go through this in the next section).
- Method 2: Running YOLOv12 using the Ultralytics library, which is quick to install and runs well even on older hardware. By default, it does not include FlashAttention, but it will still work fine without it, especially if you’re not using a modern GPU.
Installing YOLOv12 via Ultralytics
The simplest way to get YOLOv12 up and running is by installing the Ultralytics library, which simplifies the process of using YOLO models for computer vision tasks.
To install the Ultralytics library, run:
$ pip install ultralytics
This will install the latest YOLO model from Ultralytics, and you’ll be able to use YOLOv12 out of the box. It works without FlashAttention, so you don’t need to worry about GPU compatibility if you have an older GPU or if you just want to get started quickly.
Installing YOLOv12 via GitHub (Method 1)
In the next section, we’ll walk through installing YOLOv12 from the official GitHub repo. This method comes with FlashAttention support, which significantly improves inference speed by optimizing memory access on supported GPUs (e.g., A100, T4, and other modern NVIDIA GPUs).
Need Help Configuring Your Development Environment?
All that said, are you:
- Short on time?
- Learning on your employer’s administratively locked system?
- Wanting to skip the hassle of fighting with the command line, package managers, and virtual environments?
- Ready to run the code immediately on your Windows, macOS, or Linux system?
Then join PyImageSearch University today!
Gain access to Jupyter Notebooks for this tutorial and other PyImageSearch guides pre-configured to run on Google Colab’s ecosystem right in your web browser! No installation required.
And best of all, these Jupyter Notebooks will run on Windows, macOS, and Linux!
Running YOLOv12 Inference
Now that we know what makes YOLOv12 unique, it’s time to run some inference and see how it performs. In this section, we’ll go over two ways to run YOLOv12, depending on your hardware and setup:
- Method 1: Running YOLOv12 directly from the official GitHub repo with FlashAttention support
- Method 2: Running YOLOv12 with the Ultralytics library, which doesn’t have FlashAttention by default but still provides great performance
Supported Hardware (FlashAttention vs. Not)
Before we dive into the setup, let’s clarify the hardware requirements:
- With FlashAttention: To leverage the full power of YOLOv12’s attention mechanisms, you’ll need modern GPUs (e.g., NVIDIA T4, A100, 3090, RTX 30/40 series).
- Without FlashAttention: YOLOv12 will still work on older GPUs or CPUs, but without the speedups provided by FlashAttention. On these devices, inference will be slower due to the fallback to standard attention.
FlashAttention optimizes memory access and speeds up inference by keeping data in the GPU’s high-speed memory, but it’s only supported on Turing and later GPUs.
In this lesson, we will use the A100 GPU, which supports FlashAttention, to showcase the full performance potential of YOLOv12.
Method 1: Running YOLOv12 from the Official Repo with FlashAttention on NVIDIA GPU
In this method, we’ll run YOLOv12 directly from the official GitHub repo, which has FlashAttention built-in (if your hardware supports it). For this demo, we’ll be using an NVIDIA A100 GPU, which is fully compatible with FlashAttention. This method involves setting up everything as specified in the official repo, running the Gradio app, and then demonstrating how to run YOLOv12 directly via Python and CLI without the Gradio UI.
Clone the YOLOv12 Repository
To start, clone the official YOLOv12 repository from GitHub:
git clone https://github.com/sunsmarterjie/yolov12.git
cd yolov12
Step 2: Switch to the Correct Branch
Since the v1.0 branch contains the necessary updates for FlashAttention and the correct model behavior, we need to switch to it before continuing.
git checkout v1.0
This ensures that you are working with the correct version of the code (before YOLOv12 turbo was released) that is compatible with FlashAttention and optimized for performance.
Set Up a Conda Environment
It’s recommended to use a conda environment for YOLOv12 to ensure compatibility. If you don’t already have conda installed, you can get it from the Anaconda website.
Create a new conda environment with Python 3.11:
conda create -n yolov12 python=3.11
conda activate yolov12
Download the FlashAttention.whl File
Since requirements.txt references a FlashAttention .whl file, you need to download it manually:
wget https://github.com/Dao-AILab/flash-attention/releases/download/v2.7.3/flash_attn-2.7.3+cu11torch2.2cxx11abiFALSE-cp311-cp311-linux_x86_64.whl
Install Dependencies
Now, you can install the required dependencies listed in requirements.txt:
pip install -r requirements.txt
Install the YOLOv12 Package
After installing the dependencies, install the YOLOv12 package in editable mode to ensure proper setup of the Ultralytics components:
pip install -e .
This step is crucial because it installs the Ultralytics package in editable mode. This allows you to make real-time modifications to the code without needing to reinstall the package each time. The -e flag tells pip to install the package in “editable” mode, meaning any changes made to the source code will be immediately reflected in the installed package.
By installing Ultralytics in editable mode, you ensure that the repository is set up for development, and any changes made to the code will be reflected without requiring reinstallation. This is especially useful if you want to make modifications or updates to the YOLOv12 model and test them in real-time.
However, this step can also be avoided, and your application should still function as is, apart from one or two packages needing to be installed manually (e.g., ultralytics-thop).
Run the YOLOv12 Gradio App
To run the YOLOv12 Gradio demo, simply execute app.py:
python app.py
This command will start the Gradio interface, which you can access through the local or public URL generated by Gradio (the link will be output in the terminal).
- Local URL:
http://127.0.0.1:7860 - Public URL: This will be provided if you’re running on a server or cloud, allowing access from external devices.
Running YOLOv12 via Python Code (Without Gradio)
In addition to running the Gradio app, you can run YOLOv12 directly using Python code. This approach can be more efficient, especially when you want to bypass the overhead introduced by Gradio.
Here’s the code to run YOLOv12 inference using the Ultralytics package (from the YOLOv12 author’s folder):
from ultralytics import YOLO

import cv2
import matplotlib.pyplot as plt

# Load the model (Ensure you're using the correct model path)
model = YOLO("yolov12s.pt")

# Predict with the model
results = model.predict("https://ultralytics.com/images/bus.jpg", device="cuda:0", imgsz=320, conf=0.5)

# Visualize predictions
result_image = results[0].plot()

# Save using OpenCV
cv2.imwrite("output.jpg", result_image_bgr)

# Optionally: Show the image
plt.imshow(result_image)
plt.axis('off')
plt.show()
The model.predict() function processes an image URL (can be a local path, too) and performs inference on the image using the YOLOv12 model. The device="cuda:0" specifies that the A100 GPU is being used. The image size and confidence threshold can be adjusted as needed.
Running YOLOv12 via CLI
Alternatively, if you prefer running inference via the CLI (command line interface), you can use the following YOLO CLI from within the YOLOv12 repo directory:
yolo detect predict model=yolov12s.pt source=path_to_image.jpg
This command runs YOLOv12 on the specified image file, eliminating the need to write any Python code.
Object Detection Results and CLI Logs
Once the Gradio interface is up, you can use the default examples provided by the authors to run object detection, or you can upload your own images. Here’s what you can expect when you run the inference:
- Gradio UI: After uploading an image, the YOLOv12 model processes the image and returns the detected objects, along with their bounding boxes and confidence scores.
- CLI Output: Alongside the Gradio UI, you’ll also see CLI logs that detail the inference process, including speed and processing times. For example:
* Running on local URL:  http://127.0.0.1:7860
* Running on public URL: https://e6a32ce70052250cb7.gradio.live

Downloading https://github.com/sunsmarterjie/yolov12/releases/download/turbo/yolov12s.pt to 'yolov12s.pt'...
100%|████████████████████████████████████████████████████████████████████████████████████████████████████████████████████████████████████████████████████| 17.8M/17.8M [00:05<00:00, 3.31MB/s]

0: 640x480 4 persons, 1 bus, 115.9ms
Speed: 3.1ms preprocess, 115.9ms inference, 121.3ms postprocess per image at shape (1, 3, 640, 480)
The inference time (e.g., 115.9ms) and processing time are shown for each image processed, including:
- Preprocess Time: The time taken to preprocess the image before running inference.
- Inference Time: The time taken to run the model.
- Postprocess Time: The time taken to draw bounding boxes and handle post-processing.
However, the inference time of 115.9ms seems relatively high, especially when running on a powerful GPU such as the NVIDIA A100 with FlashAttention support. This is likely due to the fact that the Gradio app is running inference on a single image, which introduces additional overhead. While this setup works well for quick testing, it may not fully utilize the GPU’s potential and FlashAttention optimizations. In the next section, we’ll dive into insights from our tests and provide more details on GPU utilization and FlashAttention performance improvements when using YOLOv12 directly via Python or CLI.
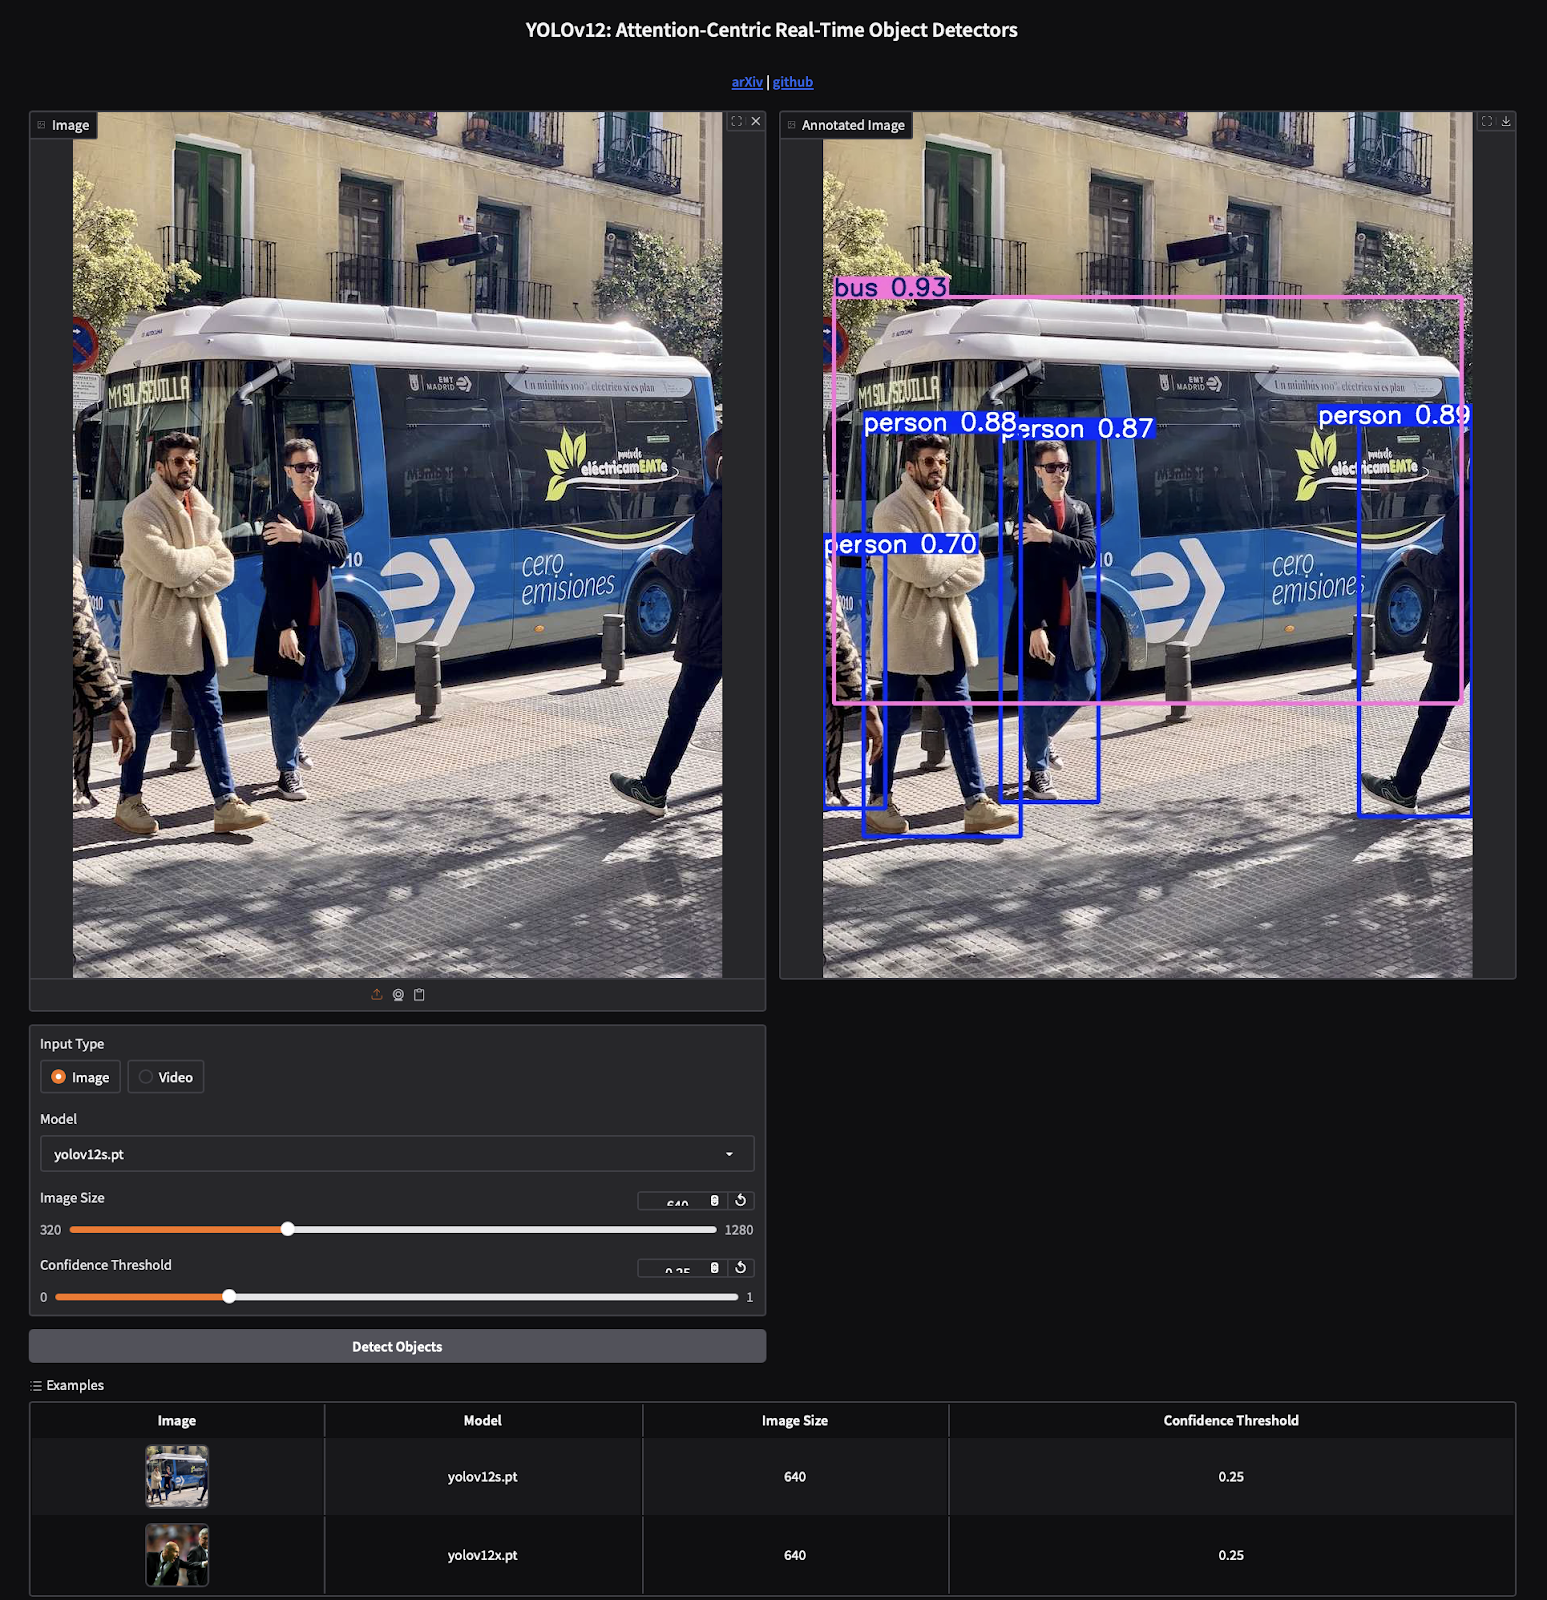
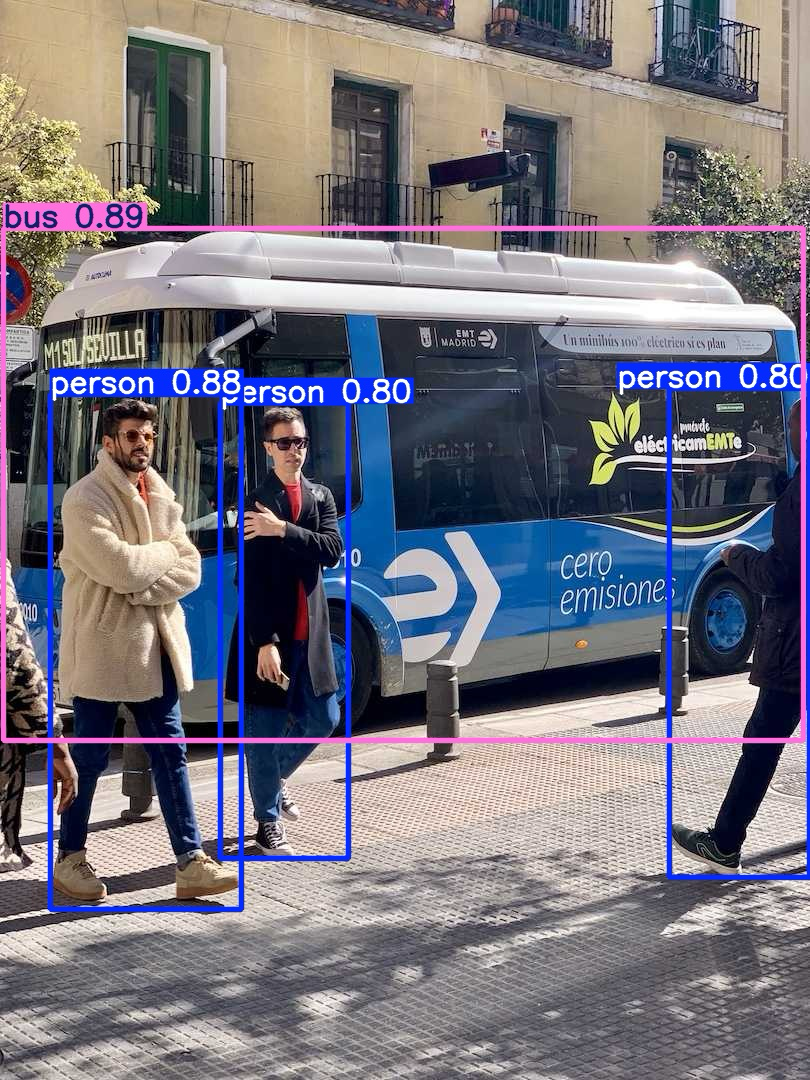
yolov12x.pt model. The annotated output (right) displays accurate predictions for people and a bus with high confidence scores, highlighting YOLOv12’s attention-centric architecture and seamless integration with Gradio for interactive visualization (source: image by the author).In the screenshot above, you can see the Gradio interface for running YOLOv12 object detection. On the left, the user uploads an image of a bus with pedestrians. On the right, the annotated image displays the detected objects along with their respective confidence scores.
- The confidence threshold slider at the bottom allows users to adjust the minimum confidence level for detections.
- The model selection dropdown ensures you’re using the correct YOLOv12 model (e.g.,
yolov12.pt). - As shown, the detection results include class labels and confidence values, with bounding boxes drawn around the detected objects (e.g., the bus and people).
This interactive interface makes it easy to visualize the power of YOLOv12 for real-time object detection tasks, whether you’re working with static images or videos.
Troubleshooting Common Errors (Gradio)
While running YOLOv12 using Gradio, you might encounter a few common issues. Here’s how to resolve them:
Issue 1: Shareable Link Error
If you’re running YOLOv12 on a server, you may encounter the following error:
TypeError: argument of type 'bool' is not iterable
This occurs because Gradio expects a shareable link when running in non-local environments. To fix this, ensure you set share=True when launching the Gradio app:
if __name__ == '__main__':
    gradio_app.launch(share=True)
Issue 2: Upgrade Gradio and Gradio Client
If the above solutions don’t work, you may be using an outdated version of Gradio. To fix this, upgrade both Gradio and Gradio Client to the latest versions:
pip install --upgrade gradio gradio-client
After upgrading from Gradio 4.44.1 to Gradio 5.25.2 and Gradio Client 1.3.0 to 1.8.0, the issues were resolved, and YOLOv12 ran successfully.
Running YOLOv12 with Ultralytics: A Simplified Approach to Fast Inference
In Method 2, we will run YOLOv12 using the Ultralytics library, which offers a simpler setup and integration compared to the official YOLOv12 repo. Ultralytics offers an intuitive interface for YOLO models, simplifying GPU usage, although FlashAttention is not enabled by default. Even without FlashAttention, Ultralytics offers excellent performance, especially for users who need a quick setup.
Install the Ultralytics Library
To get started, install the Ultralytics library using the following command:
pip install ultralytics
This will install the Ultralytics package from the official PyPI (Python Package Index) repository. Unlike Method 1, which uses the YOLOv12 author’s package, this method uses the standard Ultralytics package.
Run YOLOv12 Inference via Python Code
Once Ultralytics is installed, you can run YOLOv12 inference with the following Python code:
from ultralytics import YOLO
import matplotlib.pyplot as plt

# Load the model
model = YOLO("yolov12s.pt")

# Predict with the model
results = model.predict("https://ultralytics.com/images/bus.jpg", device="cuda:0", imgsz=320, conf=0.5)

# Visualize predictions
result_image = results[0].plot()

# Save the image
plt.imsave("output.png", result_image)

# Optionally: Show the image
plt.imshow(result_image)
plt.axis('off')
plt.show()
Important Note: When using Ultralytics via pip install ultralytics, ensure that you are not inside the YOLOv12 repository that you cloned from GitHub earlier. If you are inside the cloned repo, Python will import the YOLOv12 author’s custom Ultralytics folder, which may include experimental modifications (e.g., FlashAttention). Running this code inside the cloned repo will instead use the author’s version of Ultralytics, so ensure you are outside the cloned repo directory when using the standard Ultralytics package.
Insights and Performance Notes
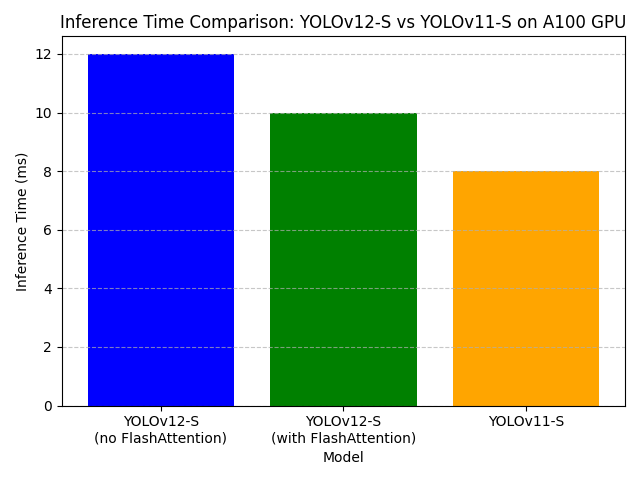
- Inference Performance: Running YOLOv12 with the Ultralytics library without FlashAttention typically results in inference times of around 12-13ms per image (on A100 GPU). The results are similar to Method 1, but without FlashAttention, the performance is slightly slower than the 10ms achieved with FlashAttention enabled.
- No FlashAttention: The major difference between Method 1 and Method 2 is that FlashAttention is not enabled by default in Ultralytics. As a result, inference times are slightly higher (around 12-13ms) but still very fast compared to other methods (e.g., YOLOv11). YOLOv12-S achieves inference times of 12ms, which is quite close to YOLOv11-S’s 7.8ms.
- GPU Utilization: Even without FlashAttention, Ultralytics provides excellent GPU utilization, especially on modern GPUs (e.g., the A100). However, FlashAttention can be manually enabled to achieve faster inference.
- Comparison with YOLOv11: YOLOv11-S has an inference time of 7.8ms, while YOLOv12-S without FlashAttention is around 12-13ms. With FlashAttention enabled, YOLOv12-S can achieve 10ms inference, which is quite close to YOLOv11-S in terms of speed.
Performance Benchmarks
Now, let’s dive into the performance benchmarks for YOLOv12, including key metrics (e.g., mean average precision (mAP), latency, and the number of parameters for different model scales). We will also compare YOLOv12’s performance to that of previous models (e.g., YOLOv10, YOLOv11, and RT-DETR).
mAP, Latency, and Parameters Across Scales (N/S/M/L/X)
The YOLOv12 model comes in various sizes, each optimized for different use cases, ranging from nano to extra-large models. Here’s a breakdown of the key metrics for mAP, latency, and parameters across the various scales:
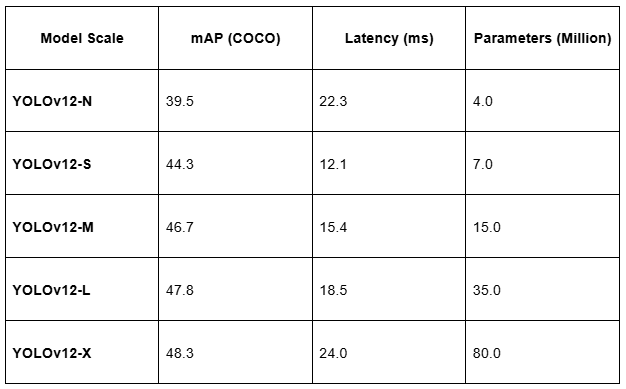
- mAP (mean average precision) is a key performance metric that indicates how accurately the model detects objects across different classes.
- Latency refers to the inference time per image. As we can see, smaller models (e.g., YOLOv12-N) are faster but slightly less accurate, while larger models (e.g., YOLOv12-X) are more accurate but slower.
- Parameters indicate the model size, where larger models (e.g., YOLOv12-X) contain more parameters, resulting in increased computational requirements but higher accuracy.
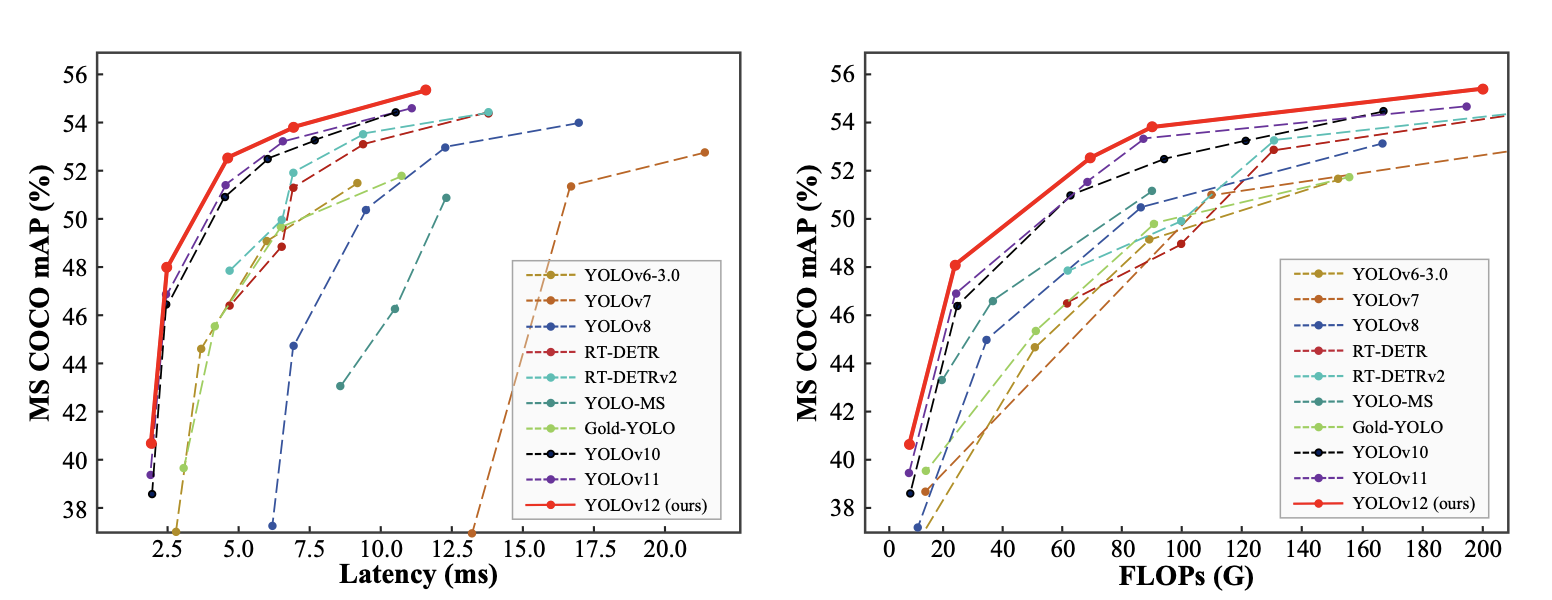
Latency vs. Accuracy
The following chart plots latency versus accuracy for different YOLOv12 scales. It visually demonstrates the trade-off between model size and performance:
- Smaller models (e.g., YOLOv12-N) have lower latency but suffer from slightly lower accuracy (mAP).
- Larger models (e.g., YOLOv12-X) have higher accuracy, but the latency is also higher due to the increased number of parameters.
What's next? We recommend PyImageSearch University.
86+ total classes • 115+ hours hours of on-demand code walkthrough videos • Last updated: July 2025
★★★★★ 4.84 (128 Ratings) • 16,000+ Students Enrolled
I strongly believe that if you had the right teacher you could master computer vision and deep learning.
Do you think learning computer vision and deep learning has to be time-consuming, overwhelming, and complicated? Or has to involve complex mathematics and equations? Or requires a degree in computer science?
That’s not the case.
All you need to master computer vision and deep learning is for someone to explain things to you in simple, intuitive terms. And that’s exactly what I do. My mission is to change education and how complex Artificial Intelligence topics are taught.
If you're serious about learning computer vision, your next stop should be PyImageSearch University, the most comprehensive computer vision, deep learning, and OpenCV course online today. Here you’ll learn how to successfully and confidently apply computer vision to your work, research, and projects. Join me in computer vision mastery.
Inside PyImageSearch University you'll find:
- ✓ 86+ courses on essential computer vision, deep learning, and OpenCV topics
- ✓ 86 Certificates of Completion
- ✓ 115+ hours hours of on-demand video
- ✓ Brand new courses released regularly, ensuring you can keep up with state-of-the-art techniques
- ✓ Pre-configured Jupyter Notebooks in Google Colab
- ✓ Run all code examples in your web browser — works on Windows, macOS, and Linux (no dev environment configuration required!)
- ✓ Access to centralized code repos for all 540+ tutorials on PyImageSearch
- ✓ Easy one-click downloads for code, datasets, pre-trained models, etc.
- ✓ Access on mobile, laptop, desktop, etc.
Summary
In this post, we explored the innovative features of YOLOv12, the latest iteration of the You Only Look Once (YOLO) family. YOLOv12 introduces key advancements, such as RE-LAN (Residual Efficient Layer Aggregation Network) and Area Attention, along with the integration of attention mechanisms for the first time, making it a real-time object detection powerhouse. These innovations, particularly FlashAttention, significantly enhance inference speed and accuracy, ensuring YOLOv12 remains highly efficient on GPUs (e.g., the NVIDIA A100).
We covered two main methods for running YOLOv12 inference:
- Running YOLOv12 from the official GitHub repo with FlashAttention support, leveraging an easy-to-use Gradio app and the Ultralytics library for direct Python/CLI inference.
- Using the Ultralytics library for streamlined inference, which offers fast setup and efficient GPU utilization, although FlashAttention must be manually enabled for best performance.
We also presented performance benchmarks, including mAP, latency, and the number of parameters for different YOLOv12 model scales (e.g., YOLOv12-S, YOLOv12-M, and YOLOv12-X). Compared to previous models (e.g., YOLOv10, YOLOv11, and RT-DETR), YOLOv12 demonstrates significant improvements in both speed and accuracy, particularly when using FlashAttention.
Finally, we provided insights into inference times, noting how YOLOv12 is competitive with earlier models like YOLOv11 and how FlashAttention contributes to reducing inference latency, especially on GPUs (e.g., NVIDIA A100).
Overall, YOLOv12 provides an efficient and scalable solution for real-time object detection, offering options for fine-tuning and deployment in various environments. The Ultralytics integration simplifies setup, while FlashAttention ensures that YOLOv12 remains a top contender in performance-sensitive applications.
Acknowledgments
We sincerely thank Tian et al. (“YOLOv12: Attention-Centric Real-Time Object Detectors,” 2025) for their outstanding research and contributions to the field of real-time object detection. This blog post was made possible by insights drawn directly from their work. By carefully studying the official paper and accompanying materials, we gained a deeper understanding of the motivations, architectural choices, and innovations behind YOLOv12 and shared that knowledge with the broader community.
Citation Information
Singh, V. “Breaking the CNN Mold: YOLOv12 Brings Attention to Real-Time Object Detection,” PyImageSearch, P. Chugh, S. Huot, A. Sharma, and P. Thakur, eds., 2025, https://pyimg.co/ilcko
@incollection{Singh_2025_breaking-the-cnn-mold-yolov12-brings-attention-to-real-time-object-detection,
  author = {Vikram Singh},
  title = ,
  booktitle = {PyImageSearch},
  editor = {Puneet Chugh and Susan Huot and Aditya Sharma and Piyush Thakur},
  year = {2025},
  url = {https://pyimg.co/ilcko},
}

Join the PyImageSearch Newsletter and Grab My FREE 17-page Resource Guide PDF
Enter your email address below to join the PyImageSearch Newsletter and download my FREE 17-page Resource Guide PDF on Computer Vision, OpenCV, and Deep Learning.
The post Breaking the CNN Mold: YOLOv12 Brings Attention to Real-Time Object Detection appeared first on PyImageSearch.
July 07, 2025 at 06:30PM
Click here for more details...
=============================
The original post is available in PyImageSearch by Vikram Singh
this post has been published as it is through automation. Automation script brings all the top bloggers post under a single umbrella.
The purpose of this blog, Follow the top Salesforce bloggers and collect all blogs in a single place through automation.
============================


Post a Comment