Marimo: A Reactive, Reproducible Notebook :
by:
blow post content copied from Real Python
click here to view original post
Marimo notebooks redefine the notebook experience by offering a reactive environment that addresses the limitations of traditional linear notebooks. With marimo, you can seamlessly reproduce and share content while benefiting from automatic cell updates and a correct execution order. Discover how marimo’s features make it an ideal tool for documenting research and learning activities.
By the end of this tutorial, you’ll understand that:
- Marimo notebooks automatically update dependent cells, ensuring consistent results across your work.
- Reactivity allows marimo to determine the correct running order of cells using a directed acyclic graph (DAG).
- Sandboxing in marimo creates isolated environments for notebooks, preventing package conflicts and ensuring reproducibility.
- You can add interactivity to marimo notebooks using UI elements like sliders and radio buttons.
- Traditional linear notebooks have inherent flaws, such as hidden state issues, that marimo addresses with its reactive design.
Before you can get started with marimo, you’ll need to install it. Fortunately, this is quick and easy to do:
$ python -m pip install marimo
You use pip to install the marimo library on your system. With this done, it’s time to get started, be amazed, and learn all about a different type of notebook.
The best way to approach this tutorial is to use the instructions to complete the various examples and try the exercises yourself. If you want copies of the various notebook files created during the tutorial, you’ll find them in your download bundle. The README.md file provides further details of what’s in your downloads.
Take the Quiz: Test your knowledge with our interactive “Marimo: A Reactive, Reproducible Notebook” quiz. You’ll receive a score upon completion to help you track your learning progress:

Interactive Quiz
Marimo: A Reactive, Reproducible NotebookThis quiz is a great way to reinforce and build on what you've learned about marimo notebooks. You'll find most of the answers in the tutorial, but you'll need to do some additional research to find some of the answers.
How to Get Started in a Marimo Notebook
A notebook is a file where you can write your programming code, run it, and view the output. You can add formatted text to explain how your code works, display charts to clarify results, and even allow your notebook’s users to try out different scenarios using a customized user interface. Once your notebook is complete, you can save everything in a single file and share your creation with others.
In this section, you’ll learn to use marimo to create a simple notebook to perform a calculation and clearly display its results.
Like many notebooks, marimo notebooks consist of cells. The primary cell types are code cells, where you enter and run your Python code, and Markdown cells, where you enter formatted text to augment the code and its output.
In this first example, you’ll use a marimo notebook and NumPy to solve a pair of simultaneous equations. To do this, you’ll first need to install the NumPy library:
$ python -m pip install numpy
With NumPy installed, you can now create your notebook by typing the following command into your console:
$ marimo edit simultaneous_equations.py
When you run this command, you’ll most likely create a new notebook named simultaneous_equations.py for editing. If you already have a marimo notebook with that name, you’ll open it instead. Either way, your notebook will be ready for you to use within your browser.
Switch to your web browser, and you’ll see your new notebook. It’ll contain a single cell. Hover your mouse over the cell to reveal a range of icons, each with a tooltip that explains its purpose and shows the associated keyboard shortcuts:
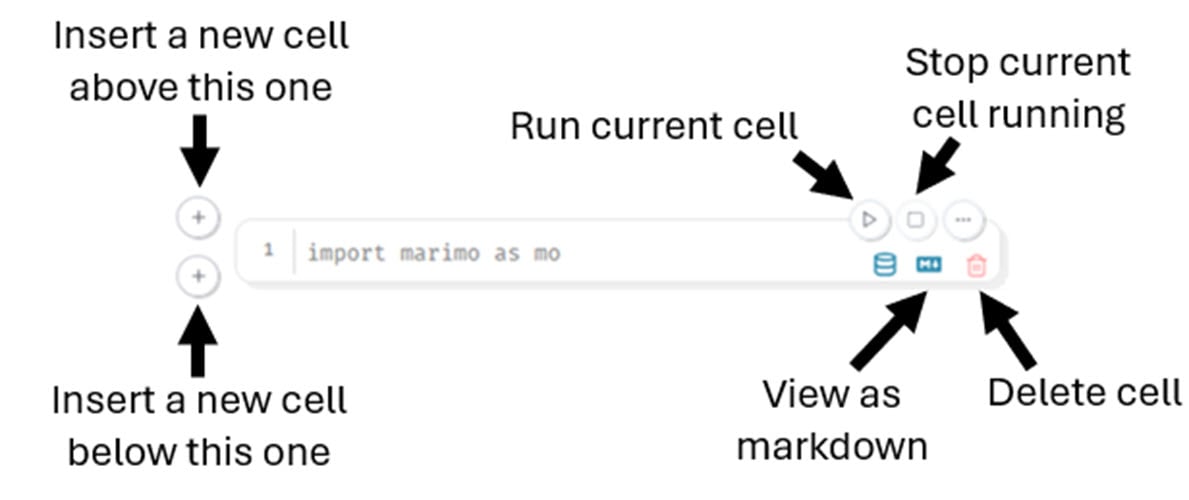
Each of the main icons are described in the screenshot above. While most of these are self-explanatory, there are some points you should be aware of:
- The red trash can icon shown here won’t appear immediately in your notebook. This is used to delete a cell and will only appear when you add other cells. You can’t see it yet because all notebooks must have at least one cell. Deleting the last cell is impossible.
- The color of the Run current cell icon is also significant. If this cell is white, as it is in the screenshot, it’s up to date and doesn’t need to be run. Once you start changing cells, you’ll see their Run icons develop a yellow tinge. This warns you that the cell has become stale, meaning you must run it to update it.
- Finally, notice that the numbers to the left of each cell indicate the line numbers of the code within the cell. Unlike most other notebooks, there are no numbers to indicate the running order of the cells. This is because marimo allows you to add code cells in any order. Marimo can work out the correct cell running order for itself. Even so, placing cells in an illogical order should be avoided.
When you hover your mouse over some of marimo’s icons, you’ll see their associated keyboard shortcuts. Unfortunately, they don’t work correctly in all browsers. If they don’t work for you, stick to using your mouse. Feel free to try them to find out if they work for you.
Adding Code and Markdown Content
It’s time for you to gain experience creating some content in marimo. By following the walk-through, you’ll get hands-on practice with the basics.
Although confusing the first time you see it, the single cell that contains import marimo as mo is actually a blank cell. This code allows you to work with the marimo API. However, it’s not in the cell unless you type it in manually.
Read the full article at https://realpython.com/marimo-notebook/ »
[ Improve Your Python With 🐍 Python Tricks 💌 – Get a short & sweet Python Trick delivered to your inbox every couple of days. >> Click here to learn more and see examples ]
May 26, 2025 at 07:30PM
Click here for more details...
=============================
The original post is available in Real Python by
this post has been published as it is through automation. Automation script brings all the top bloggers post under a single umbrella.
The purpose of this blog, Follow the top Salesforce bloggers and collect all blogs in a single place through automation.
============================


Post a Comment