Learn to Build Smart Contracts in React with web3.js: Here’s How! (2/2) : Yassin Mahmud Abdul Quddus
by: Yassin Mahmud Abdul Quddus
blow post content copied from Finxter
click here to view original post
Welcome to the second part of the series. In the first part, we have seen how web3.js helped the react frontend to connect to the smart contract.
We explored the power of the “web3.eth” attribute to call the data from the smart contract. But this time, we are not using React.
In this part, we will connect to localhost from Remix IDE using web3.js. We will create our simple smart contract and deploy it from the Remix IDE. Then we will call the functions and methods from our deployed smart contracts.
Write the Smart Contract
First, we need to create our smart contract and move to “remix.ethereum.org“, the Remix online IDE for web-based development.
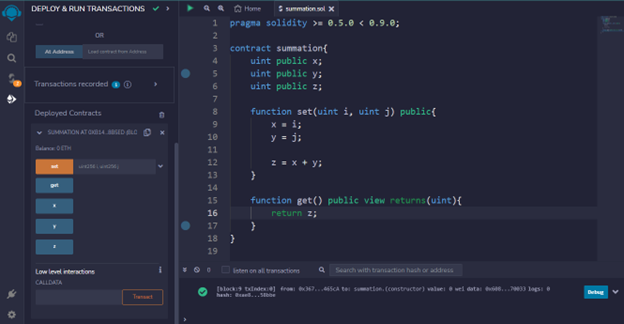
Move to the contract folder and create a new Solidity file named “summation.sol”. In the Solidity file, we will introduce a simple summation smart contract after declaring the Solidity version.
Inside our smart contract, we will create some functions that we will try to call afterward from the node.js terminal of the visual studio code. Web3 will again work as the mediator to establish a connection between Remix IDE and the locally running test blockchain ganache.
First, declare three unsigned integers x, y and z. But let’s make it clear what our smart contract will do. The purpose of the smart contract is to add two numbers, x and y. After summing up, the result will be stored as the z variable. We will use two functions, set() and get(), to set the numbers and to get the result, respectively.
The set() function will take two integers, i and j, as parameters. These i and j will be the value of the x and y variables. The sum of x and y will be published as z.
We need to return the result as an integer to display it on the terminal. That’s why we created the get() function. The get() function will return the value of z, which stores the sum of x and y.
In short, we are adding two numbers to the smart contract.
We can set the numbers as we like from the node terminals of the visual studio code. Then we will get the result from the contract by accessing the get() function of the smart contract.
We will not set the numbers from the Remix IDE; instead, we will be using the node terminal to access the smart contract with the help of web3.
Deploy the Smart Contract in the Localhost
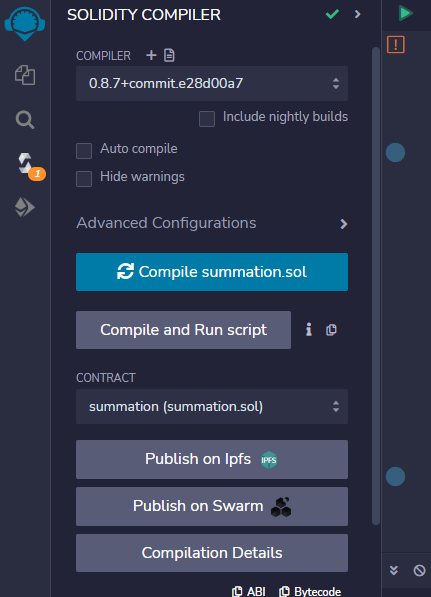
Before deploying the smart contract, you need to compile the Solidity file.
To do that, move to the SOLIDITY COMPILER section of the Remix IDE. You will get a “Compile summation.sol” option available. Just click on that.
The compiler will compile the contract automatically if your code is correct. Otherwise, some red exclamation warning will appear on your contract with the possible solution for the mistakes of your codes. Just try to solve the issues.
Otherwise, the solidity compiler will not allow you to deploy the contract. Since there will be no chance to change the state of the contract once it is deployed, it is important to recheck the codes several times.
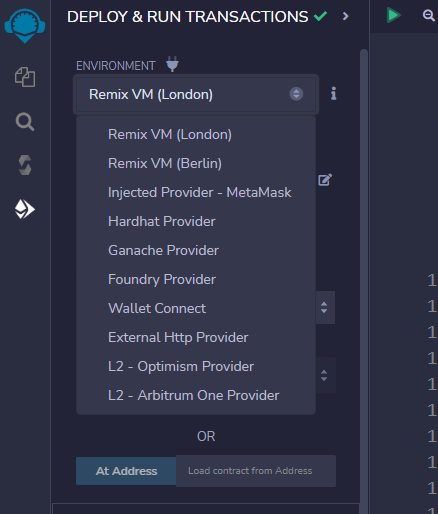
To deploy our smart contract in ganache, we need to connect our Remix IDE with Ganache first. Move to the deploy option and select the ganache provider from the environment drop-down.
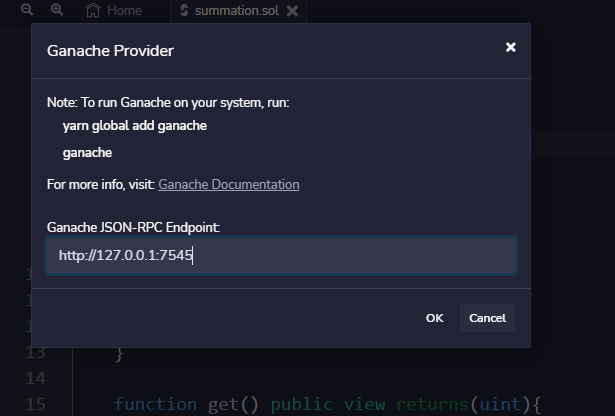
An external node request window will pop up and ask for the Web3 provider endpoint. Here we will provide the URL of our Ganache local host.
If the Ganache is appropriately connected, you will be able to see all the accounts of ganache under the ACCOUNT drop-down. Now ganache is connected. Let’s deploy the contract by clicking the deploy menu.

Just under the environment drop-down, you can see the custom network is 5777. That is the network ID of the ganache. It also indicates that you are connected with the correct local host.
Calling the Functions from Node Using Web3
Let’s move to the visual studio code and open the terminal. Make sure you are in the directory where web3 is installed already. To activate the node terminal just type:
Node
You will get the node version number in return. Now the node terminal is running, and we will import our web3 now.
let Web3 = require ("web3");
Let’s create an instance of the web3 and connect to ganache with the HTTP provider.
let web3 = new Web3(new Web3.providers.HttpProvider(http://127.0.0.1:7545));
Now again, we will create an instance of the contract with the help of web3.eth.contract method. This will take the ABI and address of the contract as the parameter. To get the ABI, move to the Remix IDE and visit the “solidity compiler” section.
You will get the ABI at the bottom left corner. Move to the “deploy and run transactions” section for the contract address. You will get the contract address under the deployed contracts. Just copy the ABI and address to use it for building the contract instance.
const contract = new web3.eth.Contract(ABI, Address);
I did not write the ABI and contract address from the code as it is too long to copy. You must replace the code with your own ABI and contract address.
A copy of our deployed smart contract is available now. We can call the methods and functions from the contracts now. “contracts.method” attribute will help us to call the functions we want.
Now we will set the value of x and y by calling the set() function from the contract.
contract.methods.set(90,10).send({from:"0x367Ea75b206ECfc52712154CCd18c88488a465cA"});
We set the value for x and y as 90 and 10, respectively. The send method mentions the account address we use for the transaction. This account address is mainly required to bear the gas price cost for the transaction.
You can use any account of the ganache for the transaction. It should not cause any problems.
Now, if everything works well, you can call the get() function from the contract and check what it returns.
contract.methods.get().call().then(console.log);
After calling the get() function through “contract.methods()” you need to “console.log” the output. Otherwise, the terminal will return a promise.
If the terminal returns 100, then it means our function is working well.
Let’s try to get the value of the x integer from the smart contract. Again we will use the “contract.methods” attribute to call the variable from the smart contract.
contract.methods.x().call().then(console.log);
If everything works well, then you will get 90 as an output. So, you can easily estimate the power of the “contract.methods” attribute of the web3 in case of fetching data from the smart contract. It is really easy to call any method or function by using web3.js.
That concludes the two-part series. You have learned how the smart contract interacts with the node terminal and how web3 helps us to communicate with the smart contract. thanks for being with me.
 Reference: https://web3js.readthedocs.io/en/v1.2.11/web3-eth-contract.html#id26
December 14, 2022 at 04:10PM
Click here for more details...
=============================
The original post is available in Finxter by Yassin Mahmud Abdul Quddus
this post has been published as it is through automation. Automation script brings all the top bloggers post under a single umbrella.
The purpose of this blog, Follow the top Salesforce bloggers and collect all blogs in a single place through automation.
============================


Post a Comment