Step-by-Step Guide to Open-Source Implementation of Generative Fill: Part 1 : Aritra Roy Gosthipaty and Ritwik Raha
by: Aritra Roy Gosthipaty and Ritwik Raha
blow post content copied from PyImageSearch
click here to view original post
Table of Contents
- Step-by-Step Guide to Open-Source Implementation of Generative Fill: Part 1
- Understanding Open-Source Generative Fill
- Configuring Your Development Environment for Generative Fill
- Essential Setup and Imports
- Loading and Preparing Input Images for Editing
- Generating Captions for Image Understanding
- Summary
Step-by-Step Guide to Open-Source Implementation of Generative Fill: Part 1
In this tutorial, you will learn to edit text-based images using Open-Source models like Segment Anything (SAM), OWL-ViT (Vision Transformer for Open-World Localization), and SDXL (Stable Diffusion XL) inpainting.
This lesson is the 1st of a 2-part series on Open-Sourcing Generative Fill:
- Step-by-Step Guide to Open-Source Implementation of Generative Fill: Part 1 (this tutorial)
- Step-by-Step Guide to Open-Source Implementation of Generative Fill: Part 2
To learn how to create your own text-based image editing product, just keep reading.
Step-by-Step Guide to Open-Source Implementation of Generative Fill: Part 1
Have you ever wished you could edit an image simply by describing the changes you want? Well, you can now, and with open-source deep learning models. In this two-part blog series, we’ll explore the world of “Open-Source Generative Fill,” where text prompts transform your images in ways once strictly limited to professional photo editing software.
Here, we will harness the power of image captioning models, large language models (LLMs), segmentation techniques, and image inpainting. We’re building an open-source pipeline to give you unprecedented control over image manipulation, all driven by the power of your words.
Understanding Open-Source Generative Fill
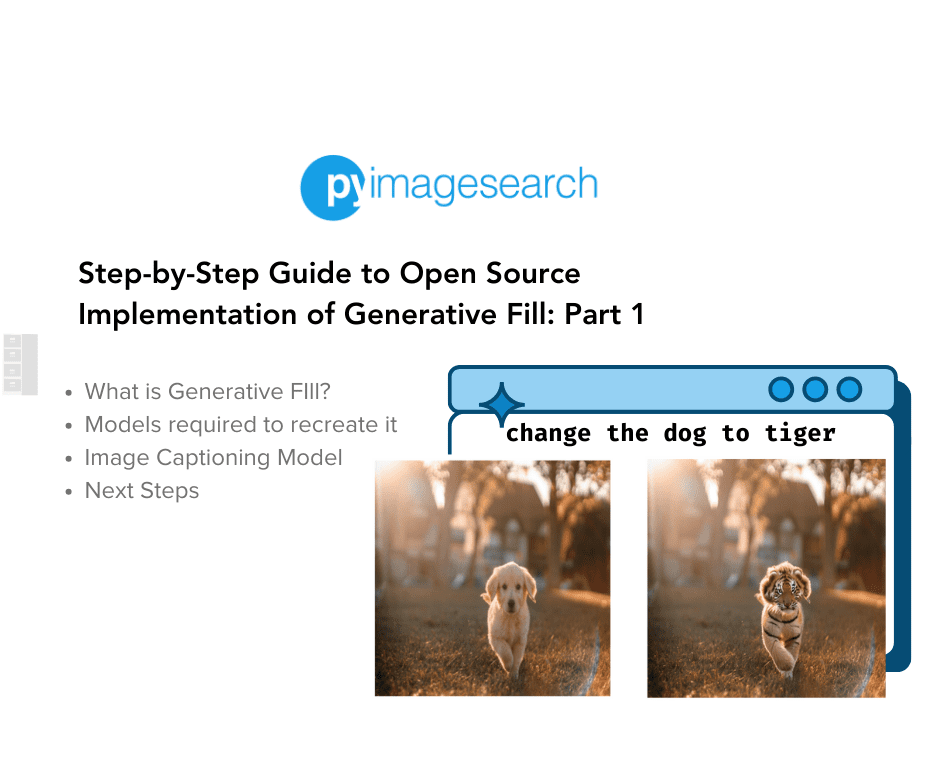
Generative Fill is a proprietary technology from Adobe that allows one to replace or change any part of the image with a custom image generated through the prompt, as shown in Figure 1.

This is patented and not something one can open up and inspect to understand how it works. However, with the boom of Open-Source models and their heightened capabilities, we can take a look at how to create the same functionality with these models.
What we aim to achieve here is:
- An edit prompt or instruction laying down what needs to be changed
- An input picture of where the change needs to happen
- Edit the image based on the initial edit prompt
How do we propose to do this?
- Accept an
edit_promptand an image as input. - Use a vision model to caption the image.
- Pass the
edit_promptthrough a language model to extract the source entity. - Create a
replacement_captionwhere the source entity of the original image is swapped with the target entity in theedit_prompt. - Use the source entity to create a segmentation mask using OWL-VIT and SAM.
- Use the mask and the
replacement_captionfor image inpainting.
Configuring Your Development Environment for Generative Fill
To follow this guide, you need to have some Open-Source libraries installed on your system.
Luckily, these are all pip-installable:
$ pip install diffusers
$ pip install accelerate
$ pip install transformers
If you need help configuring your development environment for OpenCV, we highly recommend that you read our pip install OpenCV guide — it will have you up and running in minutes.
Essential Setup and Imports
import torch
from PIL import Image
import requests
from matplotlib import pyplot as plt
from transformers import (
    BlipForConditionalGeneration,
    BlipProcessor,
)
Here, we import essential libraries for working with images and advanced natural language processing. The core libraries provide tools for loading, manipulating, and displaying images. The transformers library offers a pre-trained BLIP (Bootstrapping Language-Image Pre-training) model and its processor, which specializes in generating text descriptions of images.
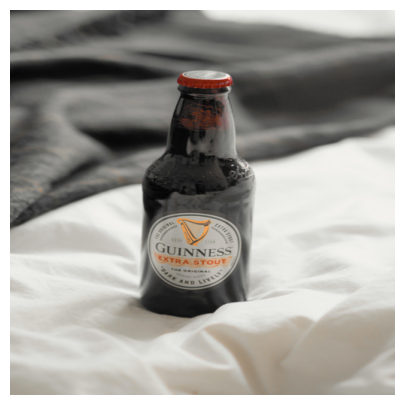
IMAGE_URL = "https://huggingface.co/datasets/pyimagesearch/blog-post-images/resolve/main/bottle.jpeg"
EDIT_PROMPT = "change the bottle to a wine"
SEED_VALUE = 41

# Set the device
DEVICE = "cuda" if torch.cuda.is_available() else "cpu"
GENERATOR = torch.Generator().manual_seed(SEED_VALUE)
The IMAGE_URL stores the address of an image to be used, while EDIT_PROMPT provides instructions to modify the image. The SEED_VALUE ensures that any random elements involved in image editing will be reproducible. Here, we also check for a GPU (CUDA) to accelerate image processing, falling back to the CPU if a GPU isn’t available.
class Config:
    IMAGE_SIZE = (512, 512)
    LANGUAGE_MODEL_ID = "Qwen/Qwen1.5-0.5B-Chat"
    CAPTION_MODEL_ID = "Salesforce/blip-image-captioning-base"
    DETECTION_MODEL_ID = "google/owlv2-base-patch16-ensemble"
    SEGMENTATION_MODEL_ID = "facebook/sam-vit-base"
    INPAINTING_MODEL_ID = "diffusers/stable-diffusion-xl-1.0-inpainting-0.1"

config = Config()
We define our configuration inside a class. This class acts as a central place to store various important settings and parameters that will be used throughout our image editing or generation process.
def delete_model(model: torch.nn.Module):
    model.to("cpu")
    del model
    torch.cuda.empty_cache()
The delete_model function aims to thoroughly remove a PyTorch model (torch.nn.Module) from GPU memory, ensuring resources are freed up for other tasks.
Loading and Preparing Input Images for Editing
def load_image(image_url, image_size = (512, 512)):
    raw_image = Image.open(requests.get(image_url, stream=True).raw).convert("RGB")

    image = raw_image.resize(image_size)
    return image
The load_image function downloads an image from a web address and prepares it for use in your image processing tasks. It first fetches the image using the requests library and opens it with the PIL (Image) library. The image is then converted to standard RGB format (if necessary) for compatibility. Finally, it’s resized according to the specified image_size parameter and returned, ready to be used by other parts of your code.
# Load the image from the url and get the text prompt
image = load_image(image_url=IMAGE_URL, image_size=config.IMAGE_SIZE)
Let’s load the image and visualize it. The image is shown in Figure 2.
plt.figure(figsize=(5, 5))
plt.imshow(image)
plt.axis("off")
plt.show()
Generating Captions for Image Understanding
def run_caption_model(model_id: str, image: Image, device: str = "cuda"):
    caption_model = BlipForConditionalGeneration.from_pretrained(model_id).to(device)
    caption_processor = BlipProcessor.from_pretrained(model_id)

    inputs = caption_processor(image, return_tensors="pt").to(device)
    with torch.no_grad():
        outputs = caption_model.generate(**inputs, max_new_tokens=50)

    caption = caption_processor.decode(outputs[0], skip_special_tokens=True)
    delete_model(caption_model)
    return caption
The run_caption_model function takes a model identifier, an image, and a device preference (“cuda” for GPU or “cpu”). It uses the Hugging Face transformers library to load a pre-trained BLIP image captioning model specified by the model_id. The BlipProcessor prepares the image into a format the model expects. The model then generates a caption (up to 50 tokens) describing the image. Finally, to conserve memory, the captioning model is deleted. The generated caption is returned as the result.
# Image captioning
caption = run_caption_model(
    model_id=config.CAPTION_MODEL_ID, image=image, device=DEVICE
)
Let’s run the caption model and print the caption of the image.
print("#"*100)
print(f"Using caption model: {config.CAPTION_MODEL_ID}")
print(f"Caption: {caption}")
print("#"*100)
#################################################
Using caption model: Salesforce/blip-image-captioning-base
Caption: a bottle of beer sitting on a bed
#################################################
What's next? We recommend PyImageSearch University.
84 total classes • 114+ hours of on-demand code walkthrough videos • Last updated: February 2024
★★★★★ 4.84 (128 Ratings) • 16,000+ Students Enrolled
I strongly believe that if you had the right teacher you could master computer vision and deep learning.
Do you think learning computer vision and deep learning has to be time-consuming, overwhelming, and complicated? Or has to involve complex mathematics and equations? Or requires a degree in computer science?
That’s not the case.
All you need to master computer vision and deep learning is for someone to explain things to you in simple, intuitive terms. And that’s exactly what I do. My mission is to change education and how complex Artificial Intelligence topics are taught.
If you're serious about learning computer vision, your next stop should be PyImageSearch University, the most comprehensive computer vision, deep learning, and OpenCV course online today. Here you’ll learn how to successfully and confidently apply computer vision to your work, research, and projects. Join me in computer vision mastery.
Inside PyImageSearch University you'll find:
- ✓ 84 courses on essential computer vision, deep learning, and OpenCV topics
- ✓ 84 Certificates of Completion
- ✓ 114+ hours of on-demand video
- ✓ Brand new courses released regularly, ensuring you can keep up with state-of-the-art techniques
- ✓ Pre-configured Jupyter Notebooks in Google Colab
- ✓ Run all code examples in your web browser — works on Windows, macOS, and Linux (no dev environment configuration required!)
- ✓ Access to centralized code repos for all 536+ tutorials on PyImageSearch
- ✓ Easy one-click downloads for code, datasets, pre-trained models, etc.
- ✓ Access on mobile, laptop, desktop, etc.
Summary
In this first installment, we laid the foundation for our image-editing adventure. We learned the importance of image captioning for understanding the content of our images. We also understood how the end-to-end workflow must be structured to achieve something like this.
To recap, we would need the following:
- Vision model for image captioning
- Language model for entity extraction from the prompt
- Object detection model for detecting the entity in the image
- Segmentation model for creating the mask
- Diffusion model for performing the image inpainting
To recreate generative fill, we would need about five open-source models. In this tutorial, we saw the segment about creating the image-captioning workflow. The image captioning workflow is one of the most crucial steps for the entire pipeline. Whether the image caption is good or not will determine how well the image inpainting works.
We used the Salesforce/blip-image-captioning-base from the Hugging Face Hub since it is readily usable in a free-tier Colab notebook.
Next Steps: Building an End-to-End Workflow for Image Editing
In the next part of this tutorial, we will look at the end-to-end workflow and understand how we can stitch together different models to create a pipeline where we can input a text and an image and edit the image based on the text.
Citation Information
A. R. Gosthipaty and R. Raha. “Step-by-Step Guide to Open-Source Implementation of Generative Fill: Part 1,” PyImageSearch, P. Chugh, S. Huot, and K. Kidriavsteva, eds., 2024, https://pyimg.co/jbsn9
@incollection{ARG-RR_2024_Open-Source-Implementation-Generative-Fill-part1,
  author = {Aritra Roy Gosthipaty and Ritwik Raha},
  title = {Step-by-Step Guide to Open-Source Implementation of Generative Fill: Part 1},
  booktitle = {PyImageSearch},
  editor = {Puneet Chugh and Susan Huot and Kseniia Kidriavsteva},
  year = {2024},
  url = {https://pyimg.co/jbsn9},
}

Unleash the potential of computer vision with Roboflow - Free!
- Step into the realm of the future by signing up or logging into your Roboflow account. Unlock a wealth of innovative dataset libraries and revolutionize your computer vision operations.
- Jumpstart your journey by choosing from our broad array of datasets, or benefit from PyimageSearch’s comprehensive library, crafted to cater to a wide range of requirements.
- Transfer your data to Roboflow in any of the 40+ compatible formats. Leverage cutting-edge model architectures for training, and deploy seamlessly across diverse platforms, including API, NVIDIA, browser, iOS, and beyond. Integrate our platform effortlessly with your applications or your favorite third-party tools.
- Equip yourself with the ability to train a potent computer vision model in a mere afternoon. With a few images, you can import data from any source via API, annotate images using our superior cloud-hosted tool, kickstart model training with a single click, and deploy the model via a hosted API endpoint. Tailor your process by opting for a code-centric approach, leveraging our intuitive, cloud-based UI, or combining both to fit your unique needs.
- Embark on your journey today with absolutely no credit card required. Step into the future with Roboflow.

Join the PyImageSearch Newsletter and Grab My FREE 17-page Resource Guide PDF
Enter your email address below to join the PyImageSearch Newsletter and download my FREE 17-page Resource Guide PDF on Computer Vision, OpenCV, and Deep Learning.
The post Step-by-Step Guide to Open-Source Implementation of Generative Fill: Part 1 appeared first on PyImageSearch.
March 18, 2024 at 06:30PM
Click here for more details...
=============================
The original post is available in PyImageSearch by Aritra Roy Gosthipaty and Ritwik Raha
this post has been published as it is through automation. Automation script brings all the top bloggers post under a single umbrella.
The purpose of this blog, Follow the top Salesforce bloggers and collect all blogs in a single place through automation.
============================


Post a Comment