People Counter on OAK : Aditya Sharma
by: Aditya Sharma
blow post content copied from PyImageSearch
click here to view original post
Table of Contents
People Counter on OAK
In this tutorial, you will learn how to construct a people-counting system on an OAK device in conjunction with DepthAI and Python. This people-counting application aims to tally the number of individuals moving “up” or “down” within a video sequence.
In counting people, our first step involves detecting individuals in a specific frame, followed by the implementation of tracking on the OAK device. For the detection phase, we will harness the capabilities of a pre-trained YOLOv8 nano model and employ a tracker within the device.
Upon the conclusion of this tutorial, you will understand the procedures involved in developing and deploying a people-counting application on the OAK platform.
This lesson is the 3rd in our series on OAK 102:
- Training the YOLOv8 Object Detector for OAK-D
- Hand Gesture Recognition with YOLOv8 on OAK-D in Near Real-Time
- People Counter on OAK (this tutorial)
To learn how to implement and run people counting on OAK, just keep reading.
People Counter on OAK
Introduction
People counting is a cutting-edge application within computer vision, focusing on accurately determining the number of individuals in a particular area or moving in specific directions, such as “entering” or “exiting.” It is immensely useful across various fields (e.g., retail analytics, smart building management, and public safety).
While counting people, techniques like object detection and tracking are deployed to scrutinize and make sense of the visuals of human movement within a frame or sequence of frames. Notably, this application is greatly enhanced by utilizing edge devices like OAK, which combines advanced computer vision and artificial intelligence (AI) capabilities.
Imagine being able to analyze foot traffic in a retail store to optimize product placement or efficiently managing building occupancy for energy savings and safety — the applications are manifold.
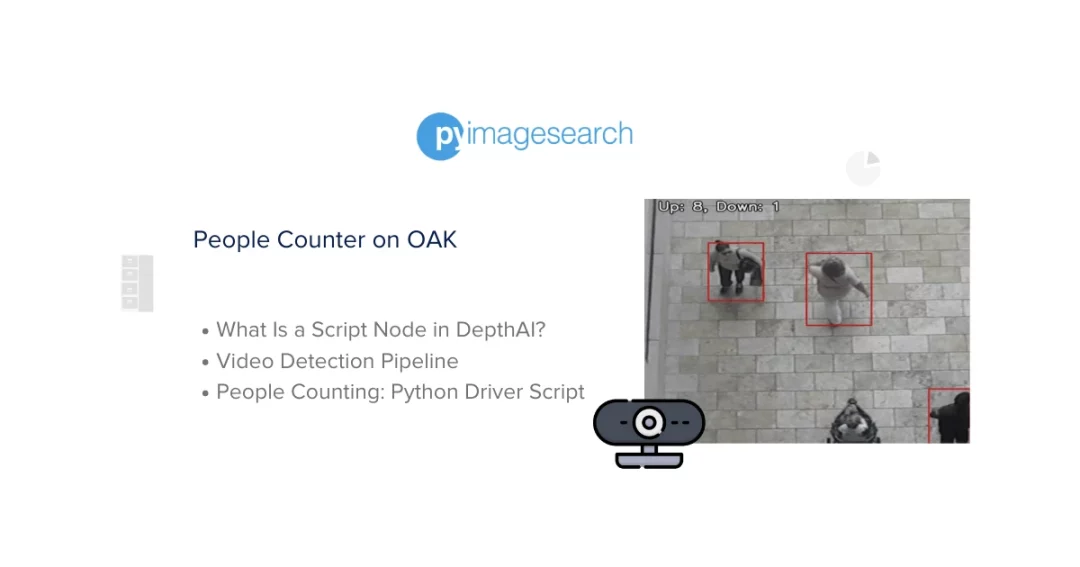
Figure 1 illustrates an example frame from a video sequence where individuals are accurately counted as they move in different directions. The annotations displaying the individual counts of people moving “up” or “down” are shown in real-time.

For those enthusiastic about exploring the potential of OAK devices and the array of computer vision applications they can facilitate, we suggest browsing through the Introduction to OpenCV AI Kit (OAK) tutorial on PyImageSearch, particularly the Applications on OAK section.
If you’ve been following our OAK series, you may recall that in our previous post, we delved into gesture recognition and how it can be applied to identify and interpret human gestures by deploying on an OAK device. Today, we are shifting gears to explore another fascinating application: people counting.
Let’s not delay any further but dive straight into this engaging tutorial to unravel the procedure for building, deploying, and running a people counting application on the OAK platform. But before that, let’s quickly discuss the topics we will cover to implement people counting on OAK.
In the first segment of this tutorial, we will address the essential Python packages necessary for building our people counter on OAK. The primary focus will be on DepthAI and OpenCV, as they are the cornerstone libraries for this application.
Next, we’ll set up the foundational elements for today’s project. Among these, a crucial component of DepthAI, known as the Script node, will be discussed. The Script node is instrumental in enabling the implementation and execution of custom tracking logic directly on the OAK device.
Subsequently, we will lay out the utilities required for the smooth operation of the people counting application on OAK. This includes the construction of video detection and tracker pipeline, as well as the creation of helper functions. Moreover, we will establish the object tracker logic, designed to operate within the Script node.
As we approach the culmination of this tutorial, we will define the primary Python driver script that integrates all the utilities and logic that have been developed. This script will be the driving force behind the successful execution of the application.
Lastly, we will evaluate the fruits of our labor by analyzing the results of employing the people counting application on OAK to real video footage. Through this, you will witness firsthand the effectiveness and practicality of the people counter in action.
Configuring Your Development Environment
To follow this guide, you need to have depthai and opencv libraries installed on your system.
Luckily, all these libraries are pip-installable:
$ pip install depthai==2.21.2.0
$ pip install opencv-python==4.6.0
If you need help configuring your development environment for OpenCV, we highly recommend that you read our pip install OpenCV guide — it will have you up and running in minutes.
Need Help Configuring Your Development Environment?
All that said, are you:
- Short on time?
- Learning on your employer’s administratively locked system?
- Wanting to skip the hassle of fighting with the command line, package managers, and virtual environments?
- Ready to run the code on your Windows, macOS, or Linux system now?
Then join PyImageSearch University today!
Gain access to Jupyter Notebooks for this tutorial and other PyImageSearch guides that are pre-configured to run on Google Colab’s ecosystem right in your web browser! No installation required.
And best of all, these Jupyter Notebooks will run on Windows, macOS, and Linux!
Project Structure
We first need to review our project directory structure.
Start by accessing this tutorial’s “Downloads” section to retrieve the source code and example images.
From there, take a look at the directory structure:
$ tree .
.
├── main.py
├── output
│   └── tracking_result_long.mp4
├── pyimagesearch
│   ├── __init__.py
│   ├── config.py
│   ├── track.py
│   └── utils.py
├── videos
│   ├── example_01.mp4
│   └── example_02.mp4
└── yolov8-model
    └── yolov8n
        ├── yolov8n.blob
        └── yolov8n.json

6 directories, 10 files
In the pyimagesearch directory, we have the following:
__init__.py: A special Python file that allows the directory to be treated as a packageconfig.py: The configuration file for the object tracking taskutils.py: The utilities for running the people counter on OAK (e.g., creating video and tracker pipelines and a few other helper functions)track.py: A script that keeps track of the movement of objects across the screen in four directions and communicates with OAK to send information on the count data
In the core directory, we have the following:
main.py: The main Python driver script to run people counting on OAK leveraging the pipelines and other utilities fromutils.pyyolov8-model: Houses YOLOv8 variants model filesyolov8n: A subdirectory inside theyolov8-modeldirectoryyolov8n.blob: A file inside theyolov8ndirectory containing the weights of the YOLOv8 model.yolov8n.json: A JSON file inside theyolov8ndirectory containing the configuration or metadata of the YOLOv8 model.
videos: Contains a few test video files, which themain.pyscript will use to run people counting on OAKoutput: Houses people counting result video files
What Is a Script Node in DepthAI?
In today’s tutorial, we will use the Script node to execute people counting on the OAK device. Up to this point in our OAK series, we haven’t delved into the Script node, so let’s take a moment to understand its functionality.
In the context of the DepthAI library, a Script node (Figure 3) is a special node within the DepthAI pipeline that allows you to execute custom Python scripts onboard the device. It’s part of the pipeline that can be used for additional processing using Python code.
If you’re not acquainted with DepthAI pipelines, then be sure to look at this tutorial.
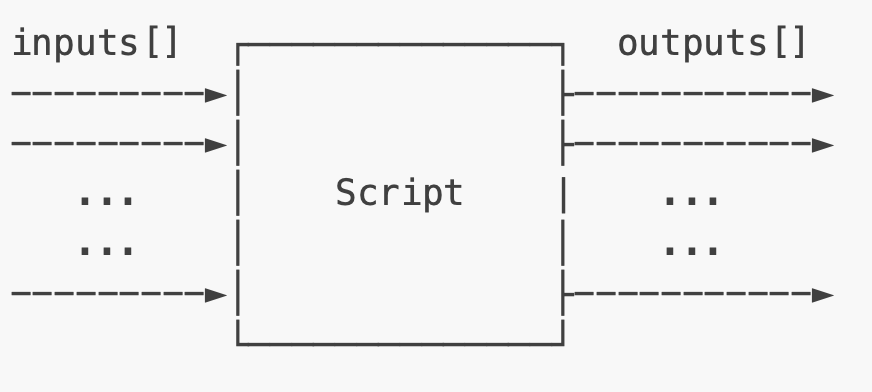
Following are some of the key points about the Script node:
- Custom Processing: It is often used for custom data processing or algorithms not covered by the built-in nodes. For example, a Script node could perform mathematical operations, data filtering, or custom logic.
- Python Code: The Script node runs Python code. You can create your own custom Python script and load it into the Script node. For instance, in this tutorial, we will write a custom Python script named
track.py, which will then be loaded into a Script node.
- Interfacing with Other Nodes: The Script node can take input from other pipeline nodes and provide output to other nodes. For example, in this tutorial, we would
linktheObjectTrackernode output with the Script node.
The Script node in DepthAI is very useful for incorporating custom logic and processing within the DepthAI pipeline, leveraging the flexibility of Python scripting. However, as the scripts run on the device itself, it’s important to be mindful of the resource constraints and optimize the scripts accordingly.
If you are still interested in learning more about the Script node, you can check the Luxonis documentation here.
Configuring the Prerequisites
Before we start our implementation, let’s review our project’s configuration. For that, we will move on to the config.py script located in the pyimagesearch directory.
The config.py script sets up the necessary paths for the YOLOv8n models, their configurations, test video, and output directories for the resulting video. It also defines the camera preview dimensions and tracking threshold.
# import necessary packages
import os

# path to the model, test data directory, and results
YOLOV8N_MODEL = os.path.join(
    "yolov8-model", "yolov8n", "yolov8n.blob"
)  # path to yolov8 model blob
YOLOV8N_CONFIG = os.path.join(
    "yolov8-model", "yolov8n", "yolov8n.json"
)  # path to yolov8 model configuration
We start by importing the os module on Line 2.
On Lines 4-10, we set up two variables, YOLOV8N_MODEL and YOLOV8N_CONFIG, to store the file paths of the YOLOv8 model’s blob file and configuration file, respectively. To accomplish this, we leverage os.path.join to construct the file paths.
INPUT_VIDEO_LONG = os.path.join("videos", "example_02.mp4")  # path to long input video
INPUT_VIDEO_SHORT = os.path.join(
    "videos", "example_01.mp4"
)  # path to short input video
OUTPUT_VIDEO_LONG = os.path.join(
    "output", "tracking_result_long.mp4"
)  # path to long output video
OUTPUT_VIDEO_SHORT = os.path.join(
    "output", "tracking_result_short.mp4"
)  # path to short output video
On Lines 12-21, we set the input and output video paths for the short and long video files:
INPUT_VIDEO_LONG: set to the file path of a longer input videoINPUT_VIDEO_SHORT: set to the file path of a shorter input videoOUTPUT_VIDEO_LONG: set to the file path where the inference result of the longer input video will be savedOUTPUT_VIDEO_SHORT: set to the file path where the inference result of the shorter input video will be saved
# minimum distance the person has to move (across the x/y axis) to be considered a real movement
DISTANCE_THRESHOLD = 0.25

# define camera preview dimensions same as yolov8 model input size
CAMERA_PREV_DIM = (640, 640)
On Line 24, DISTANCE_THRESHOLD is set to 0.25. This constant represents the minimum distance an object (a person) must move across the x or y axis to be considered as having moved.
This would help filter out small movements that should not be considered actual.
Lastly, the CAMERA_PREV_DIM is assigned the tuple (640, 640), which has been utilized in some of our earlier tutorials in the OAK series, so we assume you are already familiar with it.
Defining the Utilities
Now that the configuration is defined, we can outline the utilities needed for creating video detection and object tracker pipelines with DepthAI, as well as some helper functions. The utils.py script defines several functions:
- Assists in creating a pipeline for object detection in videos using the YOLOv8 model
- Sets up a pipeline for tracking people by taking the output from the detection pipeline and adding a Script node for the tracking logic
- Defines a handful of helper functions for loading configuration files, annotating camera frames, and normalizing predictions
Setting Up Imports
# import the necessary packages
import json
import logging
from pathlib import Path

import cv2
import depthai as dai
import numpy as np

from pyimagesearch import config

# set up logging configuration
logging.basicConfig(
    level=logging.INFO, format="%(asctime)s - %(levelname)s - %(message)s"
)
On Lines 2-10, necessary packages and modules are imported:
json: to work with JSON datalogging: module to log messagesPathfrompathlib: for handling file paths in an object-oriented waycv2: for reading videos, processing images, and annotating framesdepthai: is the most important module for working on interacting with OAK and building pipelines for itnumpy: for array related operations- custom
config: module frompyimagesearchfor importing configuration constants
Logging is configured on Lines 13-15 using logging.basicConfig to display logs when required. The parameters such as logging level is set to INFO, meaning log messages with severity INFO and higher will be displayed. And the format of the log messages to indicate the timestamp, log level, and the actual log message.
Video Detection Pipeline
def video_detection_pipeline(config_path, model_path):
    # initialize a depthai pipeline
    pipeline = dai.Pipeline()
    logging.info("Initialized DepthAI pipeline")

    # load model config file and fetch nn_config parameters
    configPath = Path(config_path)
    model_config = load_config(configPath)
    nnConfig = model_config.get("nn_config", {})
On Line 18, we define the video_detection_pipeline function which
- initializes a DepthAI pipeline on Line 20
- loads some configuration parameters using the
load_configmethod for a YOLOv8n model and fetchesnn_configfrom the JSON configuration file on Lines 24-26
    # using nnConfig extract metadata like classes, iou and confidence threshold, number of coordinates
    metadata = nnConfig.get("NN_specific_metadata", {})
    classes = metadata.get("classes", {})
    coordinates = metadata.get("coordinates", {})
    anchors = metadata.get("anchors", {})
    anchorMasks = metadata.get("anchor_masks", {})
    iouThreshold = metadata.get("iou_threshold", {})
    confidenceThreshold = metadata.get("confidence_threshold", {})
In this continuation of the video_detection_pipeline function, the code snippet above retrieves metadata and other configuration parameters from the nnConfig dictionary. This dictionary holds configurations specific to the neural network, established on Lines 30-35.
The following shell block demonstrates what the nn_config looks like and what values it holds. From nn_config, we extract the key NN_specific_metadata, which contains the configuration necessary for object detection, and straightforwardly assigns each of these parameters to their respective variables (e.g., classes, coordinates, etc.).
"nn_config": {
        "output_format": "detection",
        "NN_family": "YOLO",
        "input_size": "640x640",
        "NN_specific_metadata": {
            "classes": 80,
            "coordinates": 4,
            "anchors": [],
            "anchor_masks": {},
            "iou_threshold": 0.5,
            "confidence_threshold": 0.5
        }
For instance, in the shell block mentioned above, the parameter classes is set to 80 because the pre-trained YOLOv8 model we are using was trained on the MS COCO dataset, which comprises 80 classes.
How would you like immediate access to 120K+ images curated and labeled with object bounding boxes to train, explore, and experiment with … for free. Head over to Roboflow and get a free account to grab these hand gesture images.
    # configure inputs for depthai pipeline
    # since this pipeline is dealing with images an XLinkIn node is created
    videoIN = pipeline.createXLinkIn()
    # create a Yolo detection node
    detectionNetwork = pipeline.create(dai.node.YoloDetectionNetwork)
    # create a XLinkOut node for fetching the neural network outputs to host
    nnOut = pipeline.create(dai.node.XLinkOut)

    # set stream names used in queue to fetch data when the pipeline is started
    nnOut.setStreamName("nn")
    videoIN.setStreamName("video_input")
On Line 39, an XLinkIn node is instantiated within the pipeline and is assigned to the variable videoIN. This node is the conduit for data transmission from the host system (e.g., a computer executing the script) into the DepthAI pipeline. Typically, it is employed for transmitting images or video frames into the pipeline for further processing. In this particular scenario, it is utilized for sending video frames.
Subsequently, on Line 41, a node named YoloDetectionNetwork is instantiated within the pipeline. This node executes the YOLO object detection algorithm on the inputted video frames.
On Line 43, an XLinkOut node is instantiated within the pipeline. The variable nnOut will transmit the data processed by the neural network from the DepthAI pipeline back to the host system.
On Lines 46 and 47, the stream names for the nnOut and videoIN nodes are configured as nn and video_input, respectively. These names facilitate retrieving data from these particular output streams at the host end.
    # network specific settings - parameters read from config file
    # confidence and iou threshold, classes, coordinates are set
    # most important the model .blob file is used to load weights
    detectionNetwork.setConfidenceThreshold(confidenceThreshold)
    detectionNetwork.setNumClasses(classes)
    detectionNetwork.setCoordinateSize(coordinates)
    detectionNetwork.setAnchors(anchors)
    detectionNetwork.setAnchorMasks(anchorMasks)
    detectionNetwork.setIouThreshold(iouThreshold)
    detectionNetwork.setBlobPath(model_path)
    detectionNetwork.setNumInferenceThreads(2)
    detectionNetwork.input.setBlocking(False)
The code on Lines 52-60 configures the YOLO detection network node within the DepthAI pipeline with various parameters such as:
- Setting up the confidence threshold for the detection. Detections with a confidence score below this threshold will be discarded.
- The number of object classes the YOLO network has been trained to detect.
- The bounding box coordinate size (
xmin,ymin,xmax,ymax). - Sets the anchor boxes, which are used in YOLO for predicting the bounding boxes of objects.
- Sets the anchor masks. These are used in YOLO to divide the prediction layer outputs among multiple scales.
- Sets the Intersection over Union (IoU) threshold for non-maximum suppression. This is used to determine which boxes should be kept vs discarded.
- The path to the model file (in blob format). This file contains the weights and architecture of the trained model.
- The number of threads to be used for running inferences. This can be tuned for performance.
- The input to non-blocking mode. In non-blocking mode, if the input queue is full, the node will not wait for it to free up space and will continue processing. This can be useful to keep data flowing through the pipeline without stalling.
It’s important to note that both the anchors and anchor masks are left empty following the nn_config dictionary that was previously observed.
    # linking the nodes - image node output is linked to detection node
    # detection network node output is linked to XLinkOut input
    videoIN.out.link(detectionNetwork.input)
    detectionNetwork.out.link(nnOut.input)

    # return the pipeline to the calling function
    logging.info("DepthAI pipeline created")
    return detectionNetwork, pipeline
In the final part of the video_detection_pipeline method, we establish the data flow within the DepthAI pipeline by linking the nodes in the correct order.
On Line 64, the output of the XLinkIn node (videoIN) is linked to the input of the YOLO detection network node (detectionNetwork). The XLinkIn node receives video frames from the host into the pipeline. This line essentially sends the image to the detection network for inference.
Then, the output of the YOLO detection network node (detectionNetwork) is linked to the input of the XLinkOut node (nnOut). This line returns the processed output (detections) to the host.
Finally, on Lines 68 and 69, a log message is printed to indicate that the pipeline has been successfully created, and the function returns detectionNetwork and pipeline to the calling function.
In this instance, in conjunction with the pipeline object, the detectionNetwork node is also returned because it will be connected to the object tracker node within the object_tracker_pipeline method. This connection is essential for further processing and tracking of the detected objects.
Tracker Pipeline
def object_tracker_pipeline(pipeline, detectionNetwork):
    # create and configure the object tracker
    objectTracker = pipeline.create(dai.node.ObjectTracker)
    objectTracker.setDetectionLabelsToTrack([0])  # Track people
    objectTracker.setTrackerType(dai.TrackerType.ZERO_TERM_COLOR_HISTOGRAM)
    objectTracker.setTrackerIdAssignmentPolicy(
        dai.TrackerIdAssignmentPolicy.SMALLEST_ID
    )
The function object_tracker_pipeline on Line 72 takes two arguments: pipeline (the DepthAI pipeline) and detectionNetwork (the YOLO detection network node).
Within this function, on Lines 74-79, an object tracker node is created and configured to track people (or objects with label 0) using a color histogram-based tracking algorithm and a specific ID assignment policy:
objectTracker = pipeline.create(dai.node.ObjectTracker): Creates an object tracker node within the DepthAI pipeline.objectTracker.setDetectionLabelsToTrack([0]): Configures the object tracker to only track objects with label0. In object detection models, different object classes have various labels (e.g.,personmight be labeled as0,caras1, etc.), so this line configures the tracker to track persons.objectTracker.setTrackerType(dai.TrackerType.ZERO_TERM_COLOR_HISTOGRAM): Sets the type of tracker to use. Here,ZERO_TERM_COLOR_HISTOGRAMis chosen, which is a specific algorithm for object tracking based on color histograms.objectTracker.setTrackerIdAssignmentPolicy(dai.TrackerIdAssignmentPolicy.SMALLEST_ID): Sets the ID assignment policy for the tracker. In this case, it assigns the smallest available ID to the new objects being tracked.
    # link detection networks outputs to the object tracker
    detectionNetwork.passthrough.link(objectTracker.inputTrackerFrame)
    detectionNetwork.passthrough.link(objectTracker.inputDetectionFrame)
    detectionNetwork.out.link(objectTracker.inputDetections)
Here, we connect the detection network’s output (both the raw frames and the processed detections) to the object tracker node. This allows the object tracker to use both the raw video frames and the detection results to track objects in a video stream.
Let’s dissect each of these lines to comprehend their respective functions:
detectionNetwork.passthrough.link(objectTracker.inputTrackerFrame): This links the raw frames (unprocessed by the neural network) from the detection network to the input tracker frame of the object tracker. This means that the object tracker will have access to the original video frames.
detectionNetwork.passthrough.link(objectTracker.inputDetectionFrame): This links the same raw frames from the detection network to the input detection frame of the object tracker. Often, object trackers use additional information from the original image to improve tracking accuracy.
detectionNetwork.out.link(objectTracker.inputDetections): This links the processed output from the detection network (bounding boxes, class labels, etc.) to the input detections of the object tracker. This means the object tracker will use the output of the detection network to keep track of the objects as they move across frames.
    script = pipeline.create(dai.node.Script)
    objectTracker.out.link(script.inputs["tracklets"])

    with open("pyimagesearch/track.py", "r") as f:
        s = f.read()
        s = s.replace("THRESH_DIST_DELTA", str(config.DISTANCE_THRESHOLD))
        script.setScript(s)
This is where things become more interesting as we introduce a Script node into the DepthAI pipeline and link the object tracker’s output to the Script node’s input. Additionally, we load a Python script from a file, modify it, and set it as the script for the Script node. Let’s understand it step-by-step:
On Line 86, a Script node is created in the DepthAI pipeline. Then in the next line, the output of the objectTracker node (which contains tracking information of objects) is linked to the input of the Script node. The name tracklets refers to the specific input in the Script node receiving the tracking information.
Then on Lines 89-92,
- Open a file named
script.pylocated in thepyimagesearchdirectory for reading and read the entire content of the file into a string variables. - We replace the placeholder text
THRESH_DIST_DELTAwithin the script with the actual distance threshold value from the configuration (config.DISTANCE_THRESHOLD). It parameterizes the script with a specific threshold value. - Finally, set the modified script as the script for the Script node within the DepthAI pipeline.
    # send tracklets to the host
    trackerOut = pipeline.create(dai.node.XLinkOut)
    trackerOut.setStreamName("out")
    script.outputs["out"].link(trackerOut.input)
Next, we add an XLinkOut node to the DepthAI pipeline to send the tracklets processed by the Script node back to the host.
Lines 95 and 96 collectively instantiate an XLinkOut node within the DepthAI pipeline and designate the stream name for this XLinkOut node as out. This node and naming are crucial as it facilitates identifying and retrieving this specific data stream on the host system.
Line 97 links the output named out of the Script node to the input of the XLinkOut node. This effectively means the processed tracklets from the Script node will be sent back to the host through the XLinkOut node.
    # send RGB preview frames to the host
    xlinkOut = pipeline.create(dai.node.XLinkOut)
    xlinkOut.setStreamName("preview")
    objectTracker.passthroughTrackerFrame.link(xlinkOut.input)

    logging.info("Object Tracker pipeline created")
    return pipeline
In the concluding segment of the tracker function, an additional XLinkOut node is integrated into the DepthAI pipeline. However, on this occasion, it is employed to transmit the RGB preview frames, which have undergone processing by the object tracker, back to the host system.
Specifically, on Lines 100 and 101, an XLinkOut node is instantiated, and the stream name for this XLinkOut node is assigned as preview.
On Line 102, objectTracker.passthroughTrackerFrame.link(xlinkOut.input) establishes a connection between the passthrough tracker frame of the Object Tracker node and the input of the XLinkOut node. This effectively signifies that the RGB preview frames processed by the Object Tracker node will be relayed back to the host via the XLinkOut node.
Finally, Line 105 ensures the pipeline is returned to the invoked function.
Helper Functions
def frameNorm(frame, bbox):
    # nn data, being the bounding box locations, are in <0..1> range
    # normalized them with frame width/height
    normVals = np.full(len(bbox), frame.shape[0])
    normVals[::2] = frame.shape[1]
    return (np.clip(np.array(bbox), 0, 1) * normVals).astype(int)


def load_config(config_path):
    # open the config file and load using json module
    with config_path.open() as f:
        config = json.load(f)
        logging.info("Config loaded from file")
        return config
The above code defines two utility functions, frameNorm and load_config, which convert neural network output to usable bounding box values and load configuration settings from a file, respectively.
On Lines 108-113, the frameNorm is defined which accepts two arguments:
frame: A frame from a video or imagebbox: A bounding box coordinate in normalized format (ranging from0to1)
The frameNorm function converts the normalized coordinates of the bounding box to actual pixel values based on the frame’s dimensions. This is useful for mapping the bounding box correctly on the original image. The denormalized coordinates are returned to the calling function for annotating the frame with bounding boxes.
Then, on Lines 116-121, we define the load_config function, which accepts a config_path: Path to a configuration file. This function opens a JSON configuration file, loads its contents into a Python dictionary, and returns it to the calling function.
def to_planar(arr: np.ndarray, shape: tuple) -> np.ndarray:
    # resize and rearrange dimensions
    return cv2.resize(arr, shape).transpose(2, 0, 1).flatten()


def annotateFrame(frame, detections):
    # loops over all detections in a given frame
    # annotates the frame with bounding box on the object
    color = (0, 0, 255)
    for detection in detections:
        bbox = frameNorm(
            frame, (detection.xmin, detection.ymin, detection.xmax, detection.ymax)
        )
        cv2.rectangle(frame, (bbox[0], bbox[1]), (bbox[2], bbox[3]), color, 2)
    # logging.info(f"Annotated frame with {len(detections)} detections")
    return frame
We define two more utility functions, to_planar and annotateFrame, which are used for resizing images and annotating images with bounding boxes, respectively.
On Lines 124-126, the to_planar function is defined as accepting an array representing an image and a tuple representing the target shape to resize the image to. The function returns an n-dimensional array.
The to_planar function:
- resizes the input array (image) to the target shape specified by the
shapeparameter - transposes the dimensions so that the channel comes first, followed by height and width
- flattens the array and returns it
Next, on Lines 129-139, the annotateFrame method is defined that accepts two parameters:
frame: A frame from a video or an image that is to be annotateddetections: A list of detections, where each detection has the propertiesxmin,ymin,xmax, andymaxrepresenting the coordinates of the bounding box
This function iterates through all detections in the provided detections list. For each detection, it:
- normalizes the bounding box coordinates to pixel values using the previously mentioned
frameNormfunction - draws a rectangle on the input frame using the normalized bounding box coordinates
Finally, after looping over all the detections, the function returns the annotated frame.
class TextHelper:
    def __init__(self) -> None:
        self.bg_color = (0, 0, 0)
        self.color = (255, 255, 255)
        self.text_type = cv2.FONT_HERSHEY_SIMPLEX
        self.line_type = cv2.LINE_AA

    def putText(self, frame, text, coords):
        cv2.putText(
            frame, text, coords, self.text_type, 1, self.bg_color, 6, self.line_type
        )
        cv2.putText(
            frame, text, coords, self.text_type, 1, self.color, 2, self.line_type
        )
In the aforementioned code, a TextHelper class is defined that facilitates the addition of text annotations to frames (images). This class is meticulously crafted to append text along with a background outline to enhance visibility. Here’s a succinct explanation of the class and its methods:
The TextHelper class is particularly useful for incorporating text annotations in images, which is especially crucial in scenarios such as object detection, where clear visibility of text against the background is essential. The code is largely self-explanatory, so you are expected to grasp the underlying logic of the operations within the TextHelper class.
def update(previewQ, outQ, detectionNN, text, frame, counters):
    inDet = detectionNN.get()

    if previewQ.has():
        frame = previewQ.get().getCvFrame()
        if inDet is not None and frame is not None:
            detections = inDet.detections
            annotateFrame(frame, detections)

    if outQ.has():
        jsonText = str(outQ.get().getData(), "utf-8")
        logging.debug(f"Received json text: {jsonText}")
        counters = json.loads(jsonText)

    if counters is not None:
        text.putText(frame, f"Up: {counters['up']}, Down: {counters['down']}", (30, 30))

    logging.info("Frame and counters updated")
    return frame, counters
The update function is the last in the utils.py script and also a very important function that will help us in the Python driver script main.py. It is part of an object detection and tracking pipeline, where the objects detected and tracked in video frames are processed, and the frames are annotated with relevant information.
Let’s first break down the function parameters:
previewQ: A queue that holds the preview (raw) framesoutQ: A queue that has tracking informationdetectionNN: The detection queue that receives YOLO detection output from the devicetext: An instance of theTextHelperclass that helps in annotating the frames with textframe: The current frame being processedcounters: A dictionary that keeps count of certain attributes (e.g., the number of objects moving up or down).
On Line 159, we fetch the detection results from the detectionNN queue.
Then, on Lines 161-165, we:
- check if there are frames available in the
previewQ- retrieve the next frame from the queue and convert it to a format suitable for processing by OpenCV
- if
inDet(YOLO detection) is notNoneand the frame is notNone- extracts detections from the input
- calls the
annotateFramefunction to annotate the frame with bounding boxes around the detected objects
On Lines 167-170,
- check if there is tracking data is available in
outQ- retrieve the output data from the queue, convert it to a string encoded in UTF-8
- deserialize the JSON string into a Python dictionary (
counters).
If counters is not None (this means that data was successfully retrieved from outQ):
- We use the
TextHelperinstance to add text to the frame, displaying the counters forupanddown(Lines 172 and 173).
Finally, the updated frame and counters dictionary are returned to the calling function.
Object Tracker Logic
# import necessary packages
import json

# initialize the data dictionary and the counter dictionary.
# the counter dictionary tracks the number of times objects
# move up, or down across the screen.
data = {}
counter = {
    "up": 0,
    "down": 0,
}
We start by setting up some initial variables that will be used later in the script for object tracking in the video, where the directions of object movements will be counted.
On Line 2, we import the json module. This module allows you to work with JSON data (e.g., you can read JSON data from a file or write Python data structures to a file in JSON format).
An empty dictionary named data is initialized on Line 7. This data dictionary will be used later to store some data.
A dictionary named counter is initialized with keys up, down on Lines 8-11, and all the values are set to 0. The counter dictionary will be used to keep track of the number of times objects move in the specified directions (up, down) across the frame.
# function to send the current state of the counter as json data
def send():
    # initialize a buffer with a size of 50
    b = Buffer(50)
    # set the buffer's data to be the counter dictionary
    # converted to json and then encoded as bytes
    b.setData(json.dumps(counter).encode("utf-8"))
    # send the data via the output port of the node
    node.io["out"].send(b)
The above code snippet defines a function named send. The purpose of this function is to send the current state of the counter dictionary as JSON data through an output port of a node.
Here’s how the function accomplishes this:
Line 17 creates a buffer named b with a size of 50. In DepthAI, the term Buffer generally refers to a temporary storage area for data used to manage the data flow between the host (e.g., a PC) and the DepthAI device (e.g., OAK). When data is being processed or transferred at different rates, buffers help handle this discrepancy efficiently. In our case, the buffer b will hold the data that needs to be sent.
Line 20 sets the data in buffer b. It takes the counter dictionary, converts it to a JSON-formatted string using json.dumps(counter), and then encodes this string into bytes using UTF-8 encoding with .encode("utf-8"). The resulting bytes are set as the data for the buffer.
Line 22 sends the data through a node’s output port, accessing the output port named “out” of a node defined in the utils module (Line 96). The .send(b) function sends the data in object b through the output port. This is transmitting the data to the next stage in a pipeline.
# function to handle when a tracklet (a tracked object)
# is removed and update the counter accordingly
def tracklet_removed(tracklet, coords2):
    # get the initial coordinates of the tracklet
    coords1 = tracklet["coords"]
    # calculate the difference in x and y coordinates
    deltaX = coords2[0] - coords1[0]
    deltaY = coords2[1] - coords1[1]

    # check if the object moved significantly along the y-axis
    if abs(deltaY) > abs(deltaX) and abs(deltaY) > THRESH_DIST_DELTA:
        # if so, update the counter for the appropriate direction
        # and send the updated data
        direction = "up" if 0 > deltaY else "down"
        counter[direction] += 1
        send()
Next, we define a function named tracklet_removed. This function is designed to handle situations where a tracklet (a tracked object) is removed and updates a counter according to the direction in which the object moved. This function takes two parameters: tracklet and coords2.
On Line 29, we extract the initial coordinates of the tracklet from the tracklet dictionary using the key coords and assign it to the variable coords1.
Then, on Lines 31 and 32, calculate the difference in the x and y coordinates between the initial position (coords1) and the final position (coords2) of the tracklet.
The if condition on Line 35 checks if the object moved significantly along the y-axis. It does this by comparing the absolute value of deltaY with the absolute value of deltaX and checking if the absolute value of deltaY is greater than a threshold (THRESH_DIST_DELTA).
If this condition is True, the object moves vertically. On Line 38, the variable direction is set to up if deltaY is negative (meaning it moved up) or down if deltaY is positive (meaning it moved down).
On Lines 39 and 40, the counter dictionary is updated to increment the count for the appropriate direction by 1, and the send() function is called to send the updated counter data.
# function to compute the centroid of a region of interest (roi)
def get_centroid(roi):
    # calculate the centroid coordinates by averaging
    # the top-left and bottom-right coordinates
    x1 = roi.topLeft().x
    y1 = roi.topLeft().y
    x2 = roi.bottomRight().x
    y2 = roi.bottomRight().y
    return (x2 - x1) / 2 + x1, (y2 - y1) / 2 + y1
Then the function called get_centroid is defined, which calculates the centroid of a region of interest (roi) in a frame. The centroid is the point equidistant from all the shape boundaries. Basically, the arithmetic mean position of all the points in the shape.
The function takes a single parameter, roi, representing the region of interest. The roi parameter is expected to have methods topLeft() and bottomRight(), which return the coordinates of the top-left and bottom-right corners of the region, respectively.
Lines 47-50 retrieve:
- The
xcoordinate of the top-left corner of the region of interest and assigns it to variablex1. - The
ycoordinate of the top-left corner of the region of interest and assigns it to variabley1. - The
xcoordinate of the bottom-right corner of the region of interest and assigns it to variablex2. - The
ycoordinate of the bottom-right corner of the region of interest and assigns it to variabley2.
Finally, on Line 51, we compute the average of the x-coordinates (x1 and x2) and the y-coordinates (y1 and y2) to find the centroid and return the centroid coordinates as a tuple.
# send initial counter data (all zeros)
send()

# main loop for processing tracklets
while True:
    # get the current set of tracklets
    tracklets = node.io["tracklets"].get()

    for t in tracklets.tracklets:
        # handle different tracking statuses
        if t.status == Tracklet.TrackingStatus.NEW:
            # if the tracklet is new, initialize a new dictionary
            # for it in the data dictionary
            data[str(t.id)] = {}
            # store the centroid of the tracklet's region of interest
            data[str(t.id)]["coords"] = get_centroid(t.roi)
        elif t.status == Tracklet.TrackingStatus.TRACKED:
            # if the tracklet is currently being tracked, reset its "lost"
            # counter in the data dictionary
            data[str(t.id)]["lostCnt"] = 0
Now starts our main loop for processing the tracklets, but before that, we call the previously defined send function that sends the initial counter data (which should be all zeros at the beginning) as JSON data.
Line 58 starts an infinite loop, typical for video or stream processing, as the code needs to keep processing the frames as they come in.
Line 60 gets the current set of tracklets from the node’s output. A tracklet here refers to a set of observations of an object’s state being tracked. This line implies that there’s an ongoing tracking process, and it retrieves the tracking data.
Line 62 starts iterating through each tracklet in the set of tracklets.
On Line 64, we check if the status of the tracklet is NEW. If a tracklet is new, it means that it has been newly identified in the frame and was not there in the previous frame(s):
- Initialize a new dictionary for this tracklet in the
datadictionary using the tracklet’s ID as the key (Line 67) - Compute the centroid of the tracklet’s region of interest using the
get_centroidfunction defined earlier and store it in the data dictionary under the keycoords(Line 69)
If the status of the tracklet is TRACKED (Line 70), this means that the tracklet is currently being actively tracked across frames:
- Reset the
lostcounter for this tracklet in the data dictionary. Thelostcounter represents how often the tracklet has been lost during tracking. Resetting it to0indicates that the tracklet is currently being successfully tracked.
        elif t.status == Tracklet.TrackingStatus.LOST:
            # if the tracklet is lost, increment the "lostCnt" counter for the
            # tracklet to keep track of the number of frames it has been lost
            data[str(t.id)]["lostCnt"] += 1
            # if tracklet has been lost for more than 10 frames, remove it
            if 10 < data[str(t.id)]["lostCnt"] and "lost" not in data[str(t.id)]:
                # call the tracklet_removed function to handle the removal
                # of the lost tracklet
                tracklet_removed(data[str(t.id)], get_centroid(t.roi))
                # mark the tracklet as lost by setting the "lost" flag to True
                data[str(t.id)]["lost"] = True
        elif (t.status == Tracklet.TrackingStatus.REMOVED) and "lost" not in data[
            str(t.id)
        ]:
            # if the tracklet is removed and not marked as lost,
            # call the tracklet_removed function to handle the removal of the tracklet
            tracklet_removed(data[str(t.id)], get_centroid(t.roi))
The above part of the code continues handling the different states of the tracklets:
Next, on Line 74, we check if the tracklet is LOST. This generally means that the object being tracked is not visible or not detectable in the current frame:
- Increment the
lostCntcounter for the tracklet to keep track of the number of frames it has lost (Line 77). - If the tracklet has been lost for more than 10 frames and not yet marked as lost, then the code considers this tracklet as lost (Line 79).
- The
tracklet_removedfunction finds the object’s direction based on its initial and last coordinates (Line 82). - Mark the tracklet as lost by setting the
"lost"key in the data dictionary toTrue(Line 84).
- The
Lines 85-87 are the final condition when a tracklet is removed. A tracklet can be removed for various reasons (e.g., if the object has left the scene):
- Similar to the previous block, the
tracklet_removedfunction calculates the changes in the object’sxandycoordinates and updates the movement direction counters accordingly.
People Counting: Python Driver Script
With the configurations and utilities implemented, we can finally get into the code walkthrough of people counting with OAK.
# import the necessary packages
import logging
from pathlib import Path
from time import monotonic

import cv2
import depthai as dai

from pyimagesearch import config, utils

# set up logging configuration
# level: the root logger will delegate an event to all the handlers
# if the event’s level is greater than or equal to the handler’s level.
# format: handlers use this format for the emitted log message.
logging.basicConfig(
    level=logging.INFO, format="%(asctime)s - " "%(levelname)s - %(message)s"
)
We start by importing the necessary packages on Lines 2-9. We import logging, cv2, depthai, and custom modules config and utils from pyimagesearch.
On Lines 15-17, we set up the logging system, which will be used throughout the code to log messages for information.
# assign the path of the video to be processed
videoPath = config.INPUT_VIDEO_LONG

# set the video codec to use with video writer. MJPG is a format that uses motion JPEG
fourcc = cv2.VideoWriter_fourcc(*"MJPG")
# create video writer object with parameters: output video path,
# video codec, frame rate of output video, and dimensions of video frame
out = cv2.VideoWriter(config.OUTPUT_VIDEO_LONG, fourcc, 20.0, config.CAMERA_PREV_DIM)
logging.info("video writer initialized.")  # logging the information
On Line 20, we assign the path of the input video where we want to run people counting.
The path is retrieved from the config.INPUT_VIDEO_LONG file.
Next, on Lines 23 and 26, we set the video codec to use with the video writer and initialize the video writer, which we will use to store the inference results in a video format. The cv2.VideoWriter accepts the path to store the inference video, video codec, output video frame rate, and video frame dimensions.
Line 27 logs a message indicating that the video writer has been initialized.
# create video pipeline with the specified yolo configuration and model
detectionNetwork, pipeline = utils.video_detection_pipeline(
    config.YOLOV8N_CONFIG, config.YOLOV8N_MODEL
)

# add object tracker to the pipeline
pipeline = utils.object_tracker_pipeline(pipeline, detectionNetwork)
logging.info("detection and tracking pipeline created.")  # logging the information
In the above code snippet, we set up the video detection pipeline defined in utils.py by passing in the YOLOv8 configuration and model files.
Subsequently, we add the object tracker to the pipeline by passing the pipeline object and detectionNetwork node.
# pipeline defined, now the device is connected to. HIGH means we choose high speed USB
with dai.Device(pipeline, dai.UsbSpeed.HIGH) as device:
    logging.info("connected to the device.")  # logging the information

    # get the output and input queues of the device
    previewQ = device.getOutputQueue("preview")
    outQ = device.getOutputQueue("out")
    detectionNN = device.getOutputQueue("nn")
    videoQ = device.getInputQueue("video_input")

    counters = None  # initialize counters
    frame = None  # initialize frame
    text = utils.TextHelper()  # create a TextHelper object

    # capture the video from the specified path
    cap = cv2.VideoCapture(str(Path(videoPath).resolve().absolute()))
The above code establishes a connection to a device with the defined pipeline and high-speed USB communication. Various queues are then set up for data handling, and video capture is initiated.
Line 39 creates a context for connecting to the device using the previously defined pipeline and specifying high-speed USB communication through dai.UsbSpeed.HIGH. The with statement ensures the device is properly opened and closed, managing resources efficiently.
On Lines 43-46, several queues are defined:
preview: An output queue retrieved from the device and assigned to the variablepreviewQ. This queue will handle preview (raw) frames from the processing pipeline.out: An output queue retrieved and assigned to the variableoutQ. This queue holds the tracking outputs.nn: Another output queue fetched and assigned to the variabledetectionNN. It’s used for neural network detection outputs.video_input: An input queue retrieved from the device and assigned tovideoQ. This queue feeds video frames from the host to the OAK device.
On Lines 48-50, we initialize
counters: set toNoneand used later for counting objects.frame: set it toNone, which will store the video’s individual frames.text: an instance of theTextHelperclass (defined earlier in the code in theutilsmodule) for adding text annotations to the frames.
We initialize video capture by creating a cv2.VideoCapture object using OpenCV on Line 53. The video file’s path is converted to an absolute path and passed as an argument. The VideoCapture object is assigned to the variable cap, which will read frames from the video.
while cap.isOpened():  # as long as the video is playing
        read_correctly, video_frame = cap.read()  # read a frame from the video
        if not read_correctly:  # if frame not read correctly, break the loop
            break
        logging.info("frame read successfully.")  # logging the information

        img = dai.ImgFrame()  # create an ImgFrame object
        # reshapes the video frame to 640x640 and send the reshaped frame to the img object
        img.setData(utils.to_planar(video_frame, config.CAMERA_PREV_DIM))
        img.setType(dai.RawImgFrame.Type.BGR888p)  # set the type of img
        img.setTimestamp(monotonic())  # set the timestamp of img
        img.setWidth(config.CAMERA_PREV_DIM[0])  # set the width of img
        img.setHeight(config.CAMERA_PREV_DIM[1])  # set the height of img
        videoQ.send(img)  # send img to the video input queue
        logging.info("frame sent to video input queue.")  # logging the information
In this code block, we run a loop that reads frames from an opened video file, processes them, and sends them into a DepthAI pipeline for object detection and tracking.
On Line 55, a while loop runs as long as the video file is open (cap.isOpened()).
Then read a single frame from the video on Line 56. read_correctly is a boolean indicating whether the frame was read properly, and video_frame is the actual frame if it was read correctly.
If the frame is not read correctly, the loop is broken, and the processing ends (Lines 57 and 58). This also usually indicates the end of the video file.
On Lines 61-68,
- We initiate an
ImgFrameobject to forward the frame to the OAK device. - The video frame (Line 63) is first transformed into a format suitable for neural network processing using the
to_planarfunction from theutilsmodule. This function resizes the frame to the desired dimensions (640x640) and rearranges its data into a planar format. - We then specify the image type as BGR (Blue Green Red) in a planar format using
setType. - The current monotonic time is set as the timestamp for the frame with
setTimestamp. - The dimensions of the image, both width and height, are explicitly set using
setWidthandsetHeight. - Finally, the prepared frame is sent to the OAK device via an input queue named
videoQfor further processing.
On Line 69, we log information that the frame was sent to the video input queue.
        # update the frame and counters with the detected objects and texts
        frame, counters = utils.update(
            previewQ, outQ, detectionNN, text, frame, counters
        )
        # if the frame is successfully updated
        if frame is not None:
            out.write(frame)  # write the frame to the output video
            cv2.imshow("frame", frame)  # show the frame
            logging.info(
                "frame updated with detections and text."
            )  # logging the information

        # if the 'q' key is pressed, break from the loop
        if cv2.waitKey(1) == ord("q"):
            break

    logging.info("End of the video")  # logging the information that the video ended

out.release()  # release the VideoWriter object
logging.info("video writer released.")  # logging the information
The above code block continues the while loop that reads frames from a video file, and processes and displays them.
We have reached the concluding stage of annotating and displaying the results, having completed the majority of the intensive tasks such as:
- Setting up both the detection and tracking pipelines
- Defining the input and output queues
- Reading video frames
- Sending frames to the device
- Defining the
update()method in theutilsmodule
On Lines 72-74, we call the update function (defined in the utils module), which updates the frame with object detections and text overlays like the person up and down count. The counters contain the statistics or counts of the person up and down.
Next, on Lines 76-81, we check if the frame is not empty (meaning that it has been successfully updated with detections and counter information)
- Write the processed frame to the output video file using the
VideoWriterobjectout. - Display the processed frame in a window titled
frame.
Finally, on Lines 84-90, we break out of the loop (if the q key is pressed), log that the frame has been updated with detections and text, and release the VideoWriter resource.
Results
A full video of the demo can be seen below:
What's next? I recommend PyImageSearch University.
79 total classes • 101+ hours of on-demand code walkthrough videos • Last updated: August 2023
★★★★★ 4.84 (128 Ratings) • 16,000+ Students Enrolled
I strongly believe that if you had the right teacher you could master computer vision and deep learning.
Do you think learning computer vision and deep learning has to be time-consuming, overwhelming, and complicated? Or has to involve complex mathematics and equations? Or requires a degree in computer science?
That’s not the case.
All you need to master computer vision and deep learning is for someone to explain things to you in simple, intuitive terms. And that’s exactly what I do. My mission is to change education and how complex Artificial Intelligence topics are taught.
If you're serious about learning computer vision, your next stop should be PyImageSearch University, the most comprehensive computer vision, deep learning, and OpenCV course online today. Here you’ll learn how to successfully and confidently apply computer vision to your work, research, and projects. Join me in computer vision mastery.
Inside PyImageSearch University you'll find:
- ✓ 79 courses on essential computer vision, deep learning, and OpenCV topics
- ✓ 79 Certificates of Completion
- ✓ 101+ hours of on-demand video
- ✓ Brand new courses released regularly, ensuring you can keep up with state-of-the-art techniques
- ✓ Pre-configured Jupyter Notebooks in Google Colab
- ✓ Run all code examples in your web browser — works on Windows, macOS, and Linux (no dev environment configuration required!)
- ✓ Access to centralized code repos for all 512+ tutorials on PyImageSearch
- ✓ Easy one-click downloads for code, datasets, pre-trained models, etc.
- ✓ Access on mobile, laptop, desktop, etc.
Summary
In today’s tutorial, we took a deep dive into building a people counting system on the OAK device, using key Python packages: DepthAI and OpenCV.
We began by discussing the essential libraries required and proceeded to set up the prerequisites for the project. A notable feature we explored was the Script node within DepthAI, which is pivotal in executing custom tracking logic on the OAK device.
We then defined the utilities crucial for operating the people counting application, including the video detection and tracker pipeline, along with auxiliary helper functions. We also developed object tracker logic tailored to function within the Script node.
As a final step, we brought together all the elements by creating a Python driver script that harmonized the utilities and logic for the effective functioning of the application. To wrap up, we assessed the results of the people counting system by applying it to real video data, showcasing the practicality and efficiency of the solution developed on the OAK platform.
We hope you found immense value and insights in today’s tutorial on crafting a sophisticated people counting system using DepthAI and OpenCV on the OAK platform!
Citation Information
Sharma, A. “People Counter on OAK,” PyImageSearch, P. Chugh, A. R. Gosthipaty, S. Huot, K. Kidriavsteva, and R. Raha, eds., 2023, https://pyimg.co/pi5v4
@incollection{Sharma_2023_PeopleCounter,
  author = {Aditya Sharma},
  title = {People Counter on {OAK}},
  booktitle = {PyImageSearch},
  editor = {Puneet Chugh and Aritra Roy Gosthipaty and Susan Huot and Kseniia Kidriavsteva and Ritwik Raha},
  year = {2023},
  url = {https://pyimg.co/pi5v4},
}

Unleash the potential of computer vision with Roboflow - Free!
- Step into the realm of the future by signing up or logging into your Roboflow account. Unlock a wealth of innovative dataset libraries and revolutionize your computer vision operations.
- Jumpstart your journey by choosing from our broad array of datasets, or benefit from PyimageSearch’s comprehensive library, crafted to cater to a wide range of requirements.
- Transfer your data to Roboflow in any of the 40+ compatible formats. Leverage cutting-edge model architectures for training, and deploy seamlessly across diverse platforms, including API, NVIDIA, browser, iOS, and beyond. Integrate our platform effortlessly with your applications or your favorite third-party tools.
- Equip yourself with the ability to train a potent computer vision model in a mere afternoon. With a few images, you can import data from any source via API, annotate images using our superior cloud-hosted tool, kickstart model training with a single click, and deploy the model via a hosted API endpoint. Tailor your process by opting for a code-centric approach, leveraging our intuitive, cloud-based UI, or combining both to fit your unique needs.
- Embark on your journey today with absolutely no credit card required. Step into the future with Roboflow.
To download the source code to this post (and be notified when future tutorials are published here on PyImageSearch), simply enter your email address in the form below!

Download the Source Code and FREE 17-page Resource Guide
Enter your email address below to get a .zip of the code and a FREE 17-page Resource Guide on Computer Vision, OpenCV, and Deep Learning. Inside you'll find my hand-picked tutorials, books, courses, and libraries to help you master CV and DL!
The post People Counter on OAK appeared first on PyImageSearch.
August 21, 2023 at 06:30PM
Click here for more details...
=============================
The original post is available in PyImageSearch by Aditya Sharma
this post has been published as it is through automation. Automation script brings all the top bloggers post under a single umbrella.
The purpose of this blog, Follow the top Salesforce bloggers and collect all blogs in a single place through automation.
============================


Post a Comment